I was in the middle of a midnight snack spree when my kitchen turned into a cookie catastrophe. The butter had melted into a glossy puddle, the sugar had caramelized into a sticky mess, and my oven was a furnace of doubt. I stared at the ruined dough, feeling the sting of disappointment that only a seasoned baker knows. Then I remembered the old family recipe I’d found tucked in a dusty cookbook, a promise of buttery perfection and sweet surprises. I decided then that this would be the night I resurrected that promise, and I wasn’t going to let another cookie go to waste.
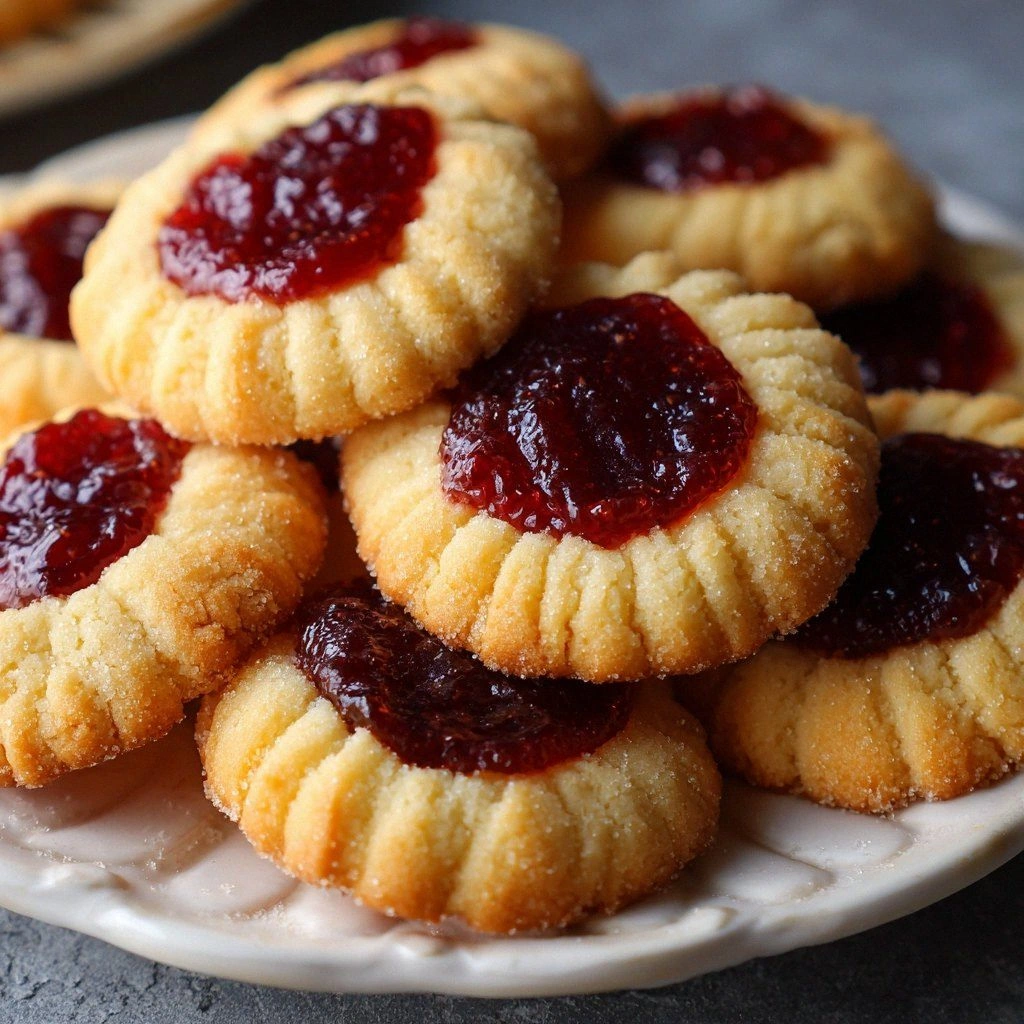
The moment I opened the oven, a warm, buttery aroma rolled out like a fragrant cloud, and my kitchen filled with the comforting scent of vanilla and melted butter. The sound of the timer ticking was a metronome, steady and reassuring. I could already taste the crisp edges that crackle when you bite into a freshly baked cookie, the soft, tender center that melts in your mouth. The sight of golden-brown cookies sliding off the tray was a visual cue that everything was working. The texture—crisp yet chewy—was a tactile promise of the perfect bite. And the faint hint of jam inside, a burst of fruity sweetness, added a layer of surprise that made my taste buds dance.
What makes this version stand out is that it takes the classic butter cookie and turns it into a multi-sensory experience. The buttery base is richer because I use unsalted butter at room temperature, which gives the dough a silky texture. I fold in a generous amount of granulated sugar, which not only sweetens but also creates a delicate crunch. The flour is sifted to keep the cookies light, and a pinch of salt balances the sweetness like a secret handshake. Vanilla extract is added at the last minute to preserve its aroma. Finally, a generous dollop of jam in the center turns each cookie into a pocket of fruity joy. I dare you to taste this and not go back for seconds.
If you’ve ever struggled with cookies that come out too hard or too soft, you’re not alone. And I’ve got the fix. Picture yourself pulling this out of the oven, the whole kitchen smelling incredible, the cookies cooling on a rack like a golden sunrise. The moment you take a bite, the buttery exterior gives way to a soft interior with a burst of jam that sings. Okay, ready for the game-changer? Let me walk you through every single step—by the end, you'll wonder how you ever made it any other way.
What Makes This Version Stand Out
- Flavor: The blend of butter and vanilla creates a depth that ordinary cookies lack, delivering a buttery richness that lingers on the palate.
- Texture: The cookies have a crisp edge and a tender crumb, a balance that turns each bite into a satisfying crunch followed by a melt.
- Sweetness: The granulated sugar is folded in just enough to caramelize the edges, giving a subtle caramel note that complements the jam.
- Ease: The recipe requires minimal steps—no complex techniques, just a few ingredients and a reliable oven.
- Versatility: Swap the jam for apricot or raspberry, or add a pinch of cinnamon for a holiday twist.
- Make‑Ahead: The dough can be refrigerated overnight, and the cookies bake to perfection the next day, saving you time on busy evenings.
Alright, let's break down exactly what goes into this masterpiece...
Inside the Ingredient List
The Flavor Base
Unsalted butter is the heart of this cookie. When softened to a spreadable consistency, it coats each grain of flour, creating a silky mouthfeel. If you skip butter, the cookies will be dry and lack that signature melt. Use a high‑quality butter with a rich, creamy flavor—look for a brand that lists “cultured” or “fresh” on the label. For a dairy‑free version, substitute an equal amount of coconut butter, but be prepared for a slightly different aroma.
The Texture Crew
Granulated sugar is more than just sweet; it controls moisture and browning. The sugar crystals dissolve into the butter, creating a fine network that gives the cookies their delicate crunch. If you use powdered sugar, the cookies will be softer and less crisp. A pinch of salt is essential—it brightens the butter’s flavor and balances the jam’s acidity. A teaspoon of vanilla extract is folded in at the last minute to preserve its fragrance; if you add it too early, the volatile compounds evaporate.
The Unexpected Star
Jam is the secret weapon that transforms ordinary cookies into a sweet surprise. Whether you choose raspberry, apricot, or strawberry, the jam adds a burst of fruity sweetness that contrasts with the buttery base. The jam should be at room temperature so it spreads evenly when the cookie is baked. If you’re feeling adventurous, try a homemade jam with a hint of citrus zest for a zesty kick. Skipping jam turns the cookie into a plain buttery treat, but the jam is what makes this recipe unforgettable.
The Final Flourish
All‑purpose flour provides structure without making the cookies tough. Sift the flour to remove lumps and ensure a light texture. If you prefer a gluten‑free version, use a blend of rice flour and tapioca starch; just be sure to add a teaspoon of xanthan gum to maintain structure. A small amount of baking powder can be added for a slightly puffier cookie, but it will alter the classic buttery flavor. The final touch is a light dusting of powdered sugar on the cooled cookies, which gives them a delicate finish.
Everything's prepped? Good. Let's get into the real action...
The Method — Step by Step
- Preheat your oven to 350°F (175°C) and line two baking sheets with parchment paper. The parchment prevents sticking and makes cleanup a breeze. Let the sheets sit while you work on the dough, ensuring a smooth baking surface. If you’re using a convection oven, reduce the temperature by 25°F for even baking. The timer should be set for 12 minutes; keep a close eye on the first batch to gauge the exact timing for your oven.
- In a large mixing bowl, beat 1 cup of softened unsalted butter until it’s light and fluffy. The goal is to incorporate air, which gives the cookies a tender crumb. Add 1 cup of granulated sugar and continue beating until the mixture is pale and silky. This step is critical; rushing it will result in dense cookies. The mixture should look like a smooth, creamy mousse.
- Sift 2 3/4 cups of all‑purpose flour and 1 teaspoon of salt together, then fold it into the butter mixture. The flour should be added gradually to avoid overworking the dough. Use a spatula or a wooden spoon to keep the dough from sticking to the bowl. When the flour is fully incorporated, the dough should feel like a soft, damp ball. The dough will be slightly sticky; that’s normal.
- Roll the dough into 1‑inch balls and place them on the prepared sheets, spacing them about 2 inches apart. The spacing allows the cookies to spread evenly without merging. If you want a uniform size, use a cookie scoop or a tablespoon. For a decorative touch, press a small spoonful of jam into the center of each ball before baking. The jam should be at room temperature so it spreads evenly.
- Bake for 12 minutes, or until the edges are just beginning to turn golden. The center should remain slightly soft, which will firm up as the cookies cool. Rotate the trays halfway through baking for even browning. The aroma at this point will be intoxicating; it’s a sign that the cookies are doing their thing.
- Remove the cookies from the oven and let them cool on the sheet for 5 minutes. This short cooling period allows the jam to set slightly, preventing it from oozing out. Then transfer the cookies to a wire rack to finish cooling. If you’re in a hurry, you can let them cool on the sheet, but the texture will be a bit softer.
- Once cooled, dust the cookies lightly with powdered sugar if desired. This adds a subtle sweetness and a refined finish. Store the cookies in an airtight container at room temperature for up to a week. For longer storage, freeze the cookies on a parchment‑lined sheet for 1–2 days, then transfer them to a freezer bag. When you’re ready to eat, let them sit at room temperature for 10 minutes to bring back that fresh‑baked aroma.
That’s it — you did it. But hold on, I've got a few more tricks that'll take this to another level. If you want your cookies to stay soft longer, place a slice of bread in the same container; the bread will absorb excess moisture. For a glossy finish, brush the tops with a little melted butter before baking. And if you’re feeling extra adventurous, sprinkle a pinch of sea salt on top right before the last minute of baking for a salty‑sweet pop.
Insider Tricks for Flawless Results
The Temperature Rule Nobody Follows
Many bakers set their oven to the printed temperature, but the reality is ovens often run 10–15°F hotter. Use an oven thermometer to calibrate. Baking at the correct temperature ensures the cookies rise evenly and the jam sets without bubbling over. If you’re using a convection setting, reduce the temperature by 25°F to avoid over‑browning.
Why Your Nose Knows Best
Smell is the most reliable indicator of cookie readiness. When the edges are golden and the center emits a buttery scent, the cookies are done. If the smell is overly sweet or burnt, remove them immediately. Trust your nose; it will guide you to the perfect texture.
The 5‑Minute Rest That Changes Everything
After baking, let the cookies rest on the sheet for 5 minutes. This short pause allows the jam to set and the cookies to firm up, preventing them from cracking when you move them. Skipping this step often results in fragile cookies that break on the rack.
The Secret of a Smooth Dough
If the dough feels too sticky, chill it for 15 minutes. Cold dough is easier to handle and yields a cleaner shape. Alternatively, dust your work surface with a light dusting of flour, but be careful not to over‑flour, which can make the cookies dry.
The Perfect Dusting
Powdered sugar is optional but adds an elegant touch. Use a fine sieve to dust lightly, ensuring an even coat. If you prefer a caramelized look, brush the tops with a thin layer of melted butter before baking; this gives the cookies a shiny finish and a subtle buttery flavor.
Creative Twists and Variations
This recipe is a playground. Here are some of my favorite ways to switch things up:
Cinnamon Swirl Delight
Add 1 teaspoon of ground cinnamon to the flour mixture for a warm, spicy undertone. The cinnamon pairs beautifully with the jam, creating a cozy flavor profile. Serve these cookies with a splash of vanilla milk for a comforting treat.
Chocolate‑Covered Bliss
After cooling, dip half of each cookie in melted dark chocolate and let it set on parchment. The chocolate adds a rich, bittersweet layer that contrasts with the sweet jam. Sprinkle a pinch of sea salt on top for an extra kick.
Almond Crunch Upgrade
Replace half of the butter with almond butter for a nutty flavor and a subtle crunch. The almond butter also adds a hint of honey, which complements the jam. These cookies are a hit with almond lovers and provide a unique twist on the classic.
Lemon Zest Twist
Grate the zest of one lemon into the dough for a bright, citrusy note. The lemon zest balances the sweetness of the jam and adds a fresh aroma. These cookies are perfect for spring and summer gatherings.
Herbal Infusion
Add a few fresh basil leaves, finely chopped, to the dough for an unexpected herbal undertone. Basil pairs surprisingly well with strawberry jam, creating a sophisticated flavor profile that’s perfect for brunch.
Spicy Ginger Surprise
Incorporate a pinch of ground ginger into the dough for a subtle heat that contrasts with the sweet jam. Ginger adds depth and a warm spice note, turning these cookies into an exciting conversation starter at any gathering.
Storing and Bringing It Back to Life
Fridge Storage
Store the cooled cookies in an airtight container at room temperature for up to 7 days. Keep them in a cool, dry place away from direct sunlight. If you notice the cookies becoming soft, place a slice of bread in the container; the bread will absorb moisture and keep the cookies crisp.
Freezer Friendly
For longer storage, freeze the cookies on a parchment‑lined sheet for 1–2 days, then transfer them to a freezer bag. They can be frozen for up to 3 months. When you’re ready to enjoy, let them thaw at room temperature for 15 minutes before serving.
Best Reheating Method
To revive the cookies, preheat your oven to 300°F (150°C). Place the cookies on a baking sheet and heat for 5–7 minutes, or until warm and slightly crisp. If you prefer a softer texture, microwave on low for 10–15 seconds. Add a tiny splash of water before reheating to create steam, which will restore moisture and prevent the cookies from drying out.