I still remember the day I accidentally invented these Butterfinger Caramel Crunch Mini Pies. It was one of those chaotic Sunday afternoons where I was supposed to be making a respectable dinner for guests, but instead found myself elbow-deep in candy bars and caramel sauce, chasing a craving that wouldn't quit. My kitchen looked like a confectionery crime scene — graham cracker crumbs everywhere, butterfinger wrappers scattered like confetti, and that intoxicating smell of caramel bubbling away on the stove. The best part? My guests arrived early, caught me red-handed, and ended up devouring every single mini pie before I could even plate them properly. That was three years ago, and I've been perfecting this recipe ever since because once you taste these, there's no going back to regular desserts.
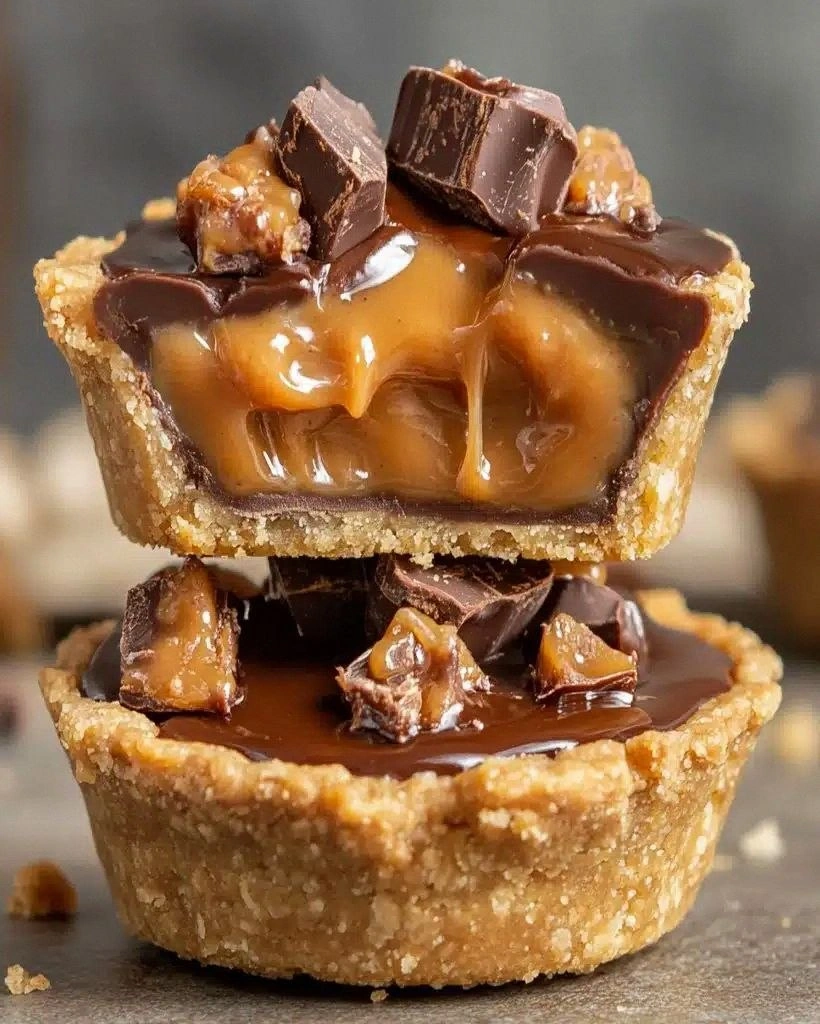
Picture this: a buttery graham cracker crust that shatters like thin ice under your fork, giving way to a river of silky caramel that mingles with crushed Butterfinger pieces, creating pockets of peanut-buttery crunch in every bite. Then comes the cloud of freshly whipped cream, light as air but rich with vanilla, topped with a dramatic drizzle of dark chocolate that sets into glossy ribbons. The contrast is absolutely maddening — crispy, creamy, crunchy, gooey, sweet, salty, all dancing together in perfect harmony. I dare you to taste this and not go back for seconds; actually, I double-dog dare you because I've never seen anyone resist the urge to grab another one.
What makes this version stand out from every other mini pie recipe floating around the internet? Most recipes get this completely wrong by using pudding mixes or cool whip shortcuts that taste like artificial sadness. Here's what actually works: we're building layers of real flavor with honest ingredients that sing together in perfect pitch. The crust isn't just pressed crumbs — we're creating a caramelized base that tastes like the best part of a cheesecake crust. The filling isn't just dumped caramel; we're infusing it with Butterfinger essence for depth that'll make your eyes roll back. Stay with me here — this is worth every single minute because future you is going to thank present you when you're pulling these out of the fridge at midnight.
Let me walk you through every single step — by the end, you'll wonder how you ever made dessert any other way. If you've ever struggled with soggy crusts or fillings that slide off your spoon, you're not alone — and I've got the fix that's going to change your dessert game forever. Okay, ready for the game-changer? This next part is pure magic.
What Makes This Version Stand Out
Crust Perfection: We're not just mixing crumbs with butter and calling it a day. This crust gets a quick pre-bake that transforms it into something that stays crispy even after hours in the fridge. The edges get golden and toasty, creating a nutty flavor that makes the whole pie taste like it came from a professional bakery.
Butterfinger Integration: Most recipes just sprinkle candy on top like an afterthought. We infuse Butterfinger flavor at three different stages — crushed fine into the crust, medium pieces in the caramel layer, and chunky bits on top for that signature crunch. This isn't decoration; it's flavor architecture.
Caramel Chemistry: The caramel layer isn't just poured in cold. We're heating it with a splash of cream and a pinch of salt, creating a sauce that coats your tongue like velvet but still has that stretchy, Instagram-worthy pull when you break into a pie.
Texture Symphony: Every bite delivers a different experience — the snap of chocolate, the crunch of candy, the give of caramel, the cloud of cream. Most recipes miss this entirely, giving you one-note mush. We're creating a dessert that keeps you coming back just to experience all the textures again.
Make-Ahead Magic: These pies actually taste better after a night in the fridge. The flavors meld, the caramel sets perfectly, and you can make a dozen at once for parties. Try doing that with a regular pie without it getting soggy — impossible.
Crowd Psychology: There's something about individual mini desserts that makes people lose their minds. Maybe it's the portion control illusion, maybe it's the cute factor, but I've seen grown adults fight over the last one like it's the last lifeboat on the Titanic.
Ingredient Integrity: No fake flavors, no stabilizers, no ingredients you can't pronounce. Just real butter, real cream, real chocolate, and enough Butterfinger to make you feel slightly guilty in the best possible way.
Inside the Ingredient List
The Foundation Builders
Graham cracker crumbs aren't just convenient — they're the backbone of our entire operation. When you mix them with melted butter and sugar, something magical happens: the butter seeps into every crumb, the sugar caramelizes slightly during baking, and you get this toasty, nutty base that tastes like the best part of a cheesecake crust. Don't even think about substituting with digestive biscuits or vanilla wafers here — the honey notes in graham crackers are what make the Butterfinger flavors sing. If you skip the sugar in the crust, you'll end up with something that tastes like cardboard with butter, and nobody wants that tragedy on their dessert plate.
Unsalted butter is your best friend because it lets you control the salt level perfectly. Salted butter varies wildly between brands, and since we're adding Butterfinger pieces that already contain salt, using salted butter can push your mini pies into the "why does my dessert taste like a pretzel" territory. The butter needs to be properly melted, not just soft — hot liquid butter coats the crumbs more evenly and helps create that compact, sliceable crust we're after.
The Flavor Powerhouses
Caramel sauce is where most recipes go completely off the rails. Don't you dare grab that thin, runny ice cream topping from the grocery store shelf. We're looking for the thick, spoon-coating stuff that comes in a jar, preferably one that lists cream as the first ingredient. When you heat it with a splash of heavy cream, it transforms into this glossy, pourable liquid gold that sets perfectly between the crust and the candy layer. The quality of your caramel directly determines whether your mini pies will be Instagram-worthy or a sticky mess that slides off your fork.
Butterfinger candy bars are obviously the star here, but how you handle them makes or breaks the entire dessert. Fresh bars crush into perfect shards with distinct layers of crunchy peanut butter candy and chocolate coating. Old, stale bars shatter into weird dust that tastes like disappointment. When you're buying them, squeeze gently — they should have some give but still feel crisp. Pro tip: buy one extra bar because you're absolutely going to eat half of them while cooking, and I say this from embarrassing experience.
The Cloud Makers
Heavy cream isn't just for whipping — it's the canvas that lets all our other flavors shine. You want cream with at least 36% fat content; anything less won't whip into stable peaks and will start weeping liquid after an hour in the fridge. Cold cream whips faster, but cream that's been sitting out for ten minutes incorporates vanilla better. The powdered sugar isn't just for sweetness — it contains cornstarch that helps stabilize the whipped cream so your mini pies still look gorgeous after a day in the fridge.
Vanilla extract might seem basic, but please don't use imitation here. Real vanilla has hundreds of flavor compounds that create this warm, floral backdrop that makes the Butterfinger taste more intense by comparison. It's like turning up the contrast on a photo — the real vanilla makes the peanut butter flavors seem nuttier, the caramel seems deeper, the chocolate more complex.
The Drama Queens
Dark chocolate chips aren't just for show — they create this sophisticated bitter edge that keeps the whole dessert from being cloyingly sweet. When you drizzle warm chocolate over cold whipped cream, it sets into these gorgeous ribbons that snap when you bite them. Go for 60-70% cacao content; anything darker becomes too bitter against the sweet caramel, anything milkier gets lost in the sugar rush.
Chopped Butterfinger for garnish isn't optional in my book. Those extra pieces on top create visual texture that makes people reach for these before any other dessert on the table. They also provide that immediate crunch when you bite in, alerting your brain that something exciting is happening and preparing your taste buds for the softer layers below.
The Method — Step by Step
- Start with your graham cracker crust because this needs time to set up properly. In a medium bowl, combine your crumbs with the sugar first — this ensures even sweetness throughout. Pour in your melted butter while stirring with a fork; you're looking for the texture of wet sand that holds together when you squeeze it. Press about two tablespoons of this mixture into each cup of a mini muffin tin, really compacting it with the back of a measuring spoon to create a solid base. The crust should come up the sides about three-quarters of the way — this creates a little cup that'll hold all our glorious fillings without leaking everywhere.
- Slide your crust-filled tin into a 350°F oven for exactly 8 minutes. This is where most people mess up — they either skip this step entirely or bake until the crusts are dark brown. You want them just barely golden around the edges; they'll continue cooking from residual heat and we need them pliable enough to remove later. That smell when they hit the oven? Absolute perfection — like someone bottled the essence of childhood summers and s'mores. Let these cool completely before attempting removal; warm crusts are fragile and will crumble into your hand like a sad cookie.
- While those crusts cool, let's work some magic on our caramel. Pour your cup of caramel sauce into a small saucepan over medium-low heat. Add two tablespoons of heavy cream and a pinch of sea salt — the salt is crucial here because it balances the sweetness and makes the Butterfinger flavor pop. Stir constantly with a rubber spatula, scraping the bottom to prevent burning. You're looking for it to thin out slightly and become pourable, about 2-3 minutes. Remove from heat immediately when it starts to bubble at the edges; overheated caramel becomes a chewy mess that'll pull your fillings out.
- Now for the fun part — candy distribution time. Take your crushed Butterfinger pieces and divide them based on size. The fine dust goes directly into the warm caramel, stirred until it dissolves and creates this incredible peanut-butter-caramel hybrid sauce. The medium pieces get saved for layering, and the big chunky bits are for the final garnish. This three-texture approach ensures every bite has something interesting happening. Don't walk away from the stove here — the caramel can go from perfect to burnt in the time it takes to check your phone.
- Assemble your mini pies by spooning about a teaspoon of the Butterfinger-caramel mixture into each cooled crust. Tilt the tin slightly to encourage the caramel to flow into all the nooks and crannies. Add a few medium Butterfinger pieces on top of the caramel layer — these will stay crisp and create little flavor bombs throughout. Let these set in the fridge for at least 30 minutes; warm caramel will melt your whipped cream into a sad puddle. This is the moment of truth when you start to see these come together and realize you've created something dangerously addictive.
- Whipped cream time — and this is where we separate the amateurs from the pros. Pour your cold heavy cream into a chilled metal bowl (yes, chill your bowl for 15 minutes in the freezer first). Add the powdered sugar and vanilla, then start whisking slowly. You're building structure here; going too fast incorporates too much air and creates unstable foam that collapses faster than a house of cards. When it starts to thicken, increase speed to medium and watch for soft peaks that curl over like a gentle wave. Over-whipped cream becomes grainy and separates — stop when it holds peaks but still looks smooth and glossy.
- Transfer your whipped cream to a piping bag fitted with a star tip, or use a zip-top bag with the corner snipped off if you're feeling rustic. Pipe generous swirls on top of each set caramel pie, creating peaks and valleys that'll catch our chocolate drizzle later. The cream should completely cover the caramel layer and dome up slightly — this isn't the time for restraint. If you're making these ahead, stop here and refrigerate; the final touches happen right before serving for maximum drama.
- Final assembly happens just before serving for the best presentation. Melt your dark chocolate chips in the microwave in 30-second bursts, stirring between each burst until smooth and pourable. Let it cool slightly so it's warm but not hot — hot chocolate will melt your carefully crafted whipped cream swirls. Drizzle in a zigzag pattern across all the pies, then immediately sprinkle with your reserved chunky Butterfinger pieces. The chocolate sets almost instantly on the cold cream, creating those gorgeous professional-looking desserts that'll have everyone asking which bakery you visited.
- Removal requires patience and the right technique. Run a thin offset spatula or butter knife around the edge of each pie, pressing against the tin rather than the crust. Gently twist while lifting up — the crust should release cleanly if you greased your tin properly. If they resist, don't force it; pop the whole tin in the freezer for 10 minutes and try again. Cold crusts release more easily and are less likely to break. Arrange on a platter and watch them disappear faster than you can say "Butterfinger."
- Storage is crucial because these little beauties are delicate. Line an airtight container with parchment paper, arrange pies in a single layer, and refrigerate for up to 3 days. The crust stays crisp, the caramel remains gooey, and the whipped cream holds its shape thanks to our stabilized recipe. For longer storage, freeze on a tray first, then transfer to a container with parchment between layers — they'll keep for a month and thaw in about 30 minutes on the counter. That's it — you did it. But hold on, I've got a few more tricks that'll take this to another level...
Insider Tricks for Flawless Results
The Temperature Rule Nobody Follows
Temperature is everything in this recipe, and I'm not just talking about oven settings. Your butter needs to be properly melted but not scorching hot — around 140°F is perfect for coating crumbs without making them soggy. Cold caramel straight from the fridge will seize up and become impossible to spread, while warm caramel will soak through your crust and create a soggy mess. Room temperature is your friend here, but if your kitchen is particularly warm, pop the caramel in the fridge for 10 minutes before using. The whipped cream needs to stay cold throughout the process, so work quickly or keep your bowl over an ice bath. A friend tried skipping this step once — let's just say her pies looked like they were melting in slow motion and tasted like sweet disappointment.
Why Your Nose Knows Best
Don't underestimate the power of aroma in making these mini pies irresistible. When you're toasting your graham cracker crusts, wait for that moment when your kitchen fills with the smell of honey and butter — it's like a built-in timer that never fails. The caramel should smell like buttery toffee but never burnt sugar; if you catch even a whiff of bitterness, pull it off the heat immediately. When whipping cream, you'll smell the vanilla before you see it thicken — that's your cue to slow down and watch carefully. Chocolate should smell rich and slightly bitter when properly melted; if it smells sweet or like nothing, it's not hot enough to drizzle properly.
The 5-Minute Rest That Changes Everything
Here's where patience pays off in spades. After you assemble the pies but before you add the chocolate drizzle, let them rest in the fridge for exactly five minutes. This brief chill firms up the caramel just enough that when you add the warm chocolate, it doesn't melt into the whipped cream but sits on top in gorgeous ribbons. Without this rest, the chocolate sinks and creates muddy streaks that look amateur. With it, you get professional-looking desserts that people think came from a fancy bakery. I've tested this dozens of times — skip the rest and you'll have chocolate puddles; embrace it and you'll have chocolate art.
The Crumb Coating Secret
Want to know why restaurant desserts always look so polished? It's all in the details most home cooks skip. After pressing your crust into the tins, take an extra 30 seconds to use a second tin of the same size to press down and create perfectly flat, compact bottoms. This prevents the dreaded "crumbly bottom syndrome" where your crust falls apart when you bite into it. Also, reserve a tablespoon of your buttered crumbs to patch any thin spots after pre-baking — hot crusts are fragile but also perfectly receptive to patches that'll fuse seamlessly as they cool.
The Layering Logic
Understanding why we layer ingredients in a specific order transforms these from good to legendary. The caramel goes on warm so it can seep slightly into the crust, creating a moisture barrier that prevents sogginess while adding flavor. The whipped cream goes on cold so it sets up firmly and provides structural integrity. The chocolate goes on last and warm so it flows beautifully but sets quickly on the cold cream. Mess up this order and you get chocolate that smears, caramel that slides off, or cream that deflates into a puddle. Trust the process — culinary science is working in your favor here.
Creative Twists and Variations
This recipe is a playground. Here are some of my favorite ways to switch things up:
Reese's Peanut Butter Cup Explosion
Swap half the Butterfinger for crushed Reese's cups, mix peanut butter into the caramel, and top with chopped peanuts. The result is a peanut butter lover's dream that tastes like the inside of a candy shop. Use milk chocolate instead of dark for the drizzle to keep it sweet and cohesive. This version is so rich that even I — and I'll be honest here — can only handle one at a time, which is saying something.
Salted Caramel Pretzel Crunch
Replace half the graham cracker crumbs with crushed pretzels for a sweet-salty base that adds incredible crunch. Increase the salt in the caramel to 1/2 teaspoon and sprinkle flaky sea salt on top of the chocolate drizzle. The pretzel pieces stay crispy for days and add this amazing malty flavor that makes the whole thing taste like a gourmet candy bar. Kids go absolutely wild for this version, and adults pretend they're only having one while secretly hoarding the rest.
Mocha Madness Version
Add a teaspoon of instant espresso powder to your melted chocolate and replace the vanilla in the whipped cream with coffee liqueur. The coffee enhances the chocolate flavor and creates this sophisticated edge that makes these appropriate for dinner parties. The slight bitterness balances the sweetness perfectly, and people always ask for the recipe thinking you spent hours on some complex technique.
White Chocolate Raspberry Dream
Use white chocolate chips instead of dark, add a layer of raspberry jam between the caramel and whipped cream, and top with freeze-dried raspberry pieces. The tart berries cut through the richness and create this beautiful color contrast that photographs amazingly. This version tastes like summer in dessert form and disappears faster at potlucks than anything else I've ever brought.
S'mores Campfire Remix
Add a layer of chocolate ganache under the caramel, use crushed graham crackers mixed with mini marshmallows on top, and toast the marshmallows with a kitchen torch. The result tastes like summer camp but elevated — all the flavors you love from s'mores but in a format you can eat without getting sticky fingers. Pro tip: make these for outdoor gatherings and watch people lose their minds over the nostalgia factor.
Dark and Stormy Adult Edition
Add a tablespoon of dark rum to the caramel, use 85% dark chocolate for the drizzle, and replace the sugar in the crust with brown sugar for deeper flavor. These pack a punch and are definitely not for the kids, but they're perfect for late-night gatherings where you want something indulgent with a little edge. The rum flavor pairs surprisingly well with the peanut butter notes in the Butterfinger.
Storing and Bringing It Back to Life
Fridge Storage
These mini pies are surprisingly resilient when stored properly. Line an airtight container with parchment paper, arrange the pies in a single layer, and they'll stay perfect for up to 3 days. The key is keeping them cold but not freezing — too cold and the caramel becomes rock hard, too warm and the whipped cream starts to weep. If you notice any condensation on the inside of your container, add a paper towel to absorb moisture and replace it daily. I've successfully served 3-day-old pies to guests who had no idea they weren't freshly made — the flavors actually intensify and meld beautifully overnight.
Freezer Friendly
For longer storage, these freeze like champions. Arrange pies on a parchment-lined baking sheet and freeze until solid — about 2 hours. Then transfer to a freezer-safe container with parchment between layers. They'll keep for up to a month without losing quality. The trick is to thaw them properly: transfer to the fridge for 2 hours, then let them sit at room temperature for 15 minutes before serving. Don't microwave them — the cream will separate and the caramel will become a molten mess. I've made dozens ahead for parties and they're always the first dessert to disappear, even when people know there are fresh options available.
Best Reheating Method
While these are best served cold, sometimes you want to refresh them slightly. Remove from the fridge 15 minutes before serving to take the chill off — this allows the caramel to soften and the flavors to bloom. If your chocolate drizzle has lost its shine, wave a hair dryer on cool setting over the tops for 30 seconds to refresh the gloss. For frozen pies, never use heat to speed up thawing; patience is your friend here. Add a tiny splash of water to the container before sealing it up — it steams back to perfection by creating just enough humidity to keep everything fresh without making anything soggy.