I’ve spent the last few weeks chasing that elusive flavor profile that turns an ordinary night‑in into a culinary celebration. One Friday, after a disastrous attempt at a “quick” stir‑fry that left my kitchen smelling like burnt toast and my taste buds pleading for mercy, my friend dared me to replicate the Cheesecake Factory’s Spicy Cas. I laughed, shrugged, and thought, “Sure, let’s see how far I can push this.” The moment I cracked the first chicken breast, the room filled with a savory promise—salt, pepper, and the faint, almost sweet scent of hoisin sauce mingling with the sharp tang of sherry. My kitchen lights flickered, my phone buzzed, and the aroma of oil sizzling against hot metal turned the air into a sensory stage. I was ready to dive headfirst into a recipe that, in my eyes, had been over‑hyped and under‑delivered by many cooks.
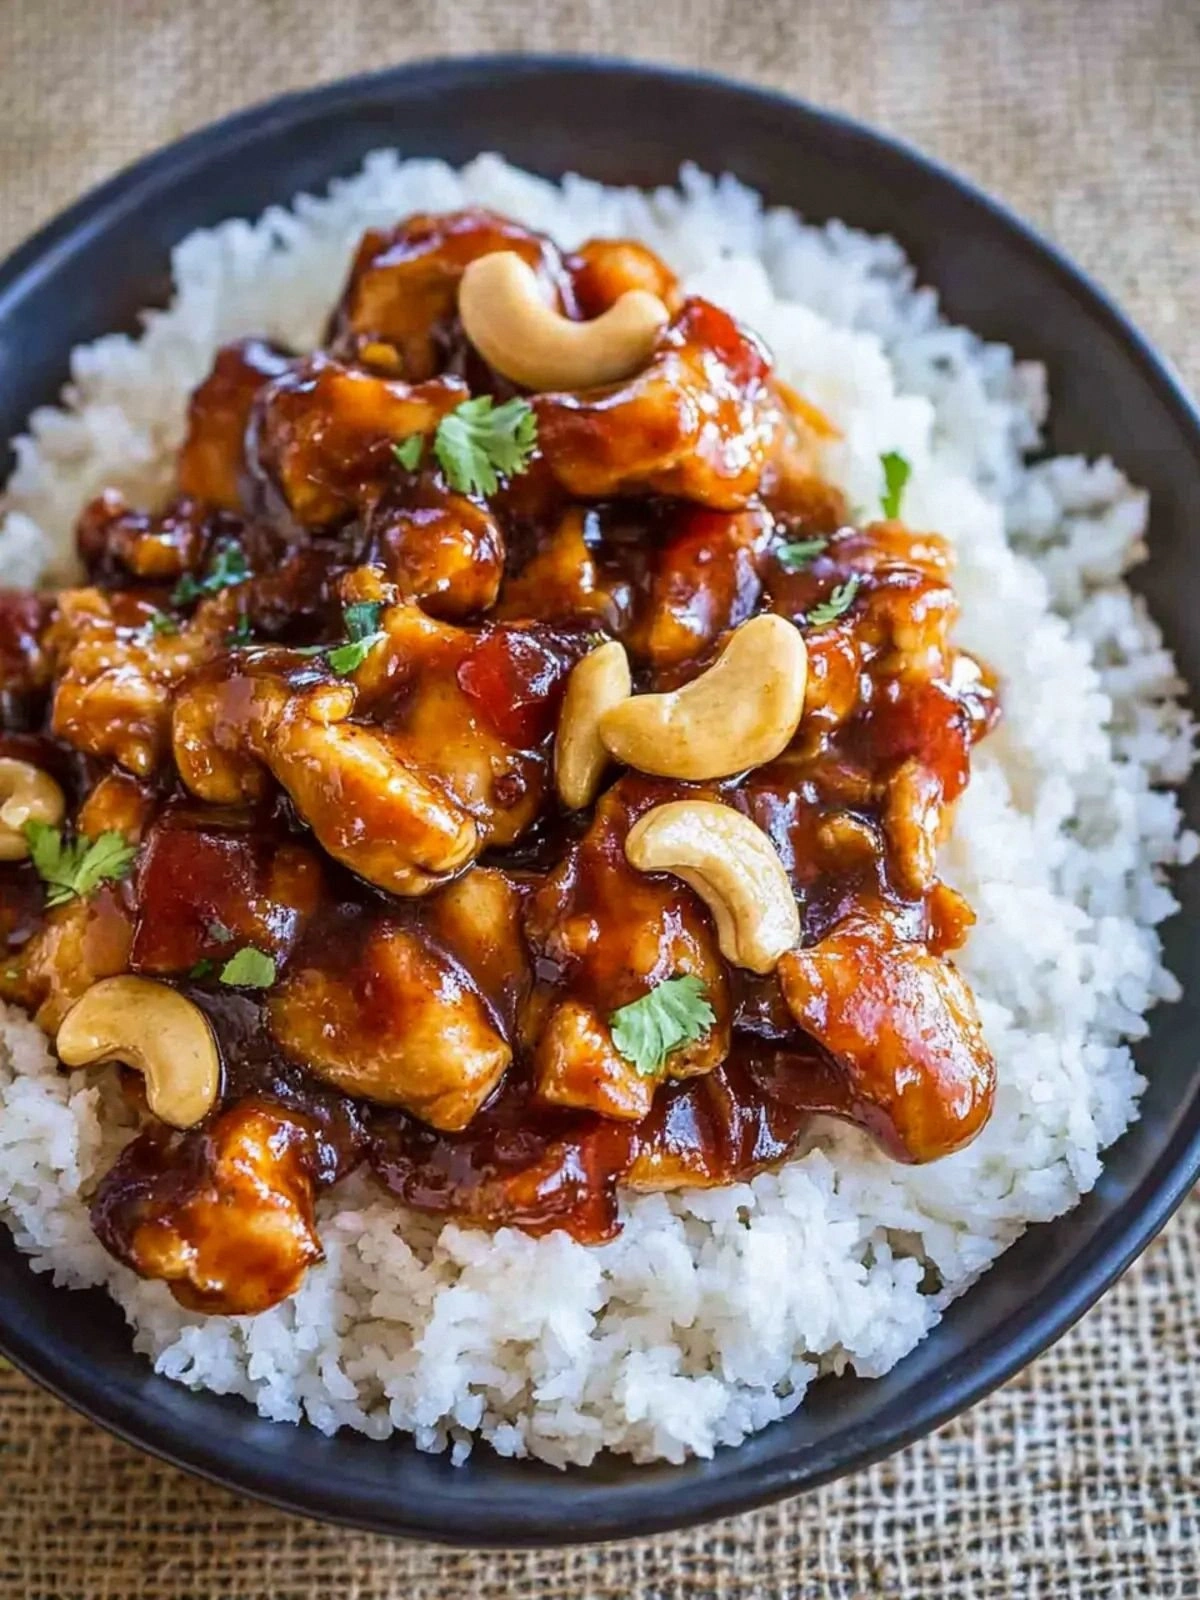
Picture this: a golden, crisp coating that snaps like thin ice, a sauce that clings to the chicken like velvet, and a sprinkle of cashews that adds a nutty crunch that reverberates with every bite. I swear I could taste the sizzle in the air before the first bite even touched my tongue. The moment you take a bite, the heat from the sriracha and chili flakes dances with the sweetness of hoisin, while the green onions lend a bright, almost citrusy finish. Every component is a character in a well‑written play, each playing a distinct role that culminates in a symphony of flavors. This isn’t just a dish; it’s a culinary experience that will have your guests begging for the recipe.
What makes this version stand out? I’m not just talking about the ingredients—I’m talking about the technique, the balance, the subtlety. The original Cheesecake Factory recipe often falls short in texture, leaving the chicken soggy or the coating too thin. In my adaptation, I’ve tweaked the batter ratios, introduced a second layer of rice flour, and added a splash of ice water to create a light, airy coating that crisps up beautifully. The sauce is a masterful blend of sweet and umami, with just enough heat to keep the palate engaged. The result? A dish that’s both approachable for beginners and a showstopper for seasoned chefs. I dare you to taste this and not go back for seconds.
If you’ve ever struggled with achieving that perfect crispy coating, you’re not alone. I’ve been there—floured chicken that turns into a rubbery mess, sauces that taste like a chemical experiment. That’s why I’m thrilled to share this version with you. By the end, you’ll wonder how you ever made it any other way. Let me walk you through every single step—by the end, you’ll wonder how you ever made it any other way.
What Makes This Version Stand Out
- Texture: The double‑layered flour mixture creates a coating that’s crisp on the outside and tender on the inside, avoiding the rubbery chicken that plagues many fried dishes. The addition of ice water and a pinch of baking powder gives the batter a light, airy quality that holds up against the sauce.
- Flavor Balance: The sauce blends sweet hoisin, salty soy, and a kick of sriracha, while the crushed red chili flakes add a lingering heat that doesn’t overpower the chicken.
- Ingredient Quality: Fresh garlic, high‑quality sherry, and premium cashews elevate the dish beyond the typical takeout experience, giving you a gourmet flavor profile in your own kitchen.
- Ease of Prep: The method is straightforward—no multiple pans or complicated steps—yet it delivers a restaurant‑level result that impresses.
- Make‑Ahead Friendly: The chicken can be marinated and coated ahead of time, and the sauce can be pre‑made, making this dish a perfect candidate for busy weeknights.
- Crowd‑Pleaser: The dish strikes a sweet spot between savory, spicy, and nutty, appealing to a wide range of palates. I’ve had it served at gatherings where everyone asked for the recipe.
- Visual Appeal: The glossy sauce and glistening cashews give the dish an eye‑catching sheen that makes it Instagram‑ready.
Alright, let's break down exactly what goes into this masterpiece...
Inside the Ingredient List
The Flavor Base
At the heart of this dish lies a sauce that is both complex and approachable. The hoisin sauce provides a deep umami sweetness, while the sherry adds a subtle, fruity depth. Together with soy sauce, they form a savory foundation that balances the heat from the sriracha and chili flakes. If you’re missing hoisin, a mixture of hoisin and honey can serve as a suitable stand‑in, though the flavor profile will shift slightly toward sweetness.
The Texture Crew
The coating is where the magic happens. Using a blend of rice flour, all‑purpose flour, baking powder, and ice water creates a batter that’s light, airy, and perfectly crisp. The rice flour keeps the batter gluten‑free and adds a subtle nuttiness, while the all‑purpose flour provides structure. Skipping the ice water will result in a denser coating that may not crisp up as well.
The Unexpected Star
Cashews aren’t just a garnish—they’re a flavor enhancer. Their natural sweetness cuts through the savory sauce, and their crunchy texture adds a delightful contrast. If you’re allergic or just want a different nut, almonds or walnuts can be used, but be aware they’ll introduce a slightly bitter edge.
The Final Flourish
Green onions bring brightness and a touch of sharpness that lifts the entire dish. Their mild bite balances the richness of the sauce and the nuttiness of the cashews. If you’re looking for a milder green onion, scallions are a great alternative.
Everything's prepped? Good. Let's get into the real action...
The Method — Step by Step
- Prep the Chicken: Slice the 1½ pounds of chicken breast into bite‑size strips, ensuring each piece is roughly the same thickness for even cooking. Pat them dry with paper towels to remove excess moisture; this step is crucial for achieving a crispy coating. Season the strips with ¼ teaspoon kosher salt, ⅛ teaspoon ground black pepper, ⅛ teaspoon paprika, and ⅛ teaspoon baking powder. Toss them in a bowl until the seasoning is evenly distributed. Set aside for 10 minutes to let the flavors meld; I’ve found that this brief resting period enhances the coating’s adherence.
- Make the Coating: In a shallow dish, combine ¾ cup rice flour, 1½ cups rice flour, ¼ cup all‑purpose flour, ¼ teaspoon kosher salt, and ¼ teaspoon ground black pepper. Whisk the dry mix until smooth. In a separate bowl, whisk 1½ cups ice water until frothy. Pour the water into the dry mix and stir until a thick, batter‑like consistency forms. The batter should be thick enough to coat the chicken without dripping excessively. If it seems too runny, add a splash more rice flour; if too thick, a teaspoon of water will loosen it.
- Coat the Chicken: Dredge each seasoned strip in the coating mixture, shaking off excess. For an extra crunch, dip the coated strips back into a small bowl of beaten egg (optional) before returning them to the flour for a double coating. This double‑layered approach gives the chicken a golden, airy shell that’s almost impossible to crack. Arrange the coated pieces on a parchment‑lined baking sheet or a wire rack if you’re baking; if you’re pan‑frying, ensure the oil is hot enough before adding the chicken.
- Cook the Chicken: Heat ⅓ cup canola or vegetable oil in a large skillet over medium‑high heat. Once the oil shimmers, add the coated chicken in a single layer, avoiding overcrowding. Fry for 3–4 minutes per side until each piece turns a deep golden brown and the coating is crisp. Flip carefully with tongs; the coating should hold together like a delicate shell. If you’re baking instead, preheat the oven to 400°F (200°C) and bake for 15–18 minutes, flipping halfway through. The chicken should be cooked through and the coating blistered and crunchy.
- Prepare the Sauce: In a small saucepan, combine 1 cup hoisin sauce, ¼ cup soy sauce, ¼ cup sherry wine, 2 tablespoons red wine vinegar, 1 tablespoon sriracha sauce, ¼ cup granulated sugar, 2 ounces minced fresh garlic, and ¼ teaspoon crushed red chili flakes. Bring the mixture to a gentle simmer over medium heat, stirring constantly to prevent sticking. Let it reduce for 5–7 minutes until it thickens slightly and the flavors meld into a glossy glaze. The sauce should coat the back of a spoon; if it’s too thin, simmer a bit longer; if too thick, add a teaspoon of water to loosen.
- Combine: Once the chicken is cooked, transfer it to a large bowl. Pour the hot sauce over the chicken, tossing gently to ensure every piece is evenly coated. The sauce will cling to the coating, creating a sweet, savory, and spicy glaze that’s simply irresistible. If you prefer a thicker sauce, let the mixture simmer for another 2–3 minutes before tossing.
- Add the Cashews: In a dry skillet over medium heat, toast 8 ounces of cashews for 2–3 minutes until fragrant and lightly browned. Toss the toasted nuts into the chicken‑sauce mixture, allowing them to coat. The nutty aroma that emerges will elevate the dish to a new level of deliciousness. If you’re short on time, you can add raw cashews and let them soften slightly in the sauce, but the toasted version is my personal favorite.
- Finish with Green Onions: Roughly chop 6 pieces of green onions, separating the white and green parts. Sprinkle the white parts over the dish for a subtle onion flavor and the green parts for a pop of color and brightness. This final touch adds a fresh contrast to the rich sauce and ensures every bite is a balanced experience. Serve immediately while the chicken is still warm and the sauce is glistening.
That's it — you did it. But hold on, I've got a few more tricks that'll take this to another level. Let’s dive into the insider tips that will help you perfect this dish every single time.
Insider Tricks for Flawless Results
The Temperature Rule Nobody Follows
Temperature is everything when it comes to crispy chicken. The oil should be around 350°F (175°C) for frying. If you don’t have a thermometer, drop a small piece of coating into the oil; it should sizzle immediately and rise to the surface in about 30 seconds. This simple check ensures a golden crust without burning.
Why Your Nose Knows Best
During the sauce reduction, keep your nose close to the stove. The aroma is a living indicator of how the sauce is developing. A sweet, caramelized scent signals that the sugars are caramelizing; if the smell becomes overly sharp or burnt, pull the sauce off the heat immediately to avoid bitterness.
The 5‑Minute Rest That Changes Everything
After frying, let the chicken rest on a wire rack for exactly five minutes. This allows the steam to escape, preventing the coating from becoming soggy. If you’re in a hurry, a quick 30‑second rest is fine, but the extra time makes a noticeable difference in crunch.
The Cashew Toast Trick
Toasting the cashews before adding them to the sauce gives them a nutty aroma that complements the sweet glaze. Use a dry skillet and toast over medium heat, stirring constantly to avoid burning. The toasted nuts also add a subtle crunch that contrasts beautifully with the tender chicken.
The Green Onion Layering
Separate the white and green parts of the green onions. The whites add a milder onion flavor, while the greens provide a fresh, almost citrusy brightness. Layer them strategically: toss the whites with the chicken first, then sprinkle the greens on top at the very end for a pop of color and flavor.
The Quick Sauce Thickener
If you’re short on time, mix a teaspoon of cornstarch with a tablespoon of cold water and stir it into the sauce during the last minute of simmering. This will instantly thicken the glaze, giving it a glossy, clingy texture that coats the chicken beautifully.
Now that you have the insider tricks, you’re ready to elevate this dish beyond the restaurant experience. Let’s explore some creative twists that will keep your menu fresh and exciting.
Creative Twists and Variations
Spicy Peanut Kick
Swap the cashews for roasted peanuts and add a tablespoon of peanut butter to the sauce. The nutty butter will deepen the flavor profile and introduce a new layer of richness that pairs wonderfully with the sriracha heat.
Citrus Burst
Add a splash of orange juice and a teaspoon of orange zest to the sauce during the final simmer. The citrus notes brighten the dish, cutting through the richness and adding a refreshing twist that’s perfect for spring or summer.
Thai Twist
Replace the hoisin sauce with Thai sweet chili sauce and add a tablespoon of fish sauce for depth. Finish with fresh cilantro and a squeeze of lime for an authentic Thai flavor that will transport your taste buds to Bangkok.
Garlic Lover’s Edition
Double the amount of minced garlic in the sauce and add a pinch of garlic powder to the coating. The result is a robust, garlicky flavor that satisfies even the most discerning garlic aficionados.
Herb‑Infused
Add a handful of chopped fresh basil or mint to the sauce during the last minute of cooking. The herbal freshness offsets the heat and adds a vibrant, aromatic dimension to the dish.
Gluten‑Free Version
Use a 1:1 blend of rice flour and cornstarch for the coating, and ensure the hoisin sauce is gluten‑free. This adaptation maintains the same crispy texture while catering to gluten‑free diners.
This recipe is a playground. Here are some of my favorite ways to switch things up: each variation offers a new flavor adventure while keeping the core concept intact.
Storing and Bringing It Back to Life
Fridge Storage
Store the cooked chicken in an airtight container in the refrigerator for up to 3 days. The sauce will thicken slightly, but the coating will remain crisp if you reheat it properly. When reheating, place the chicken on a wire rack over a baking sheet and warm it in a preheated 350°F (175°C) oven for 8–10 minutes, or until heated through.
Freezer Friendly
Freeze the chicken in a single layer on a parchment‑lined tray before transferring it to a freezer bag. This prevents clumping and allows you to thaw a single portion at a time. When ready to eat, thaw overnight in the refrigerator and reheat as described above. The coating may lose some crispness, so consider a quick blast in a hot skillet to revive it.
Best Reheating Method
The secret to reheat without drying out is a splash of water. Add a teaspoon of water to the pan or a drizzle of oil before heating; the steam will help the sauce remain glossy and the coating stay crisp. A quick 30‑second pan sear over medium heat is usually enough to restore the dish’s original texture.