I was in the middle of a frantic Friday night when my roommate dared me to reinvent the classic tiramisu in a way that would make even the Italians raise an eyebrow. I stared at a half‑empty espresso machine, a lonely tub of mascarpone, and a stack of stale ladyfingers that had been begging for redemption. The kitchen smelled like burnt toast and stale coffee, the faucet dripped a lazy rhythm, and my hands were already slick with melted chocolate. I thought, “What if I could take that coffee‑soaked sponge, layer it with a silky chocolate‑mascarpone mousse, and serve it in a clear glass that shows off every seductive layer?” That thought turned into a full‑blown obsession, and I’m about to hand you the exact blueprint.
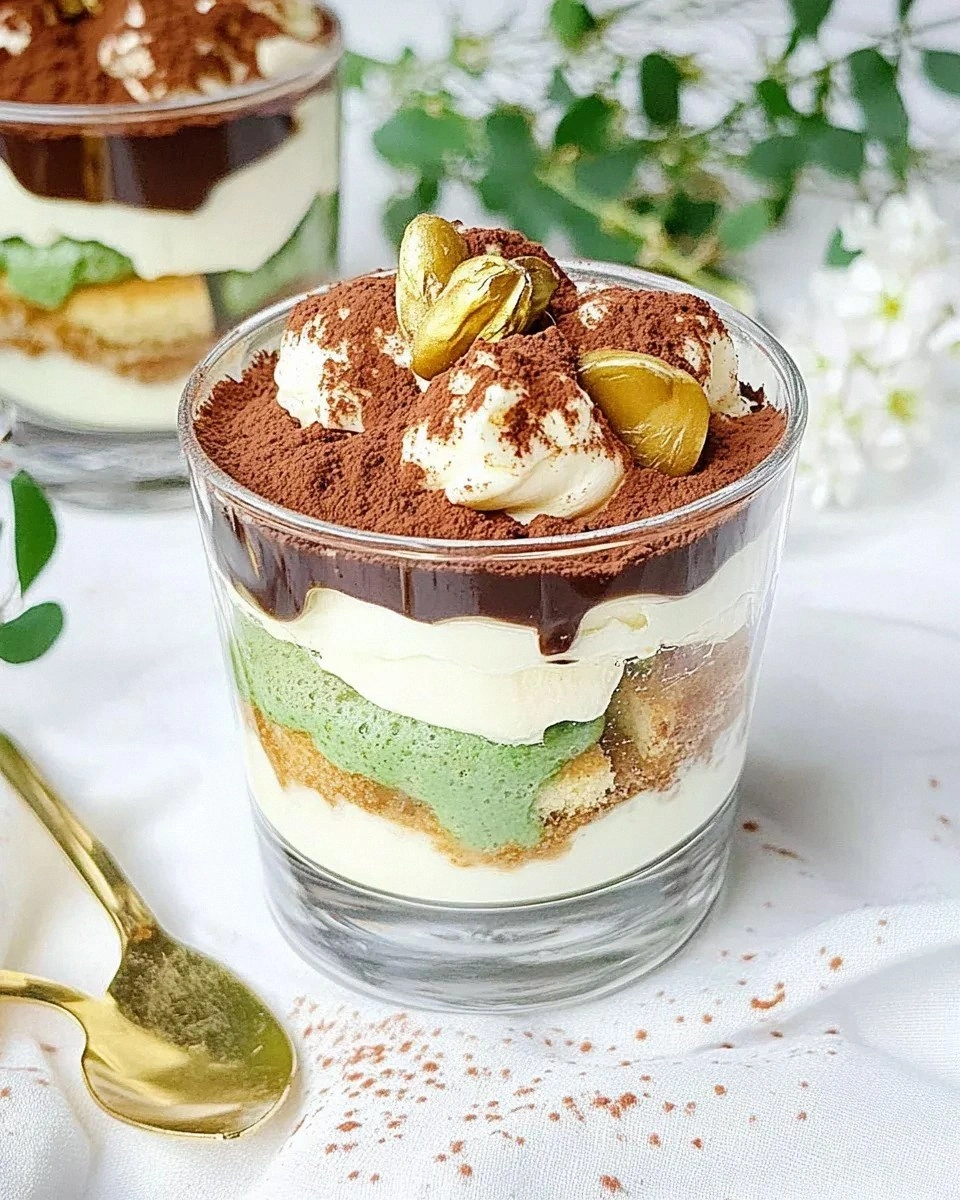
Picture this: a glass filled to the brim with coffee‑kissed ladyfingers, a cloud of chocolate‑infused mascarpone that glistens like a midnight sky, and a dusting of cocoa that looks like freshly fallen snow on a mountain peak. When you dip your spoon, the layers melt together in a cascade of flavor that is at once bitter, sweet, and utterly decadent. The aroma of espresso mingles with the rich scent of dark chocolate, while the cool creaminess of the mascarpone whispers a promise of indulgence. It’s a sensory symphony that hits all five senses at once, and it’s all happening in a single, elegant glass.
Most tiramisu recipes either drown the delicate mascarpone in too much coffee or hide the chocolate in a way that makes it taste like a generic dessert. This version flips the script: I use a double‑infusion technique where the ladyfingers soak in both espresso and a splash of coffee liqueur, while the mascarpone gets a luxurious boost from melted dark chocolate and a whisper of vanilla. The result is a dessert that is both bold and balanced, with a texture that’s creamy yet firm enough to hold its shape when you lift the glass. I dare you to taste this and not go back for seconds.
Okay, ready for the game‑changer? I’m about to reveal the secret ingredient that most recipes completely skip: a pinch of sea salt folded into the chocolate‑mascarpone mixture. That tiny grain amplifies the chocolate’s depth and makes the coffee flavor pop like fireworks. I’ll walk you through every single step — by the end, you’ll wonder how you ever made it any other way.
What Makes This Version Stand Out
- Chocolate‑Mascarpone Fusion: By melting dark chocolate directly into the mascarpone, you get a mousse that’s richer than any store‑bought version and still airy enough to melt on your tongue.
- Double‑Infused Ladyfingers: A quick dip in espresso followed by a light drizzle of coffee liqueur creates layers that are moist without becoming soggy.
- Salt‑Enhanced Flavor: A pinch of sea salt unlocks hidden chocolate notes and balances the sweetness, turning a simple dessert into a gourmet experience.
- Glass Presentation: Serving in a clear glass isn’t just for Instagram; it lets you see every layer, building anticipation with each spoonful.
- Make‑Ahead Friendly: Assemble the night before, refrigerate, and you’ll have a perfectly set tiramisu ready to wow guests at any gathering.
- Quick Assembly: No baking required, just a few minutes of mixing and layering, making it ideal for busy weeknights.
- Versatile Sweetness: Adjust the sugar level or swap the liqueur for a non‑alcoholic alternative without compromising flavor.
- Crowd‑Pleaser Factor: The combination of coffee, chocolate, and cream is a proven winner that gets applause at every party.
Inside the Ingredient List
The Flavor Base
The heart of this tiramisu is the espresso‑coffee blend. I use a dark roast that’s been allowed to cool completely; hot coffee would melt the chocolate prematurely, while cold coffee ensures the ladyfingers absorb just the right amount of bitterness. If you’re a fan of extra kick, a splash of coffee liqueur adds depth without overwhelming the palate. Remember, the coffee should be strong enough to stand up to the chocolate, otherwise you’ll end up with a dessert that tastes like sweetened milk.
Espresso (1 cup): This is the foundation. A robust espresso gives the tiramisu its signature bite and balances the sweetness of the mascarpone. If you don’t have an espresso machine, a strong French press coffee works just as well. Skipping the espresso means you lose that essential contrast that makes each bite pop.
Coffee Liqueur (2 tbsp): Optional but highly recommended. The liqueur adds a subtle warmth and a hint of vanilla that complements the chocolate. For a non‑alcoholic version, swap with a tablespoon of vanilla‑flavored almond milk.
The Texture Crew
Texture is what makes a dessert unforgettable. In this recipe, the ladyfingers provide a delicate sponge, while the chocolate‑mascarpone mousse offers a velvety contrast. The final dusting of cocoa adds a dry, slightly gritty finish that balances the creaminess. Each component is calibrated to hold its own without drowning the others.
Ladyfinger Biscuits (12 pieces): Choose fresh, dry biscuits for the best soak. If they’re too soft, they’ll become mushy; if they’re too hard, they won’t absorb the coffee. Lightly toast them for an extra crisp edge that shatters like thin ice when you bite.
Mascarpone Cheese (8 oz): The star of the mousse. Its buttery richness is what makes tiramisu feel luxurious. Always use full‑fat mascarpone; low‑fat versions become grainy and lose that signature melt‑in‑your‑mouth feel.
Heavy Cream (1 cup): Whipped to soft peaks, it lightens the mousse and creates an airy lift. Over‑whipping turns it into butter, ruining the smooth texture.
The Unexpected Star
Chocolate is the secret weapon that elevates this tiramisu from “nice” to “mind‑blowing.” By folding melted dark chocolate into the mascarpone, you get a mousse that’s deep, slightly bitter, and incredibly glossy. The cocoa powder dusting isn’t just for looks; it adds a subtle bitterness that cuts through the sweetness, creating a perfect balance.
Dark Chocolate (½ cup, 70% cacao): The higher the cacao percentage, the richer the flavor. Melt it gently over a bain‑marie to avoid scorching, then let it cool just enough to stay fluid but not set.
Cocoa Powder (¼ cup): Unsweetened, high‑quality cocoa provides that final dusting. It should be sifted to avoid clumps, ensuring a smooth, even coating.
The Final Flourish
A few finishing touches turn a good dessert into a show‑stopper. Vanilla extract adds a fragrant backbone, while a pinch of sea salt amplifies every flavor note. Eggs provide structure and lift, and powdered sugar sweetens without overwhelming.
Eggs (2 large, separated): The yolks enrich the mousse, while the whipped whites add airy volume. Fresh eggs are essential; older eggs won’t whip as well and can lead to a flat mousse.
Powdered Sugar (½ cup): Fine sugar dissolves instantly, preventing any grainy texture. Adjust to taste if you prefer a less sweet version.
Vanilla Extract (1 tsp): Pure vanilla extracts bring a floral sweetness that ties the coffee and chocolate together.
Sea Salt (pinch): The tiniest grain can make the chocolate sing. It’s the difference between a good dessert and a great one.
Everything's prepped? Good. Let's get into the real action...
The Method — Step by Step
First, brew a strong cup of espresso and let it cool to room temperature. The coffee should be dark enough that a drop on a white plate stays black for at least a few seconds. Once cooled, stir in the coffee liqueur if you’re using it. This mixture will become the soaking bath for the ladyfingers, so make sure it’s aromatic and not too watery. Pro tip: If the coffee is too hot, it will melt the chocolate later on.
Separate the egg whites from the yolks. Place the whites in a clean, dry bowl and begin whipping them with a pinch of sea salt. When they reach soft peaks, gradually add half of the powdered sugar and continue whipping until stiff, glossy peaks form. This airy foam will give the mousse its lightness.
Kitchen Hack: Adding the sugar gradually prevents the whites from deflating.In a separate bowl, whisk the egg yolks with the remaining powdered sugar until the mixture turns pale and thick—think of the color of a sunrise. Then add the vanilla extract and a pinch more salt. This yolk mixture is the backbone that stabilizes the mousse and adds richness.
Watch Out: Over‑mixing can cause the yolks to become too thin, leading to a runny mousse.Melt the dark chocolate in a heat‑proof bowl over simmering water, stirring gently until smooth. Remove from heat and let it cool just enough so it’s still fluid but not hot enough to scramble the eggs. Fold the melted chocolate into the mascarpone until fully incorporated; you’ll notice the mixture turning a deep, luxurious brown.
Now combine the mascarpone‑chocolate blend with the yolk mixture, stirring until the texture is uniform and glossy. At this stage, the mixture should be thick enough to hold a spoonful without sliding off. Gently fold in the whipped egg whites in three additions, being careful not to deflate the air you just painstakingly created. This folding technique is the secret to that cloud‑like texture.
Take each ladyfinger and give it a quick dip—no more than one second per side—into the espresso‑liqueur bath. The goal is a light soak that imparts flavor without turning the biscuit soggy. Arrange the soaked ladyfingers at the bottom of each serving glass, pressing them gently to create an even base. The visual of the coffee‑dark biscuit against the glass is already a promise of indulgence.
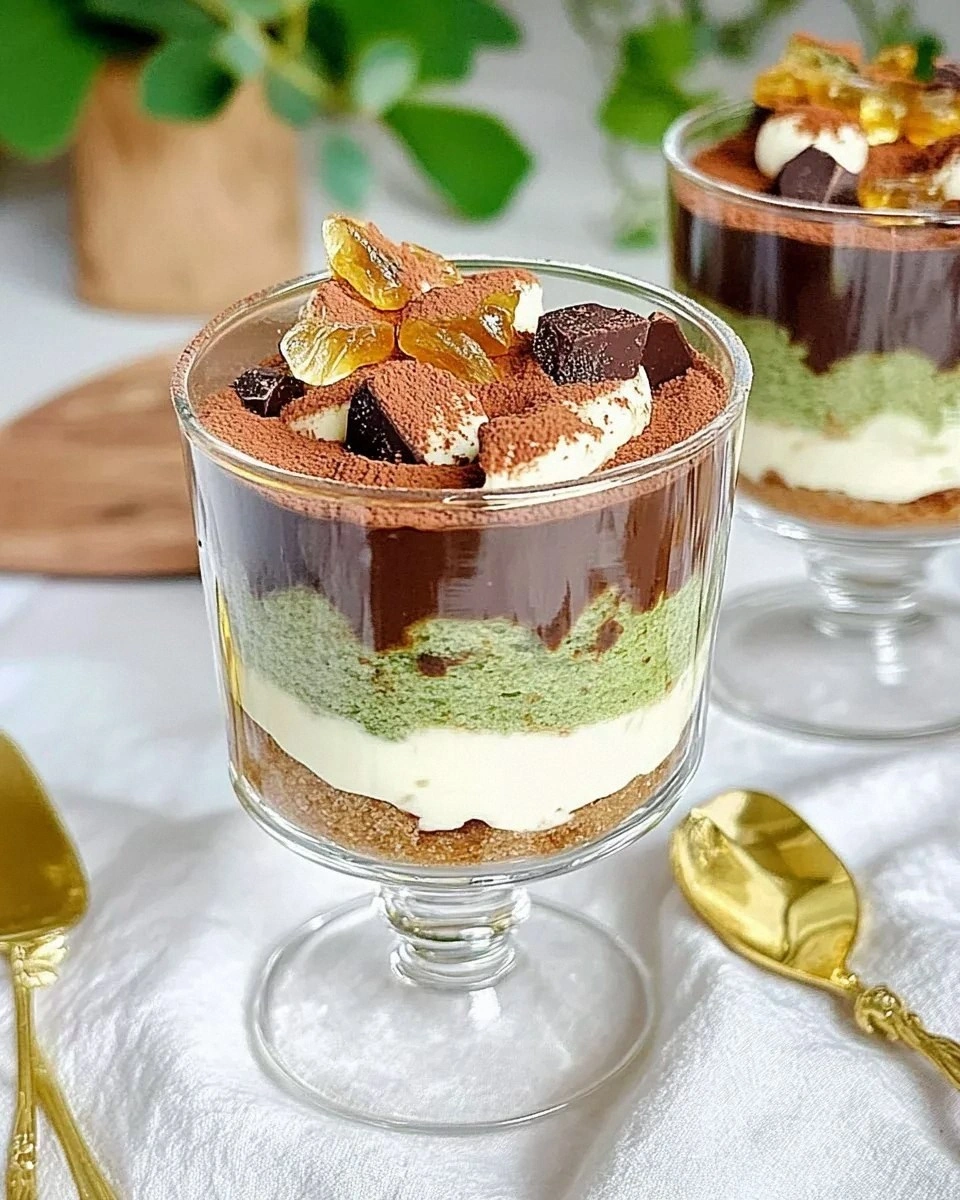
Spoon a generous layer of the chocolate‑mascarpone mousse over the ladyfingers, smoothing the top with the back of a spoon. Repeat the layering process: another round of dipped ladyfingers, then the remaining mousse, finishing with a thick final layer of mousse. The glass should show distinct, alternating bands—this is where the drama lives.
Cover each glass with plastic wrap and refrigerate for at least two hours, preferably overnight. The chilling time allows the flavors to meld and the mousse to set, giving you that perfect bite‑through texture. When you’re ready to serve, dust the tops with a fine sift of cocoa powder, creating a snow‑capped mountain effect.
Finally, garnish with a few shaved chocolate curls or a single coffee bean for that extra visual pop. This last touch isn’t just for looks; the chocolate shavings add a textural contrast that makes each spoonful a journey from creamy to crunchy. Serve chilled, and watch as your guests dive in with unabashed enthusiasm.
That's it — you did it. But hold on, I've got a few more tricks that'll take this to another level...
Insider Tricks for Flawless Results
The Temperature Rule Nobody Follows
Never, ever use hot coffee to soak your ladyfingers. The heat will melt the chocolate and cause the mousse to separate later on. Keep the coffee at room temperature or slightly chilled; this ensures the biscuits absorb just enough liquid without becoming mushy. I once tried a warm soak and ended up with a soggy, flavor‑diluted mess that tasted like a coffee‑flavored pudding. The rule of thumb: the coffee should feel like a cool breeze on your skin, not a summer heatwave.
Why Your Nose Knows Best
Your sense of smell is the ultimate indicator of doneness for the mousse. When the chocolate‑mascarpone blend is ready, you’ll notice a faint, buttery aroma that signals the fats have emulsified perfectly. If you smell a raw egg scent, you’ve under‑mixed; if you detect a burnt chocolate note, you’ve overheated. Trust that nose—it's more reliable than any timer.
The 5‑Minute Rest That Changes Everything
After you fold the whipped egg whites into the mousse, let the bowl sit for five minutes before spreading it into the glasses. This brief pause lets the air bubbles stabilize, preventing a collapse when you layer. I once rushed this step and the mousse deflated like a popped balloon, leaving a flat, dense dessert. Those five minutes are a tiny investment for a lofty, cloud‑like finish.
Chocolate Tempering Shortcut
If you want an extra glossy sheen, temper the dark chocolate using the microwave method: heat in 30‑second bursts, stirring in between, until it reaches 115°F, then cool to 88°F before adding to the mascarpone. This ensures the chocolate stays glossy and doesn’t develop a dull film after refrigeration. Most home cooks skip this step, but the visual payoff is worth the extra few minutes.
The Secret of Salted Caramel Drizzle
A thin drizzle of salted caramel over the top just before serving adds a luxurious caramel‑salt contrast that makes the cocoa dusting sing. Use a high‑quality store‑bought caramel or make your own by melting sugar, adding butter, cream, and a pinch of sea salt. Drizzle sparingly—just enough to create ribbons that catch the light.
Creative Twists and Variations
This recipe is a playground. Here are some of my favorite ways to switch things up:
Mocha Madness
Swap half of the espresso with an equal amount of strong brewed cocoa. The result is a deeper chocolate flavor that still retains the coffee punch. Ideal for chocolate lovers who crave an extra caffeine hit.
Nutty Crunch
Add a layer of finely chopped toasted hazelnuts between the ladyfingers and mousse. The nuts introduce a pleasant crunch and a buttery note that pairs beautifully with the dark chocolate.
Citrus Zest Surprise
Incorporate a teaspoon of orange zest into the mascarpone mixture. The citrus lifts the richness and adds a fragrant pop that brightens the overall profile. This variation is perfect for holiday gatherings.
Vegan Velvet
Replace mascarpone with a blend of silken tofu, coconut cream, and a touch of maple syrup. Use plant‑based ladyfingers and dairy‑free chocolate. The texture remains creamy, and the flavor stays indulgent—proof that you don’t need dairy to be decadent.
Spiced Rum Remix
Swap the coffee liqueur for dark rum infused with a cinnamon stick and a few cloves. The warm spices add an autumnal feel, making the dessert a perfect after‑dinner treat on chilly evenings.
Storing and Bringing It Back to Life
Fridge Storage
Cover each glass tightly with plastic wrap and store in the refrigerator for up to 48 hours. The mousse will continue to firm up, and the flavors will meld, becoming even more harmonious. If you plan to serve after two days, give each serving a quick stir before plating to restore the airy texture.
Freezer Friendly
For longer storage, place the assembled glasses in a freezer‑safe container and freeze for up to one month. When ready to enjoy, transfer to the fridge to thaw overnight. This method preserves the integrity of the mousse while keeping the ladyfingers from becoming overly soggy.
Best Reheating Method
If you need to serve the tiramisu slightly warmer, place the glass in a shallow pan of warm water for 2‑3 minutes—do not microwave. Add a tiny splash (about a teaspoon) of water or milk before the brief warm‑up; the steam will revive the mousse’s silkiness without compromising the chilled character.