The first time I cracked open a bag of dark chocolate chips and mixed them with honey, I thought I was about to create a simple snack. Instead, I was handed a revelation that would become the cornerstone of my midnight snack arsenal. Picture this: a handful of mixed nuts, a splash of vanilla, and a pinch of sea salt, all brought together by the silky richness of melted dark chocolate. The result is a bar that feels like a bite‑size dessert and a snack rolled into one, with a crunch that crackles like a tiny snowstorm in your mouth. I dare you to taste this and not go back for seconds, because the moment you bite into the first piece, the sweet‑salty harmony will have you begging for more. By the end of this post, you’ll wonder how you ever made these bars any other way.
I’ve spent countless evenings in my kitchen trying to perfect the balance between sweet and salty, between chewy and crunchy. My friends have called me the “nut bar ninja,” and they’re right—because once you master the technique, the process becomes a dance that feels almost meditative. I’ll be honest, I ate half the batch before anyone else got to try it, and the kitchen smelled like a chocolate‑oat bakery in a moment. Most recipes get this completely wrong; they either overcook the oats or under‑season the salt, resulting in a bland or overly sweet product. But here, the secret lies in the subtle timing of the melt and the precise ratio of honey to chocolate, which gives each bite that perfect snap and a silky finish. Picture yourself pulling these out of the fridge, the whole kitchen smelling incredible, and knowing you’re about to indulge in the best version you’ll ever make at home.
When I first tried this recipe, I was skeptical about the idea of using honey instead of syrup or sugar. The first bite, however, was a revelation: the honey’s natural sweetness cut through the bitterness of the dark chocolate, creating a flavor profile that was both familiar and unexpectedly exotic. The oats give a comforting chew that feels like a hug, while the sea salt adds a subtle crunch that elevates the entire experience. If you’ve ever struggled with bars that fall apart or taste too sweet, you’re not alone—and I’ve got the fix. The trick is to melt the chocolate just enough to coat the oats, then let the mixture set so the nuts and chocolate can cling together like a secret handshake. Stay with me here—this is worth it.
Let me walk you through every single step—by the end, you’ll wonder how you ever made it any other way. The process is surprisingly simple, yet the outcome is a bar that feels like a gourmet treat, perfect for a quick energy boost or a sweet finish to any meal. I’ll sprinkle in some playful tips, a few kitchen hacks, and a warning or two so you can avoid the most common pitfalls. And if you’re ready for the game‑changer, keep reading because the next part is pure magic. I’ll also throw in a few variations that will turn this recipe into a playground of flavors. Get ready to taste the difference that a little sea salt and a dash of vanilla can make.
What Makes This Version Stand Out
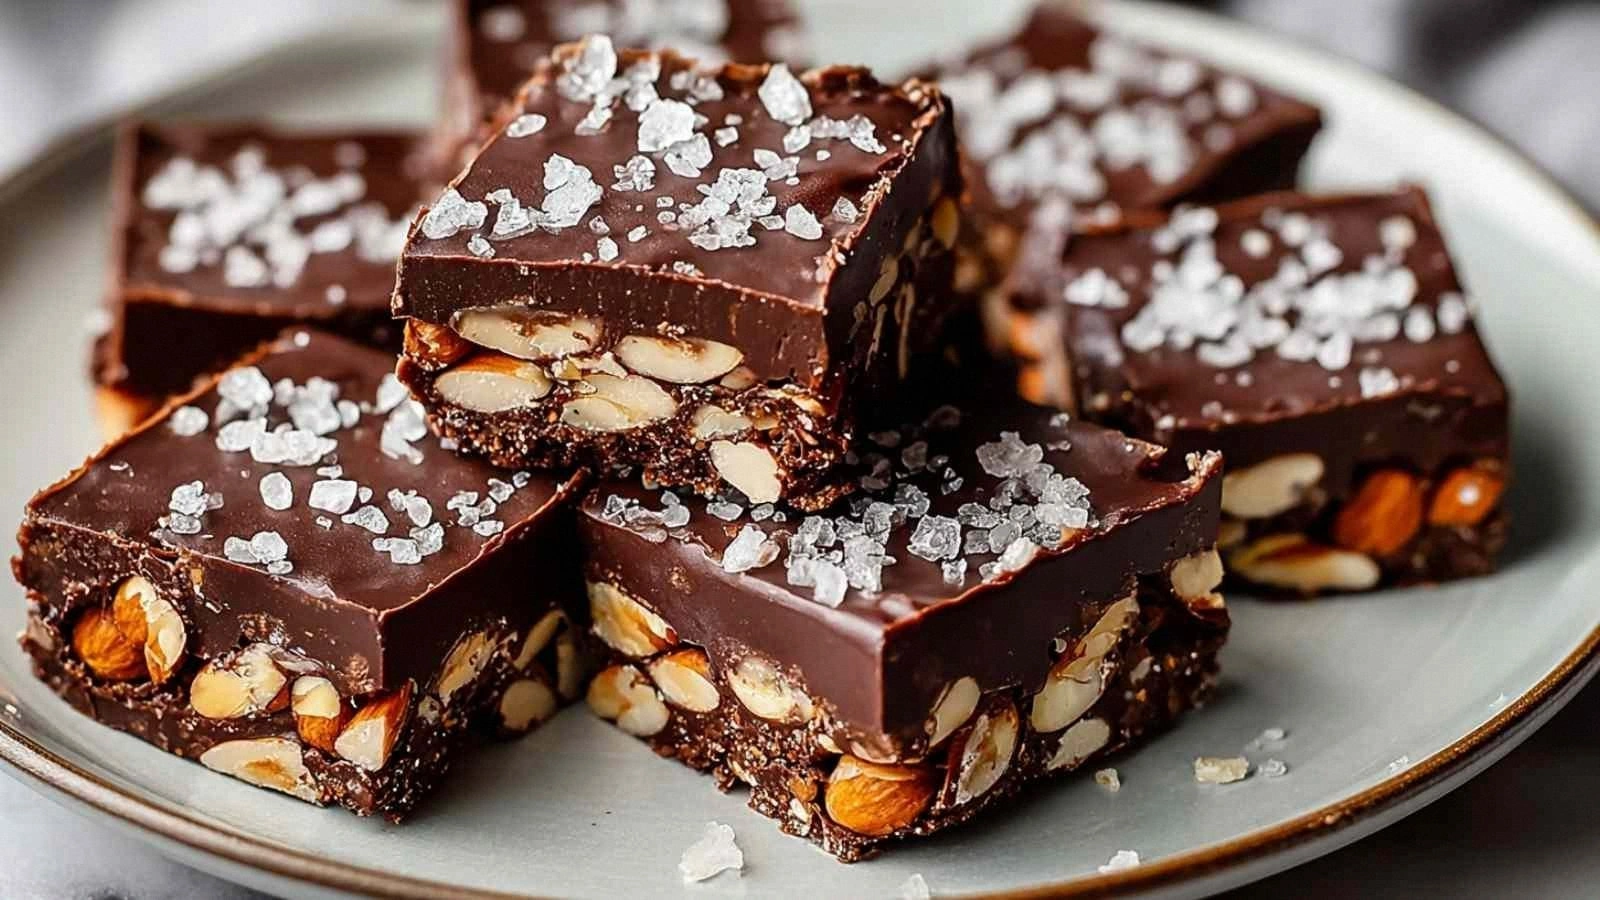
- Flavor: The combination of dark chocolate and honey creates a depth that feels like a chocolate‑oat forest with a caramelized bark. The sea salt is not just a garnish; it acts as a flavor enhancer that brings the chocolate’s bitterness into balance. The vanilla extract adds a subtle floral note that lifts the entire profile, making each bite feel more complex.
- Texture: The toasted oats give a satisfying chew that contrasts with the crunchy nuts, while the chocolate forms a smooth, glossy coating. The bars snap when you break them, yet they stay cohesive, thanks to the right amount of coconut oil that keeps everything bound. The result is a bar that feels like a piece of chocolate cake, but with a nutty crunch.
- Ingredient Quality: Using high‑quality dark chocolate (70% cacao or higher) ensures a rich, bittersweet base that doesn’t rely on added sugar. The honey is raw, preserving its natural enzymes, while the sea salt is flaky, adding both texture and an aromatic burst. The oats are rolled, not instant, for a heartier chew.
- Make‑Ahead Potential: These bars keep well for a week in an airtight container at room temperature, making them perfect for a packed lunch or a quick snack on the go. They also freeze beautifully, so you can prepare a batch in advance and pop them out when you need a sweet fix.
- Ease of Prep: No baking is required—just melt, mix, press, and chill. The process is quick, and the ingredients are pantry staples that you probably already own. Even beginners can follow along without feeling overwhelmed.
- Visual Appeal: The glossy chocolate coating gives the bars a professional look, while the nuts provide a natural color contrast that looks Instagram‑ready. The bars are cut into neat squares, making them easy to share or portion.
- Health Angle: While indulgent, these bars still offer a good amount of protein from the nuts and oats, and the honey provides a natural sweetener that is gentler on the blood sugar than refined sugar. The coconut oil adds healthy fats, and the sea salt keeps sodium in check.
Inside the Ingredient List
The Flavor Base
Dark chocolate chips are the heart of this recipe. They provide the deep, bittersweet foundation that balances the honey’s natural sweetness. If you’re looking for a richer flavor, swap the chips for a 70% cacao bar, chopped into small pieces. Skipping the chocolate entirely will leave the bars bland and lacking that glossy sheen that makes them look professional.
The Texture Crew
Rolled oats add a chewy, hearty texture that keeps the bars from becoming too soft. They also absorb the honey, creating a sticky matrix that holds everything together. If you prefer a smoother bite, you can pulse the oats in a food processor until they reach a coarse flour consistency, but you’ll lose some of that satisfying chew.
The Unexpected Star
Mixed nuts bring a burst of crunch and a nutty flavor that complements the chocolate. Choose a mix of almonds, walnuts, and pecans for a balanced profile, or add cashews for a sweeter note. If you’re allergic or simply don’t like nuts, replace them with sunflower seeds or pumpkin seeds for a nut-free version.
The Final Flourish
Sea salt is more than a seasoning; it’s a flavor enhancer that brings out the chocolate’s bitterness and balances the honey’s sweetness. A pinch of flaky sea salt on top of the bars gives a subtle crunch and a burst of flavor with each bite. If you’re watching sodium, use a lower‑sodium sea salt or reduce the amount to one‑quarter teaspoon.
Everything’s prepped? Good. Let’s get into the real action.
The Method — Step by Step
- First, line a 9x9 inch square pan with parchment paper, leaving a little overhang on the sides for easy removal. The parchment not only prevents sticking but also makes cleanup a breeze. While you’re setting the pan, gather your ingredients and place them in a large mixing bowl. This is the moment of truth, so keep your focus sharp. Once the pan is ready, the stage is set for the magic to happen.
- In a microwave‑safe bowl, combine the dark chocolate chips and coconut oil. Microwave on medium power for 30 seconds, stir, then repeat until the mixture is completely melted and silky. The chocolate should look glossy and smooth—no lumps. If you’re using a double boiler, heat the chocolate gently until it’s melted, then let it cool slightly before adding the next ingredient. The key is to avoid overheating, which can cause the chocolate to seize.
- Add the honey (or maple syrup) to the melted chocolate, stirring until the mixture is homogeneous. The honey should blend in seamlessly, creating a glossy glaze that coats every grain of oat. If you’re using maple syrup, the flavor will be slightly sweeter, but the chocolate will still dominate. Taste a small spoonful; it should be sweet enough to balance the bitterness of the chocolate without being cloying.
- Stir in the vanilla extract, followed by the sea salt. The vanilla adds a subtle floral note that lifts the chocolate, while the salt brings depth and a subtle crunch. Mix until the salt is evenly distributed; this ensures each bite has a consistent flavor profile. If you prefer a more pronounced salty kick, add a little extra salt, but be careful not to overdo it.
- Fold in the rolled oats, making sure every oat is coated with the chocolate glaze. The oats should be evenly distributed; if you see clumps, gently break them up with a spoon. The oats absorb the honey, creating a sticky matrix that binds the nuts and chocolate together. This step is crucial for the bars to hold their shape once set.
- Add the mixed nuts to the bowl and gently stir until they are fully coated. The nuts should be evenly distributed and coated with the glossy mixture. If you’re using larger nuts, consider chopping them into smaller pieces for a more even bite. This step ensures the nuts’ crunch is balanced with the chocolate’s smoothness.
- Transfer the mixture into the prepared pan, pressing it down firmly with a spatula or the back of a spoon. The more you press, the more compact the bars will be, which helps them stay together when sliced. Smooth the top with a flat edge to create an even surface. This is a good time to tap the pan gently on the counter to remove any air pockets.
- Place the pan in the refrigerator for at least 30 minutes, or until the mixture is firm enough to cut into bars. The cold temperature will set the chocolate and help the nuts and oats bind together. If you’re in a hurry, you can pop it in the freezer for 10 minutes, but watch it closely to avoid over‑hardening.
- Once set, lift the whole slab out of the pan using the parchment overhang, then cut into squares or bars using a sharp knife. A small amount of parchment will help keep the bars from sticking. If the bars feel sticky, let them rest for a few minutes to firm up. This step is where the bars get their final shape and look.
- Store the bars in an airtight container at room temperature for up to a week, or freeze them for longer storage. If you’re freezing, wrap each bar individually in parchment or wax paper before placing them in a freezer bag. When you’re ready to eat, let them sit at room temperature for a few minutes so the chocolate softens slightly, enhancing the flavor.
That’s it—you did it. But hold on, I’ve got a few more tricks that will take this to another level. These insider tips will help you avoid the most common mishaps and elevate the flavor profile even further. Get ready to become a nut‑bar master.
Insider Tricks for Flawless Results
The Temperature Rule Nobody Follows
Chocolate is temperamental; if it’s too hot, it can seize and become dull. The trick is to melt the chocolate just until it’s liquid, then let it cool slightly before adding the honey. A quick test: dip a spoon into the mixture; if the chocolate coats the spoon and then stays on it without dripping, you’ve reached the sweet spot. I’ve seen people over‑melt it, resulting in a chalky texture that feels like a bad chocolate bar.
Why Your Nose Knows Best
The aroma of toasted oats is a subtle indicator that the oats are ready to bind. As soon as the oats begin to smell nutty, it’s time to add them to the mixture. If you’re waiting too long, the oats can become overly dry, and the bars will crumble. Trust your nose; it’s a better guide than the clock.
The 5‑Minute Rest That Changes Everything
After pressing the mixture into the pan, let it rest for 5 minutes before refrigerating. This brief pause allows the chocolate to set slightly, reducing the chance of the mixture sliding when you press it down. I’ve seen bars that were too soft before chilling, and the result was a messy slab that didn’t hold its shape.
Pressing Technique for Perfect Bars
Use a flat edge of a spatula or a piece of parchment paper to press down firmly. The pressure should be even across the surface, creating a uniform thickness. If you press too lightly, the bars will be uneven and may split when you cut them. A firm press also helps the nuts settle into the chocolate matrix.
Avoiding the Sticky Mess
If the mixture feels sticky, chill it for an additional 10 minutes. Sticky bars can be difficult to cut cleanly, and the texture may feel gummy. Adding a pinch of extra oats can absorb some of the excess moisture, but this may alter the ratio slightly.
Storing Tips for Longevity
Keep the bars in an airtight container with a small piece of parchment paper between each layer. This prevents them from sticking together and keeps the chocolate from absorbing odors from the fridge. If you’re storing them in the freezer, wrap each bar individually in wax paper to preserve its texture.
Creative Twists and Variations
This recipe is a playground. Here are some of my favorite ways to switch things up:
Coconut‑Infused Bars
Add shredded coconut to the oats for a tropical twist. The coconut adds a subtle sweetness and a chewy texture that pairs well with the dark chocolate. Toast the coconut lightly before mixing to enhance its flavor.
Spiced Nut Bars
Stir in a pinch of cinnamon or cayenne pepper for a warm, spicy kick. The spice complements the chocolate’s bitterness and adds a layer of complexity. Use a small amount—one‑quarter teaspoon is enough to make a difference.
Almond‑Butter Swirl
Swirl a spoonful of almond butter into the mixture before pressing it into the pan. The almond butter creates a marbled effect and adds a creamy, nutty flavor that contrasts with the crunchy nuts. Make sure to melt the almond butter slightly so it blends smoothly.
Chocolate‑Mint Bars
Add a few drops of peppermint extract to the chocolate glaze for a minty finish. The mint pairs beautifully with the dark chocolate and gives the bars a refreshing aftertaste. Keep the extract minimal; too much can overpower the chocolate.
Berry‑Burst Bars
Fold in dried cranberries or chopped dried apricots for a fruity burst of flavor. The dried fruit adds natural sweetness and a chewy texture that contrasts with the nuts. If using dried fruit, soak it briefly in warm water to plump it up.
Salted Caramel Bars
Replace the honey with salted caramel sauce for a rich, buttery flavor. The caramel adds depth and a silky texture that complements the chocolate. Use a high‑quality caramel sauce for the best results.
Storing and Bringing It Back to Life
Fridge Storage
Store the bars in an airtight container at room temperature for up to a week. The airtight seal prevents the bars from drying out and preserves the chocolate’s glossy finish. Keep the container in a cool, dry place away from direct sunlight.
Freezer Friendly
Wrap each bar individually in parchment paper and place them in a freezer bag. Freeze for up to 3 months for the best texture. When you’re ready to enjoy, let them thaw at room temperature for 10‑15 minutes.
Best Reheating Method
To revive a frozen bar, place it on a microwave‑safe plate and heat on low for 10‑15 seconds. If the bar feels too hard, add a tiny splash of water before reheating to steam it back to perfection. The moisture helps the chocolate soften without becoming mushy.