Picture this: a quiet Sunday morning, the kitchen humming with the gentle clatter of pots, and you’re staring at a stack of thick‑cut bread that has somehow become the centerpiece of your breakfast ambitions. You’re craving something that’s both comforting and daring, a sandwich that feels like a hug wrapped in caramelized butter and a hint of sweetness. I’ve been chasing that sensation for months, swapping out the usual chicken sandwich for something that feels like a breakfast‑for‑dinner hack, and when I finally landed on this French Toast Chicken Sandwich, I knew it was a game‑changer. The moment the bread hit the skillet, the scent of toasted sugar and savory chicken mingled, and I swear the kitchen felt like a small, cozy theater of flavor.
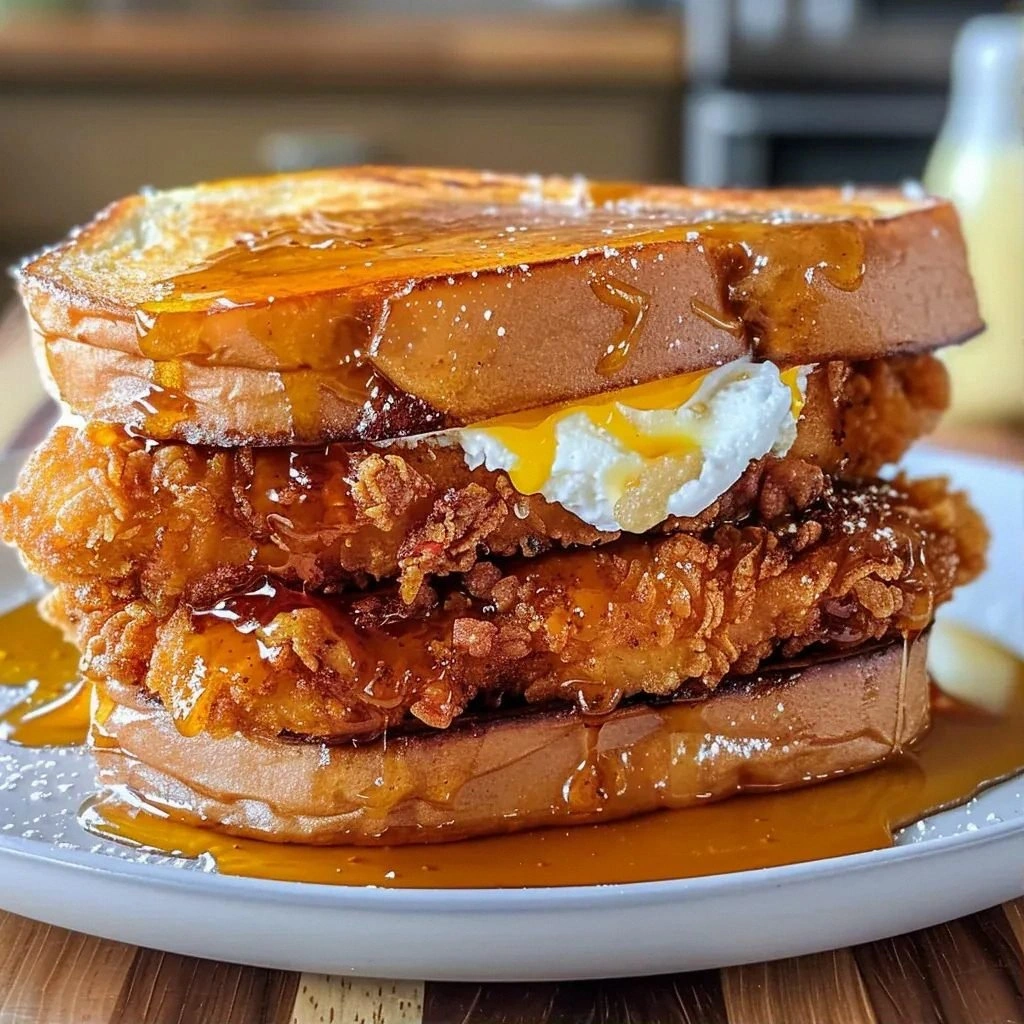
It’s a recipe that marries the classic comfort of French toast with the hearty punch of a chicken sandwich, turning an ordinary lunch into a headline act. Think of the bread—soft, buttery, and slightly sweet—embracing a juicy, seasoned chicken breast that’s been marinated in buttermilk and a blend of spices that give it a subtle heat. Then there’s the finishing touch: a drizzle of maple syrup, a dusting of powdered sugar, and a scoop of whipped cream that turns the whole thing into a dessert‑savored delight. If you’ve ever been tempted to settle for a plain grilled chicken sandwich, this version will make you question why you ever did.
What sets this version apart is not just the bold flavor profile but the technique that elevates every component. The chicken is first marinated in buttermilk, which tenderizes it while adding a tangy depth that cuts through the richness of the bread. The bread is dipped in a custard of eggs, milk, and vanilla, then lightly coated in flour before it hits the pan, creating a golden, crisp exterior that holds up against the juicy filling. And the final flourish? A generous pour of maple syrup that caramelizes into a glaze, turning the sandwich into a showstopper that’s as visually stunning as it is delicious. I dare you to taste this and not go back for seconds.
I’ve spent countless evenings experimenting with variations—adding a sprinkle of smoked paprika, swapping the bread for brioche, or even layering a slice of cheddar between the chicken and bread. Each tweak only deepens the flavor profile and confirms that this isn’t just a sandwich; it’s a culinary statement. And the best part? The process is straightforward enough that even a kitchen rookie can pull it off, while seasoned cooks will find new layers of complexity to savor. Stay with me here—this is worth it.
What Makes This Version Stand Out
- Flavor: The buttermilk marination infuses the chicken with a subtle tang that balances the sweetness of the maple glaze, creating a harmony that’s hard to resist.
- Texture: The flour coating on the bread turns the exterior into a crisp, golden shell that contrasts beautifully with the tender, juicy interior.
- Ease: Every step is designed to be intuitive, from the simple spice rub to the two‑step bread coating, making the recipe accessible for cooks of all skill levels.
- Visual Appeal: The golden crust, the glossy maple glaze, and the dusting of powdered sugar make it a feast for the eyes—perfect for Instagram-worthy brunches.
- Make‑Ahead Potential: The chicken can be marinated and even pre‑cooked ahead of time, allowing you to assemble the sandwich on the fly.
- Versatility: Swap the bread for croissants, add a slice of cheese, or top with fresh fruit—each variation opens a new flavor dimension.
Alright, let’s break down exactly what goes into this masterpiece...
Inside the Ingredient List
The Flavor Base
The foundation of this sandwich begins with the buttermilk and spice blend that bathes the chicken. Buttermilk is more than a wetting agent; its acidity tenderizes the meat, breaking down proteins and creating a melt‑in‑your‑mouth texture. Add the paprika, garlic powder, onion powder, salt, and black pepper, and you have a seasoning that’s both earthy and aromatic. If you’re in a hurry, a splash of Worcestershire sauce can replace the buttermilk for a slightly different depth of umami, though the classic tang will be missing.
The Texture Crew
Flour, breadcrumbs, and eggs form the textural backbone of this sandwich. The flour creates a light, airy coating that crisps up when fried, while the breadcrumbs add an extra crunch that lingers. Eggs bind everything together, turning the bread into a custard‑like shell that holds the chicken and syrup. For a gluten‑free version, swap the all‑purpose flour for a rice or almond flour blend, and use panko breadcrumbs to keep that satisfying crunch.
The Unexpected Star
Vanilla extract is the secret sweet whisper that elevates the custard batter, giving the bread a subtle, aromatic warmth that complements the maple glaze. This isn’t a dessert ingredient, but it’s the missing link that ties the sweet and savory together. If you’re looking for a twist, try replacing vanilla with almond extract for a nutty undertone that pairs beautifully with the maple syrup.
The Final Flourish
The finishing touches—maple syrup, powdered sugar, fresh fruit, and whipped cream—transform this sandwich into a decadent brunch staple. Maple syrup caramelizes into a glossy glaze that coats the bread, while the powdered sugar adds a delicate dusting that looks almost ethereal. Fresh fruit brings a burst of acidity that cuts through the richness, and a dollop of whipped cream turns the dish into a dessert‑like indulgence. If you prefer a lower‑calorie option, skip the whipped cream and add a splash of fresh orange juice to keep the dish bright.
Everything's prepped? Good. Let's get into the real action...
The Method — Step by Step
- Marinate the Chicken: In a shallow dish, combine the buttermilk, paprika, garlic powder, onion powder, salt, and black pepper. Add the chicken breasts, ensuring they’re fully submerged. Cover and refrigerate for at least 30 minutes, or up to 4 hours for deeper flavor. The longer you let them soak, the more tender they’ll become.
- Prepare the Bread Coating: In a shallow bowl, whisk together the eggs, milk, and vanilla extract until smooth. In another bowl, spread the flour evenly. In a third bowl, place the breadcrumbs. These three stations will be used in sequence to coat each slice.
- Heat the Skillet: Place a large non‑stick skillet over medium heat and add 1 tablespoon of butter. Allow it to melt until it starts to bubble but not brown. This creates a golden base for the bread.
- Coat the Bread: Remove a slice of bread from the stack and pat it dry with a paper towel. Dredge it in flour, tapping off excess, then dip it in the egg mixture, letting the excess drip back into the bowl, and finally coat it with breadcrumbs. Repeat for all eight slices. The flour creates a barrier that keeps the bread from becoming soggy.
- Cook the Bread: Place the coated slices onto the skillet in batches, making sure not to crowd them. Cook for 2–3 minutes on each side or until a golden brown crust forms. The bread should emit a nutty aroma and feel firm to the touch. If you’re cooking multiple batches, keep the cooked bread warm in a 200°F oven.
- Cook the Chicken: In a separate pan, heat the remaining butter over medium‑high heat. Add the marinated chicken breasts and cook for 5–6 minutes on each side, or until the internal temperature reaches 165°F. The chicken will develop a caramelized crust that locks in juices.
- Assemble the Sandwich: Lay a slice of toasted bread on a plate. Place a cooked chicken breast on top, then drizzle with maple syrup. Add a second slice of bread, then repeat the process to create a double‑layered sandwich. Finish by dusting with powdered sugar and adding a few fresh berries if desired.
- Optional Creamy Finish: If you love a dessert twist, top the sandwich with a dollop of whipped cream before serving. The cream melts into the warm sandwich, creating a velvety finish that’s simply irresistible.
- Serve Immediately: The sandwich is best enjoyed hot, with the crust still crisp and the syrup still glossy. The contrast between the warm bread, juicy chicken, and sweet glaze makes every bite a moment of pure delight.
That's it — you did it. But hold on, I've got a few more tricks that'll take this to another level...
Insider Tricks for Flawless Results
The Temperature Rule Nobody Follows
Maintaining the right skillet temperature is crucial. If the pan is too hot, the bread will brown too quickly and become dry; if too low, it will soak up butter and lose its crispness. Use a thermometer or simply drop a small amount of water into the pan—if it sizzles and evaporates instantly, you’re at the sweet spot.
Why Your Nose Knows Best
Smell is your best ally. A properly cooked sandwich will emit a caramelized aroma that’s sweet yet savory. If you notice a metallic or burnt scent, reduce the heat immediately. Your nose will guide you to the perfect balance.
The 5‑Minute Rest That Changes Everything
After cooking the chicken, let it rest for 5 minutes before slicing. This allows the juices to redistribute, ensuring each bite is moist and flavorful. Skipping this step often results in dry, stringy meat.
The Quick Butter Trick
Instead of melting butter in the skillet, add a small pat of butter to the bread just before flipping. This creates a glossy finish and a buttery crunch that’s hard to replicate with just oil.
The Sweet‑Savory Balance
If you’re not a fan of heavy sweetness, reduce the maple syrup to half a tablespoon or replace it with a drizzle of honey. The key is to maintain the contrast between sweet and savory; too much sweetness will drown the chicken’s flavor.
Creative Twists and Variations
This recipe is a playground. Here are some of my favorite ways to switch things up:
Brioche Bliss
Swap the thick‑cut bread for brioche buns. Their buttery richness complements the chicken and syrup, turning the sandwich into a decadent brunch treat that’s perfect for a special occasion.
Cheesy Layer
Add a slice of aged cheddar or provolone between the bread and chicken. The cheese melts into a gooey center that adds a savory depth and a delightful gooey texture.
Spicy Kick
Incorporate a dash of sriracha or a sprinkle of cayenne pepper into the buttermilk bath. The heat will contrast beautifully with the sweet maple glaze, giving each bite a memorable bite.
Fruit‑Infused Finish
Top the sandwich with fresh blueberries or sliced strawberries before adding the whipped cream. The fruit’s natural acidity brightens the dish, creating a balanced flavor profile.
Gluten‑Free Option
Use a gluten‑free bread or a mixture of almond and oat flour for the coating. The result is a sandwich that’s still crispy and flavorful, yet suitable for those with dietary restrictions.
Savory‑Sweet Breakfast Bowl
Slice the sandwich into bite‑size pieces and serve them in a bowl with a drizzle of maple syrup and a sprinkle of powdered sugar. It’s a playful way to enjoy the same flavors without the sandwich structure.
Storing and Bringing It Back to Life
Fridge Storage
Store assembled sandwiches in an airtight container at 40°F or below. They’ll keep for up to 2 days, but for the best texture, reheat them within 24 hours. The bread may soften slightly, so reheat quickly to regain crispness.
Freezer Friendly
Wrap each sandwich in parchment paper and place them in a freezer bag. They can be frozen for up to 3 months. When ready to eat, thaw overnight in the fridge and reheat in a skillet or oven at 350°F for 10 minutes.
Best Reheating Method
The secret to restoring the sandwich’s original crunch is to reheat it in a pre‑heated skillet with a small amount of butter. Add a splash of water to create steam, cover, and let it heat for 2–3 minutes per side. A tiny splash of water before reheating steams the bread back to perfection, preventing it from drying out.