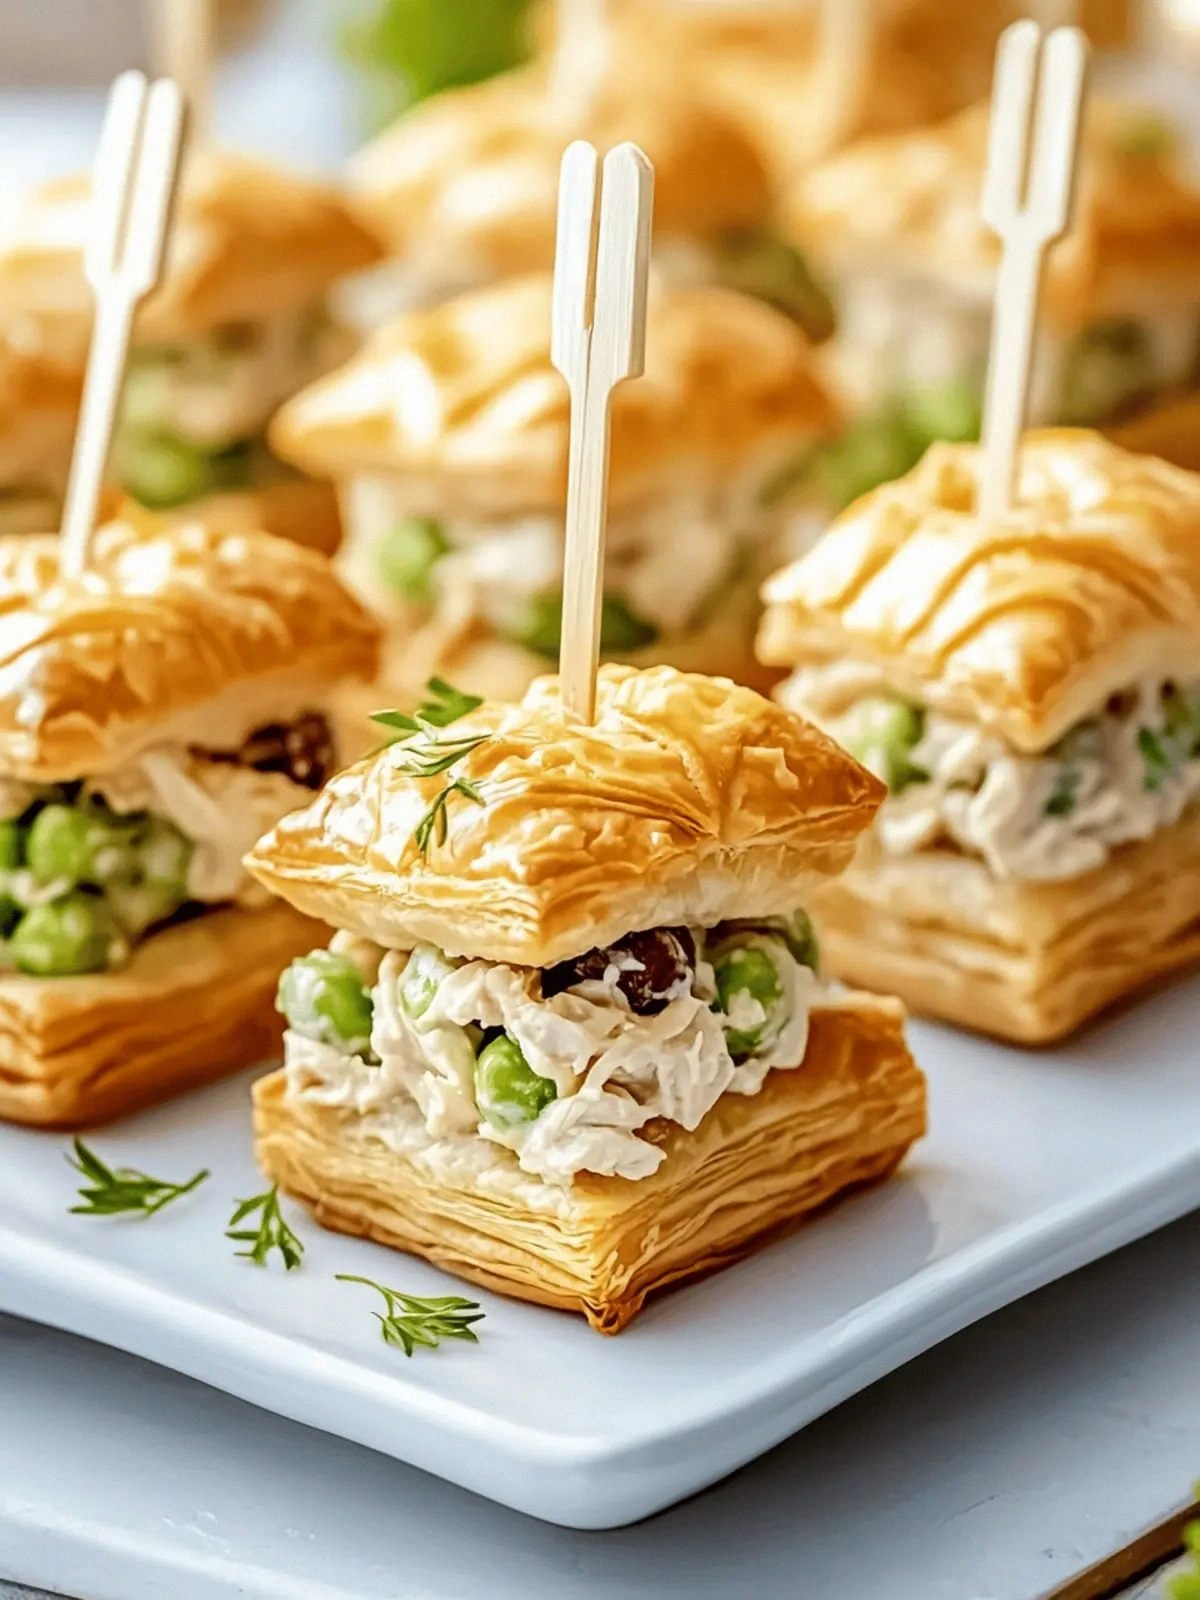
I still remember that night when the kitchen turned into a battlefield. A friend dared me to turn an ordinary chicken salad into something that would make people ask for the recipe at the next gathering. I stared at the leftover chicken, a handful of grapes, and a crumbling puff pastry sheet, thinking, “What if I just throw everything together?” The result? A fluffy, golden puff that crackles like fresh popcorn, stuffed with a salad so bright it practically glows. The first bite was a revelation: the buttery pastry hugging a crisp, tangy filling that sang with every forkful. I was instantly hooked, and the next thing I knew, I was scrambling to perfect the method, tweak the seasoning, and add a secret ingredient that makes this version stand out from every other chicken salad puff out there.
Imagine walking into your kitchen, the scent of butter melting and grapes releasing a sweet, almost floral aroma. The sound of the pastry crackling as it bakes is like a tiny applause from the oven. You see the golden edges, the steam rising like a gentle mist, and you know you’re about to create something that’s both comforting and exciting. The first bite delivers a buttery crunch followed by a burst of juicy grapes and a subtle hint of onion that lifts the flavor profile. If you’ve ever struggled to find the right balance between savory and sweet in a party appetizer, you’re not alone — and I’ve got the fix. Picture yourself pulling these out of the oven, the whole kitchen smelling incredible, and watching guests line up for the first bite. I dare you to taste this and not go back for seconds.
What makes this version hands down the best you’ll ever make at home? It’s not just the ingredients; it’s the technique, the timing, and the little touches that elevate a simple dish into a showstopper. I’ve spent hours testing different pastry types, seasoning blends, and assembly methods to find the perfect balance. The result is a puff that’s crispy on the outside, airy on the inside, and packed with a salad that’s vibrant and refreshing. Most recipes get this completely wrong by overcooking the filling or under-seasoning the pastry. Here’s what actually works: a quick sauté of onions and celery, a splash of lemon juice to brighten the grapes, and a dash of Tony’s Seasoning to give that extra kick. And the best part? It’s make‑ahead friendly, so you can prep a batch and have it ready to serve in minutes.
I’ll be honest — I ate half the batch before anyone else got a taste. The texture was so addictive that I kept reaching for more. This recipe is a playground for flavor and texture, and the next part? Pure magic. And now the fun part. Stay with me here — this is worth it. Let me walk you through every single step — by the end, you’ll wonder how you ever made it any other way.
What Makes This Version Stand Out
- Taste: The combination of sweet grapes and savory chicken creates a flavor profile that dances on the palate. The peppery undertone from Tony’s Seasoning adds a subtle depth that elevates each bite. It’s a harmony that feels both familiar and exciting.
- Texture: The puff pastry is a crispy shell that gives way to a light, airy filling. The celery adds a satisfying crunch, while the grapes provide a juicy burst. Together, they form a symphony of textures that keeps guests coming back.
- Simplicity: With only six core ingredients, this dish is quick to assemble and even quicker to bake. No complicated sauces or long prep times. It’s the perfect solution when you need to impress without spending hours in the kitchen.
- Uniqueness: The use of grapes in a chicken salad puff is a surprising twist that sets this recipe apart. Most chicken salad recipes rely on crunchy nuts or apples; grapes add a sweet, juicy contrast that feels fresh and unexpected.
- Crowd Reaction: At parties, these puffs become the star of the table. Their golden color and inviting aroma draw people in, and the bite-size nature makes them perfect for sharing. Guests often ask for the recipe after tasting.
- Ingredient Quality: Fresh, high‑quality chicken breasts and crisp celery make a noticeable difference. Using a reputable puff pastry brand ensures a flaky, buttery result that can’t be beat. The better the ingredients, the better the final product.
- Cooking Method: Baking at the right temperature with a quick glaze gives the pastry a beautiful shine and a satisfying crunch. The method is straightforward yet produces a professional finish.
- Make‑Ahead Potential: Assemble the puff shapes ahead of time, refrigerate, and bake just before serving. This flexibility makes it ideal for events where you want to minimize last‑minute prep.
Alright, let’s break down exactly what goes into this masterpiece…
Inside the Ingredient List
The Flavor Base
The heart of this dish is the chicken salad itself. Cooked chicken breasts, shredded or finely chopped, provide a lean protein that keeps the puff light and airy. Adding a splash of lemon juice brightens the flavors and prevents the chicken from drying out during baking. If you skip the lemon, the filling can become flat and less vibrant.
The Texture Crew
Celery isn’t just a garnish; it’s the crunch factor that gives the puff a lively bite. The fibrous texture of celery cuts through the softness of the pastry, creating a balanced mouthfeel. If you’re in a hurry, finely diced celery will mix more evenly, but be careful not to over‑muddle it, or the mixture will become soggy.
The Unexpected Star
Grapes are the secret weapon that makes this puff stand out. Their juicy burst of sweetness offsets the savory chicken and adds a pop of color that makes the dish visually stunning. If you can’t find fresh grapes, frozen grapes work too, but thaw them first to avoid excess moisture.
The Final Flourish
Mayonnaise and onion create a creamy, flavorful base that binds everything together. The mayo adds moisture, preventing the puff from becoming dry during baking, while the onion adds a subtle sharpness that cuts through the richness. A pinch of salt and a dash of Tony’s Seasoning complete the flavor profile, giving a savory finish that lingers on the tongue.
Everything’s prepped? Good. Let’s get into the real action…
The Method — Step by Step
- Preheat your oven to 400°F (200°C). Line a baking sheet with parchment paper to prevent sticking. This step ensures an even bake and a golden finish. The first time you bake, keep an eye on the pastry edges; they should puff up quickly and turn a beautiful golden brown.
- If your puff pastry is slightly thawed, roll it out on a lightly floured surface to a thickness of about 1/8 inch. Cut the dough into 2-inch squares, using a pizza cutter or a sharp knife. The uniform size helps them bake evenly and keeps the filling ratio consistent.
- In a large bowl, combine shredded chicken, diced celery, halved grapes, and minced onion. Toss gently with mayonnaise, ensuring every piece is coated. The mayo not only adds moisture but also creates a silky texture that holds the puff together. A pinch of salt and a sprinkle of Tony’s Seasoning bring the flavors together.
- Spoon a generous amount of the chicken mixture onto the center of each pastry square. Be careful not to overfill; the pastry should still be able to fold over the filling without breaking. The goal is a snug, but not overly tight, pocket.
- Fold each square into a triangle or half‑moon shape, sealing the edges by pressing them together. Use a fork to crimp the edges, ensuring a tight seal that prevents the filling from leaking during baking. The crimped edges also give a rustic, homemade look.
- Place the puffs on the prepared baking sheet, spacing them about 1 inch apart. Brush the tops lightly with a beaten egg or milk for a glossy finish. This step also adds a subtle golden sheen that makes the puffs visually appealing.
- Bake for 15–18 minutes, or until the pastry is puffed, golden, and crisp. The filling should be hot and steamy, indicating that the chicken is fully warmed through. If the edges brown too quickly, lower the oven temperature slightly to avoid burning.
- Let the puffs cool on a wire rack for a few minutes before serving. This cooling period allows the pastry to set, preventing the filling from leaking out when you cut into them. Serve warm or at room temperature, depending on your preference.
That’s it — you did it. But hold on, I've got a few more tricks that'll take this to another level...
Insider Tricks for Flawless Results
The Temperature Rule Nobody Follows
Baking at the exact right temperature is key to achieving that perfect golden puff. Too hot, and the pastry will brown before the filling heats through; too cool, and the puff won’t rise. I recommend setting your oven to 400°F (200°C) and using a preheated baking sheet. This ensures a consistent rise and a crisp, flaky crust.
Why Your Nose Knows Best
As the puffs bake, your nose will alert you to the perfect moment. The scent of butter and roasted grapes is a clear indicator that the pastry is golden and the filling is hot. If the aroma feels flat, give them a few more minutes. Trust your senses; they’re the best judge of doneness.
The 5-Minute Rest That Changes Everything
After baking, let the puffs rest on a wire rack for five minutes. This resting period allows the steam inside to dissipate, preventing sogginess. It also gives the pastry a chance to set, ensuring that when you slice into them, the filling stays in place. A friend once skipped this step and ended up with a soggy puff that fell apart.
Seasoning Secrets
Tony’s Seasoning adds depth without overpowering the delicate flavors. If you can’t find it, a blend of paprika, garlic powder, and a pinch of cayenne works wonders. The key is to season the filling lightly, then taste before baking. Adjust if needed; the filling will absorb the flavors during the bake.
Make-Ahead Mastery
To make these puffs ahead of time, assemble and refrigerate them for up to 24 hours. When ready to serve, bake them at 400°F for 18–20 minutes. The pastry remains crisp, and the filling stays moist. This technique is perfect for large gatherings or when you want to reduce last‑minute prep.
Serving Suggestion
Serve the puffs warm on a platter with a small bowl of extra mayo or a light yogurt dip. The dip adds a creamy contrast that enhances the grape’s sweetness. Pair them with a crisp white wine or a sparkling rosé for a complete party experience.
Creative Twists and Variations
This recipe is a playground. Here are some of my favorite ways to switch things up:
Avocado Kick
Add diced avocado to the filling for a creamy texture and a boost of healthy fats. The avocado pairs beautifully with the grapes, creating a subtle, buttery flavor that complements the chicken.
Herb Infusion
Stir in fresh chopped basil or parsley for an herbal note that brightens the dish. The herbs add a pop of color and a fresh aroma that elevates the overall experience.
Spicy Twist
Mix in a tablespoon of sriracha or a pinch of crushed red pepper flakes to give the puff a fiery kick. The heat balances the sweetness of the grapes and adds an exciting layer of flavor.
Cheesy Surprise
Fold in a tablespoon of shredded mozzarella or cheddar into the filling before sealing the pastry. The cheese melts into a gooey center that contrasts with the crisp pastry.
Smoky Flavor
Add a dash of smoked paprika or a sprinkle of chipotle powder to the chicken mixture. The smoky undertones deepen the overall profile and bring a savory edge.
Mini Puffs
Cut the pastry into smaller squares and fold them into bite‑size triangles. These mini puffs are perfect for finger‑food parties and allow guests to sample multiple flavors in one bite.
Storing and Bringing It Back to Life
Fridge Storage
Store cooked puffs in an airtight container in the refrigerator for up to 3 days. The pastry may lose some crispness, but they remain tasty and convenient for quick meals or snacks. Keep them away from moisture to maintain texture.
Freezer Friendly
Freeze uncooked puffs on a parchment‑lined tray for up to 2 weeks. Once frozen, transfer them to a freezer bag. When ready to bake, place them directly from the freezer into a preheated oven for 20 minutes. The pastry will puff up nicely, and the filling stays moist.
Best Reheating Method
Reheat puffs in a 350°F oven for 5–7 minutes, or until the pastry is crisp and the filling is hot. Add a tiny splash of water before reheating to create steam, which helps the pastry regain its flakiness. Avoid microwaving, as it can make the pastry soggy.