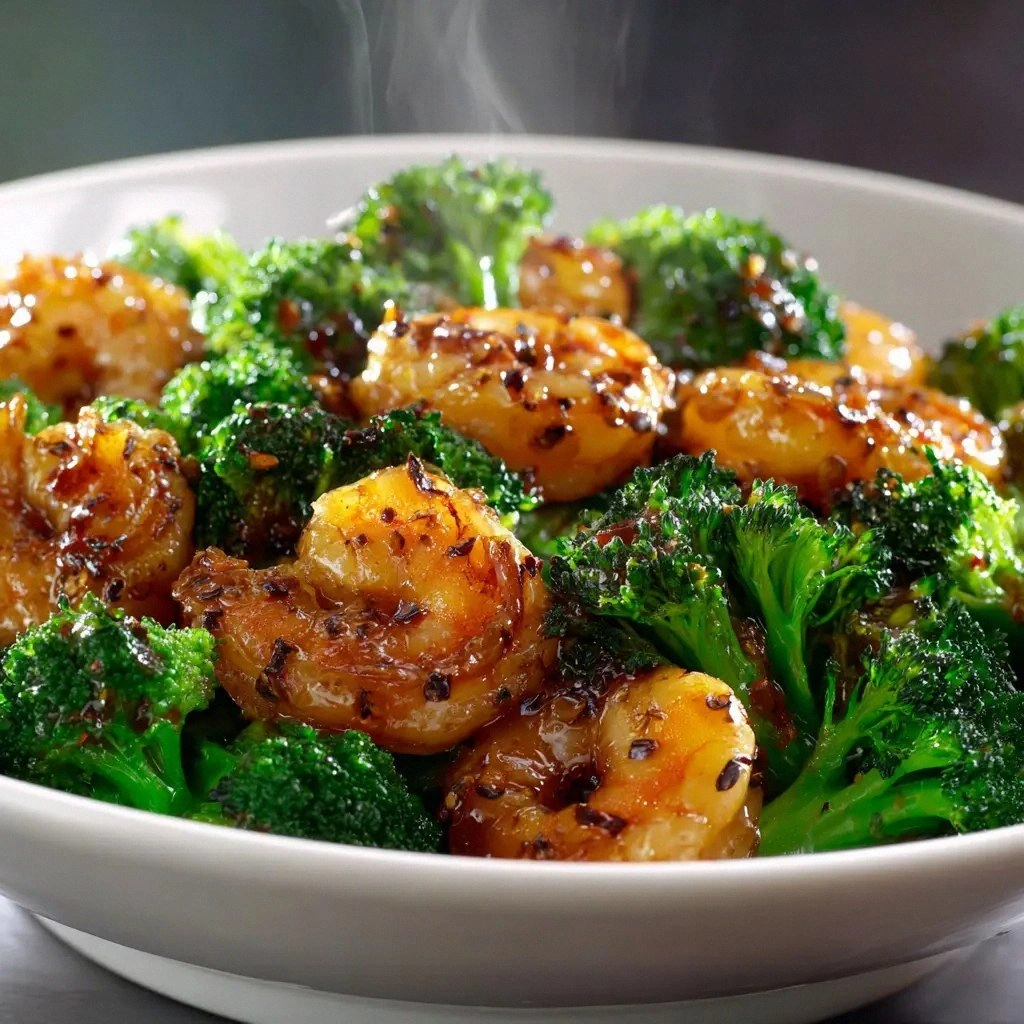
High-Protein Honey Garlic Shri
Picture this: I’m halfway through a busy week, the clock is ticking, and my stomach is screaming for something that’s both comforting and protein‑packed. I stare at the fridge, eyes darting over the shrimp that have been chilling there for days, and I think, “Why not make a quick, high‑protein dinner that feels like a cheat‑day treat?” I’ve tried every version of honey garlic shrimp out there, and each one fell short—either too sweet, too greasy, or lacking that satisfying bite that makes you want to eat a second plate. That’s when I decided to take a stand, re‑imagine the classic, and give it a high‑protein, low‑carb makeover that will have you begging for seconds.
The kitchen becomes a laboratory when you’re chasing that perfect flavor profile. The aroma of garlic sizzling in olive oil is the first signal that the transformation is underway. I can almost taste the glossy, caramelized glaze that will coat the shrimp like a velvet cloak, the honey’s subtle sweetness dancing with the umami punch of soy sauce. The sound of the shrimp popping in the pan is music to my ears—a crisp pop that signals the moment of truth. If you’ve ever felt the frustration of a shrimp that turns rubbery before the sauce even has a chance to work its magic, you’ll feel the relief of this method.
What sets this version apart isn’t just the ingredient list; it’s the philosophy behind each step. I’m not just tossing shrimp into a pan; I’m orchestrating a symphony of textures, from the buttery crunch of the sear to the silky finish of the sauce. The sauce itself is engineered to cling to the shrimp, delivering a burst of flavor with every bite. And because I’m aiming for high protein, I keep the carb load moderate, letting the honey shine without drowning the dish. I dare you to taste this and not go back for seconds; the combination of sweet, salty, and savory will have you reaching for more.
Let me walk you through every single step—by the end, you’ll wonder how you ever made it any other way. From the precise timing of the garlic to the final splash of cornstarch that thickens the glaze, each detail is crafted to elevate this humble shrimp into a headline‑making entrée. Ready? Let’s dive in.
What Makes This Version Stand Out
- Flavor: A balanced blend of honey’s sweetness, soy sauce’s depth, and ginger’s zing creates a sauce that sings without overpowering the shrimp.
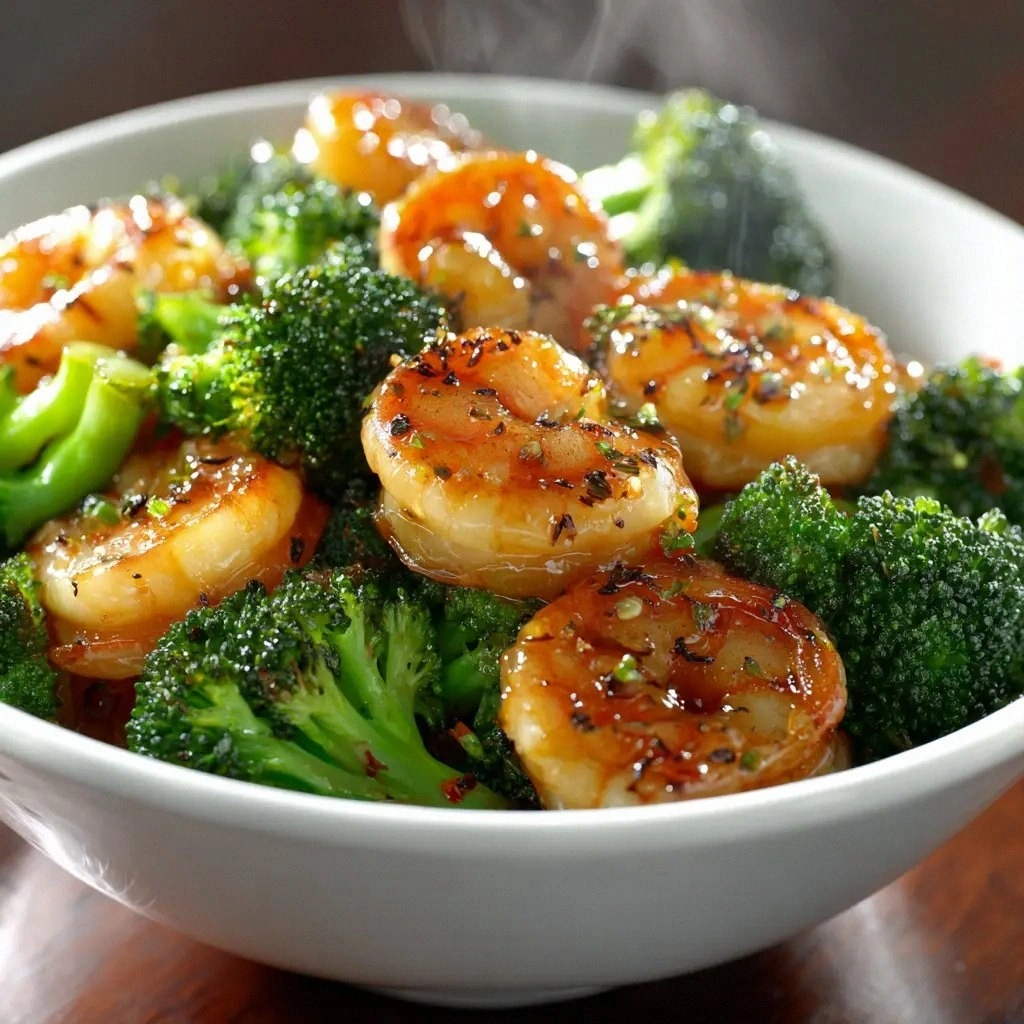
- Texture: The shrimp achieve a perfect sear—crisp edges that shatter like thin ice, while the interior remains tender and juicy.
- Protein: With a single pound of shrimp, you’re looking at roughly 25 g of protein per serving—ideal for post‑workout meals.
- Low Carb: The honey is measured carefully to keep carbs in check, making this dish a great fit for keto or low‑carb diets.
- Speed: The entire process takes under 30 minutes, so you can have a restaurant‑quality plate on the table without the wait.
- Versatility: The sauce can double as a glaze for salmon, a dressing for salads, or a dip for steamed veggies.
- Crowd‑Pleaser: Whether you’re feeding a family or a group of friends, the sweet‑savory profile is guaranteed to win hearts.
- Make‑Ahead: The sauce can be prepared in advance and stored; the shrimp can be cooked just before serving for maximum freshness.
Alright, let's break down exactly what goes into this masterpiece...
Inside the Ingredient List
The Flavor Base
Honey is the star of the show—its natural sugars caramelize and create that glossy sheen that makes every shrimp look irresistible. A third of a cup is just enough to sweeten the dish without making it cloying. If you’re a fan of a little heat, add a pinch of crushed red pepper to the base. This subtle kick balances the sweetness and gives the sauce a layered complexity.
The Texture Crew
Cornstarch is the secret to achieving that silky, clingy glaze. Mixing it with a splash of water before adding it to the sauce prevents lumps and ensures a smooth finish. A tablespoon of olive oil provides the right amount of fat for a golden sear; it also helps the sauce coat the shrimp evenly. Skipping the oil would result in a dry, unevenly cooked dish.
The Unexpected Star
Fresh ginger isn’t just a garnish; it brings bright, citrusy notes that cut through the honey’s sweetness. The ginger’s natural enzymes also help tenderize the shrimp, preventing them from drying out during the quick pan‑sear. If you’re out of fresh ginger, a teaspoon of ground ginger can work, but the aroma will be slightly muted.
The Final Flourish
Low‑sodium soy sauce is the umami backbone of the sauce. It adds depth and a savory edge that balances the sweet components. Using a low‑sodium version keeps the dish from becoming overly salty, especially when paired with the honey. If you prefer a more pronounced soy flavor, swap in regular soy sauce and reduce the honey slightly.
Everything’s prepped? Good. Let’s get into the real action...
The Method — Step by Step
- Start by patting the shrimp dry with paper towels. Removing excess moisture is key to achieving that beautiful sear. If you leave the shrimp damp, they’ll steam instead of brown, and the sauce won’t cling properly. This step takes about two minutes, but it’s worth the extra effort.
- In a small bowl, combine the honey, low‑sodium soy sauce, minced garlic, grated ginger, and a splash of water. Whisk until the mixture is smooth and the ginger is evenly distributed. This pre‑mix ensures that the sauce will have a uniform flavor profile throughout the dish.
- Heat a large skillet over medium‑high heat and add the tablespoon of olive oil. Let the oil heat until it shimmers but isn’t smoking. The oil’s high smoke point ensures it won’t burn the garlic, which would give a bitter taste.
- Add the shrimp to the skillet in a single layer. Allow them to sear for 45 seconds on the first side before flipping. You should hear a satisfying sizzle—this is the sound of the shrimp locking in moisture. Flip and sear the other side for an additional 30 seconds.
- Remove the shrimp from the skillet and set them aside on a plate. This step prevents them from overcooking while you finish the sauce. Remember, shrimp cook in seconds, so timing is crucial.
- Reduce the heat to medium and pour the honey‑soy mixture into the same skillet. Let it simmer for 30 seconds, then stir in the cornstarch slurry. The cornstarch thickens the sauce and gives it a glossy finish. Watch for any lumps; if they appear, whisk vigorously until smooth.
- Return the shrimp to the skillet and toss them in the sauce. Cook for another minute, ensuring each shrimp is fully coated and heated through. The sauce should have thickened to a glaze that clings to the shrimp like a second skin.
- Finish with a splash of fresh lemon juice or a pinch of white pepper for brightness. This final touch lifts the flavors and adds a subtle tang that balances the sweetness. Serve immediately over cauliflower rice, zucchini noodles, or a crisp green salad.
That’s it — you did it. But hold on, I've got a few more tricks that'll take this to another level...
Insider Tricks for Flawless Results
The Temperature Rule Nobody Follows
Many chefs skip the step of pre‑heating the pan to the right temperature. If the skillet isn’t hot enough, the shrimp will release moisture and steam instead of searing. I recommend letting the skillet heat for a full minute before adding oil, then letting the oil heat until it shimmers. This ensures a golden crust and prevents sticking.
Why Your Nose Knows Best
When the sauce starts to bubble, your nose should detect a caramelized honey scent. If you still smell raw garlic, it means the sauce hasn’t had enough time to cook. Let it simmer until the aroma changes to a warm, nutty fragrance—this signals the sugars have caramelized.
The 5‑Minute Rest That Changes Everything
After tossing the shrimp back into the sauce, let them rest for 30 seconds before serving. This brief pause allows the flavors to meld and the sauce to thicken to its ideal consistency. A friend once skipped this step and the dish was a little watery; the rest makes all the difference.
Use a Splatter Guard
When shrimp hit the hot oil, they can splatter dramatically. A splatter guard not only keeps your stovetop clean, but it also helps maintain a consistent temperature by preventing steam from escaping. It’s a simple tool that saves you from a messy kitchen.
Keep It Fresh
For best results, use shrimp that are fresh or flash‑frozen. Fresh shrimp have a clean, briny flavor that pairs perfectly with the honey‑soy glaze. If you’re using frozen shrimp, thaw them in cold water for 10 minutes before cooking to avoid a soggy texture.
Scale With Confidence
When adjusting servings, remember that the sauce’s thickness is tied to the amount of cornstarch. If you double the shrimp, double the cornstarch slurry to keep the sauce from becoming too thin. The recipe card’s serving adjuster will help you scale quantities accurately.
Creative Twists and Variations
This recipe is a playground. Here are some of my favorite ways to switch things up:
Spicy Thai Twist
Add a tablespoon of Thai red curry paste to the honey‑soy mixture for a fiery kick. The curry paste’s aromatic herbs complement the shrimp’s natural sweetness. Pair it with coconut milk for a richer, tropical flavor profile.
Herb‑Infused Delight
Stir in a handful of fresh basil or cilantro after the shrimp return to the skillet. The herbs add a burst of freshness that cuts through the richness of the glaze. This variation works wonderfully over steamed rice.
Smoky BBQ Version
Replace half the honey with a smoky BBQ sauce. The smoky undertones pair well with the ginger, creating a complex, layered taste. This version is great for grill‑style presentations.
Low‑Sugar Alternative
Swap honey for a low‑sugar sweetener like monk fruit or stevia, and increase the soy sauce slightly to maintain umami balance. This keeps the dish keto‑friendly while still delivering that signature glaze.
Vegetarian Take
Use large tofu cubes instead of shrimp, marinating them in the honey‑soy mixture for 15 minutes before pan‑searing. The tofu absorbs the sauce beautifully, offering a protein‑rich, plant‑based option.
Asian Noodle Bowl
Serve the shrimp over shirataki noodles or thin rice noodles, topped with sliced scallions and sesame seeds. The noodles soak up the sauce, creating a comforting, noodle‑filled meal that’s perfect for lunch or dinner.
Storing and Bringing It Back to Life
Fridge Storage
Store the cooked shrimp and sauce separately in airtight containers. The shrimp will keep for up to 3 days, while the sauce can last 5 days. When you’re ready to reheat, combine them in a skillet over medium heat, adding a splash of water to re‑create the glaze’s moisture.
Freezer Friendly
Freeze the shrimp in a single layer on a parchment‑lined tray before transferring to a freezer bag. This prevents clumping. The sauce can be frozen in a separate bag. When thawing, allow the shrimp to sit at room temperature for 15 minutes before reheating.
Best Reheating Method
Reheat the shrimp and sauce on low heat, stirring frequently. Add a teaspoon of water or broth to keep the sauce from drying out. A quick 2‑minute reheat is enough to restore the dish’s original flavor and texture.