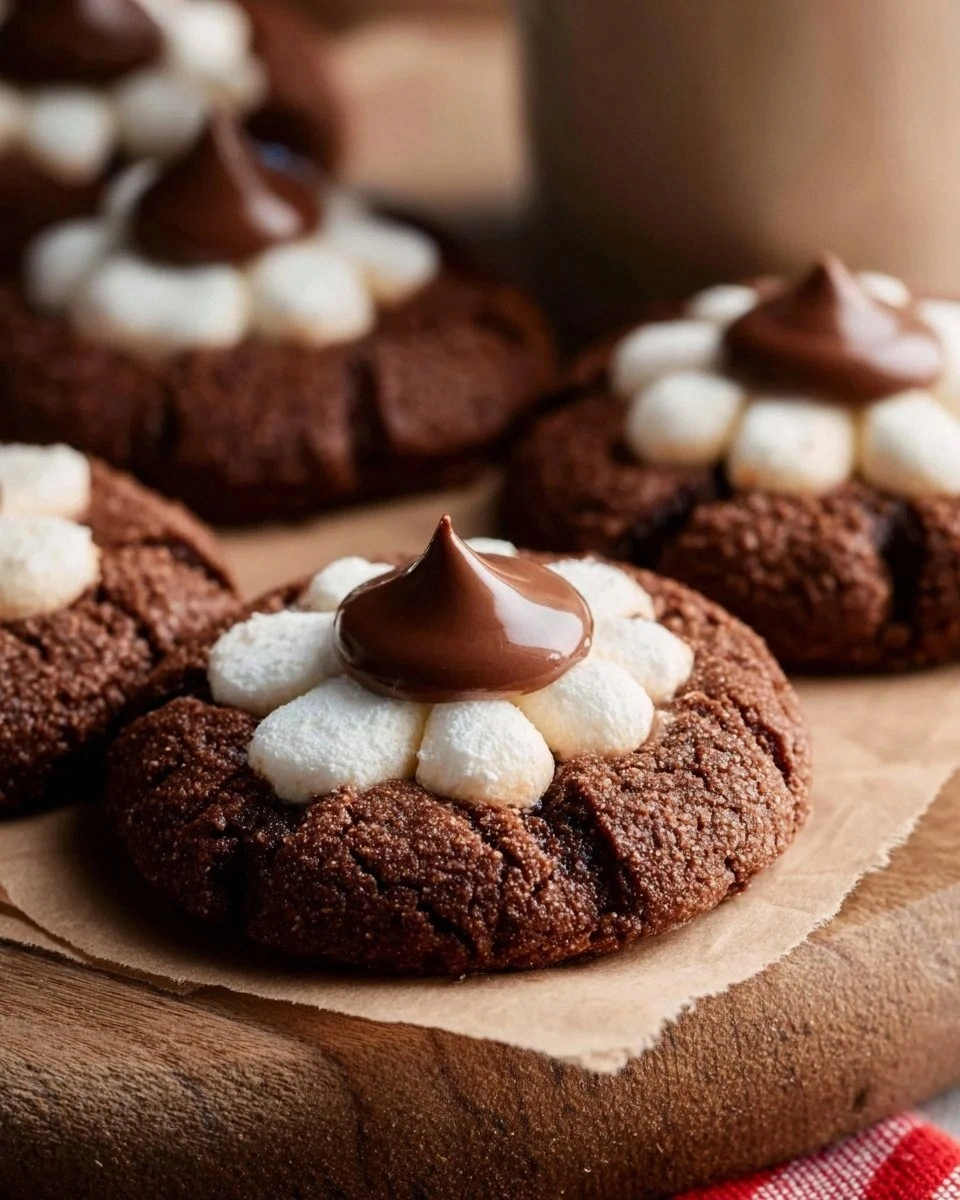
Picture this: it’s a bitterly cold Saturday night, the wind howls outside like a pack of wolves, and you’ve just burned the last batch of store‑bought cookies because the dough was too soft and the chips melted into a sad, gooey mess. I was standing in my kitchen, hands covered in flour, cursing the universe and wondering if I’d ever taste a cookie that actually felt like a warm hug. Then, in a flash of inspiration (and a half‑drunk cocoa‑infused dream), I decided to combine the comforting depth of hot cocoa with the classic cookie format. The result? A cookie that looks like a tiny, chocolate‑kissed blossom and tastes like a mug of rich hot chocolate that decided to stay forever in your mouth.
The moment the batter hits the bowl, you’re hit with the intoxicating aroma of cocoa and butter swirling together like a ballroom dance. The kitchen fills with the sweet perfume of caramelizing sugars, the faint crackle of the whisk against the side, and the promise of chocolate chips that will later melt into pockets of molten bliss. When the first batch slides onto the parchment, the edges start to crisp, turning a deep mahogany that whispers of caramelized perfection, while the centers stay chewy, soft, and undeniably decadent. I dare you to taste this and not go back for seconds – the texture is a contradiction that somehow works like a dream.
Most cookie recipes get the balance of cocoa and sweetness completely wrong, either ending up as bitter, dry bricks or overly sugary, mushy blobs. This version, however, uses a precise ratio of unsweetened cocoa to flour and a blend of both granulated and brown sugars, giving you that deep chocolate flavor without the bitterness and a subtle caramel undertone that makes every bite sing. I’ll be honest — I ate half the batch before anyone else got to try it, and that’s because the flavor hits you like a warm blanket on a frosty night. The secret weapon? A handful of chocolate candy pieces that melt into little pockets of surprise, creating a blossom‑like pattern when the cookie spreads.
Okay, ready for the game‑changer? I’m about to walk you through every single step — from selecting the perfect cocoa powder to the exact moment you pull those golden‑brown blossoms out of the oven. By the end, you’ll wonder how you ever made cookies any other way. Picture yourself pulling this out of the oven, the whole kitchen smelling incredible, and the first bite delivering a melt‑in‑your‑mouth experience that feels like a hug from the inside.
What Makes This Version Stand Out
- Deep Cocoa Flavor: The unsweetened cocoa powder is balanced with brown sugar, giving a rich, almost espresso‑like depth without any bitterness.
- Chewy Center, Crisp Edge: The butter‑sugar ratio creates a soft, chewy middle while the edges turn perfectly caramelized, offering a textural contrast that’s addictive.
- Simple Yet Sophisticated: No fancy equipment or obscure ingredients – just pantry staples, yet the result feels like a bakery masterpiece.
- Surprise Chocolate Blossoms: The addition of chocolate candy melts into pockets that look like tiny blossoms, delivering surprise bursts of gooey chocolate.
- Crowd‑Pleaser: Even the most skeptical sweet‑tooth skeptics are won over, making this the go‑to cookie for parties, potlucks, or a cozy night in.
- Make‑Ahead Friendly: The dough can be chilled for up to 48 hours, allowing flavors to meld and making prep a breeze on busy days.
- Versatile Base: The recipe tolerates a few swaps – think almond flour for gluten‑free or white chocolate chips for a sweeter twist – without losing its core identity.
- Visual Appeal: When baked, the cookies bloom outward, creating an eye‑catching pattern that looks as good as it tastes.
Inside the Ingredient List
The Flavor Base
Unsalted butter, softened (1 cup): Butter is the carrier of flavor, providing a silky mouthfeel and helping the sugars caramelize. If you substitute with margarine, you’ll lose that buttery aroma and the cookies may turn greasy. Look for European‑style butter with a higher fat content for an even richer taste.
Granulated sugar (1 cup) and Brown sugar, packed (1 cup): The duo creates a balanced sweetness; granulated sugar gives structure while brown sugar adds moisture and a subtle molasses note. Skipping the brown sugar will make the cookie too crisp and lose that caramel undertone.
Vanilla extract (1 tsp): A splash of vanilla lifts the cocoa, rounding out any sharp edges. Use pure vanilla for the best aroma; imitation can taste flat.
The Texture Crew
All‑purpose flour (3 cups): Flour provides the skeleton. If you’re gluten‑sensitive, swap with a 1‑to‑1 gluten‑free blend, but add a teaspoon of xanthan gum to keep the structure.
Unsweetened cocoa powder (½ cup): This is the heart of the flavor. Choose a Dutch‑process cocoa for a smoother, less acidic taste, or natural cocoa for a brighter chocolate punch.
Baking soda (1 tsp) and Salt (¼ tsp): Baking soda gives a slight rise and a tender crumb, while the pinch of salt amplifies all the flavors. Too much soda can give a metallic aftertaste.
The Unexpected Star
Chocolate chips (1 cup): Semi‑sweet chips melt into gooey pockets, adding texture and a familiar chocolate burst. For a deeper flavor, use dark chocolate chips with 70% cacao.
Chocolate candy (1 cup): These are the secret blossoms – they melt into irregular pockets that create the signature “flower” look. If you can’t find candy, break up a chocolate bar into small chunks.
The Final Flourish
Large eggs (2): Eggs bind everything together and add lift. Using room‑temperature eggs ensures they incorporate smoothly, preventing a lumpy dough.
Optional: a pinch of espresso powder: Adding a quarter teaspoon intensifies the chocolate flavor without making the cookies taste like coffee. It’s a pro‑chef trick that takes the depth to a new level.
Everything’s prepped? Good. Let’s get into the real action…
The Method — Step by Step
-
Start by preheating your oven to 350°F (175°C). While the oven warms up, line two baking sheets with parchment paper – this prevents sticking and gives the cookies a clean, even rise. The moment the oven hits the set temperature, you’ll hear a faint hum that tells you it’s ready for action.
Kitchen Hack: Place a baking stone on the middle rack for an even heat distribution, ensuring uniform browning on every blossom. -
In a large mixing bowl, cream together the softened butter, granulated sugar, and brown sugar until the mixture is light, fluffy, and pale yellow – think sunrise in a bowl. This process incorporates air, which will later give the cookies a tender crumb. Scrape down the sides with a spatula to make sure nothing is left unmixed.
-
Beat in the eggs one at a time, allowing each to fully incorporate before adding the next. Then stir in the vanilla extract, letting the fragrant aroma fill the kitchen. At this point, the batter should look glossy and slightly thick.
Kitchen Hack: Add a tablespoon of cold water if the dough feels too stiff; this keeps the cookies from becoming dense. -
In a separate bowl, whisk together the flour, unsweetened cocoa powder, baking soda, and salt. Whisking ensures the cocoa is evenly distributed, preventing any bitter pockets. The dry mixture should have a deep, velvety color reminiscent of midnight.
-
Gradually fold the dry ingredients into the wet mixture, using a spatula or wooden spoon. Mix just until you see no streaks of flour; over‑mixing can develop gluten and make the cookies tough. The dough will be thick, almost like a fudgy brownie batter.
-
Now comes the fun part: stir in the chocolate chips and chocolate candy pieces. Let the chocolate melt slightly into the dough, creating those signature “blossoms.” As the chips disappear, you’ll notice pockets of molten chocolate forming – that’s the magic.
Kitchen Hack: If you want extra glossy tops, sprinkle a pinch of flaky sea salt on each cookie just before baking. -
Using a medium cookie scoop (about 2 tablespoons), drop dough onto the prepared parchment, spacing them 2 inches apart. The dough should hold its shape; if it spreads too quickly, return the bowl to the fridge for 10 minutes.
-
Slide the sheet into the oven and bake for 12‑15 minutes, or until the edges are a deep caramel brown and the centers still look slightly soft. The cookies will continue to set as they cool, so pull them out at the perfect moment.
Watch Out: Do not over‑bake; the cookies will look undercooked but will firm up on the cooling rack. Over‑baking leads to hard edges that shatter like thin ice. -
Allow the cookies to cool on the baking sheet for five minutes before transferring them to a wire rack. This short rest lets the “blossoms” set and prevents them from breaking apart. As they cool, the aroma will fill the kitchen, making it impossible to resist grabbing one right away.
That’s it — you did it. But hold on, I’ve got a few more tricks that’ll take this to another level, ensuring every batch is flawless and unforgettable.
Insider Tricks for Flawless Results
The Temperature Rule Nobody Follows
Always start with room‑temperature butter and eggs; cold ingredients cause the dough to seize, resulting in uneven texture. I once tried using melted butter for speed, and the cookies turned into flat, greasy discs. The lesson? Keep everything at the same temperature for a uniform crumb.
Why Your Nose Knows Best
When the butter‑sugar mixture turns a light amber, that’s your cue to stop creaming. Over‑creaming can incorporate too much air, leading to cookies that puff up then collapse. Trust the scent of caramel; it signals the perfect point of incorporation.
The 5‑Minute Rest That Changes Everything
After mixing in the chocolate, let the dough rest for five minutes. This short pause allows the flour to hydrate fully, resulting in a softer interior. I once skipped this step and ended up with a cookie that felt dry in the middle.
Precision Baking Sheets
Use light-colored, heavy‑gauge baking sheets. Dark pans absorb heat faster, causing the edges to darken before the center sets. A light sheet gives a gentle, even bake, preserving that delicate blossom shape.
Cooling Rack Strategy
Transfer cookies to a wire rack while still warm but firm enough to handle. This prevents steam from making the bottoms soggy. If you skip this, you’ll notice a slightly gummy underside that ruins the crisp‑edge experience.
Creative Twists and Variations
This recipe is a playground. Here are some of my favorite ways to switch things up:
White Chocolate Peppermint Blossoms
Swap the semi‑sweet chocolate chips for white chocolate chips and add a teaspoon of crushed peppermint candy. The result is a festive, mint‑kissed cookie perfect for holiday gatherings.
Espresso‑Infused Dark Delight
Replace half of the cocoa powder with finely ground espresso and use dark chocolate chips. The coffee accent deepens the chocolate flavor, creating a sophisticated adult‑only treat.
Nutty Crunch Variation
Fold in a half‑cup of toasted chopped hazelnuts or pecans. The nuts add a satisfying crunch that contrasts the soft interior, and the nutty aroma pairs beautifully with cocoa.
Gluten‑Free Blossom
Use a 1‑to‑1 gluten‑free flour blend and add a teaspoon of xanthan gum. The texture remains chewy, and the flavor stays true, making it accessible for those with gluten sensitivities.
Spicy Chili Chocolate
Mix in a pinch of cayenne pepper or a dash of chili powder. The subtle heat lifts the chocolate, creating a surprising kick that’s perfect for adventurous palates.
Storing and Bringing It Back to Life
Fridge Storage
Place cooled cookies in an airtight container with a paper towel at the bottom to absorb excess moisture. They’ll stay fresh for up to five days, retaining their chewy centers and crisp edges.
Freezer Friendly
Layer cookies between parchment sheets and seal them in a freezer‑safe bag. They freeze beautifully for up to three months. When you’re ready, let them thaw at room temperature for 30 minutes, then enjoy.
Best Reheating Method
Warm the cookies in a preheated 300°F oven for five minutes, or pop them in the microwave for 10 seconds with a tiny splash of water on the plate. The steam revives the softness, making them taste fresh‑baked every time.