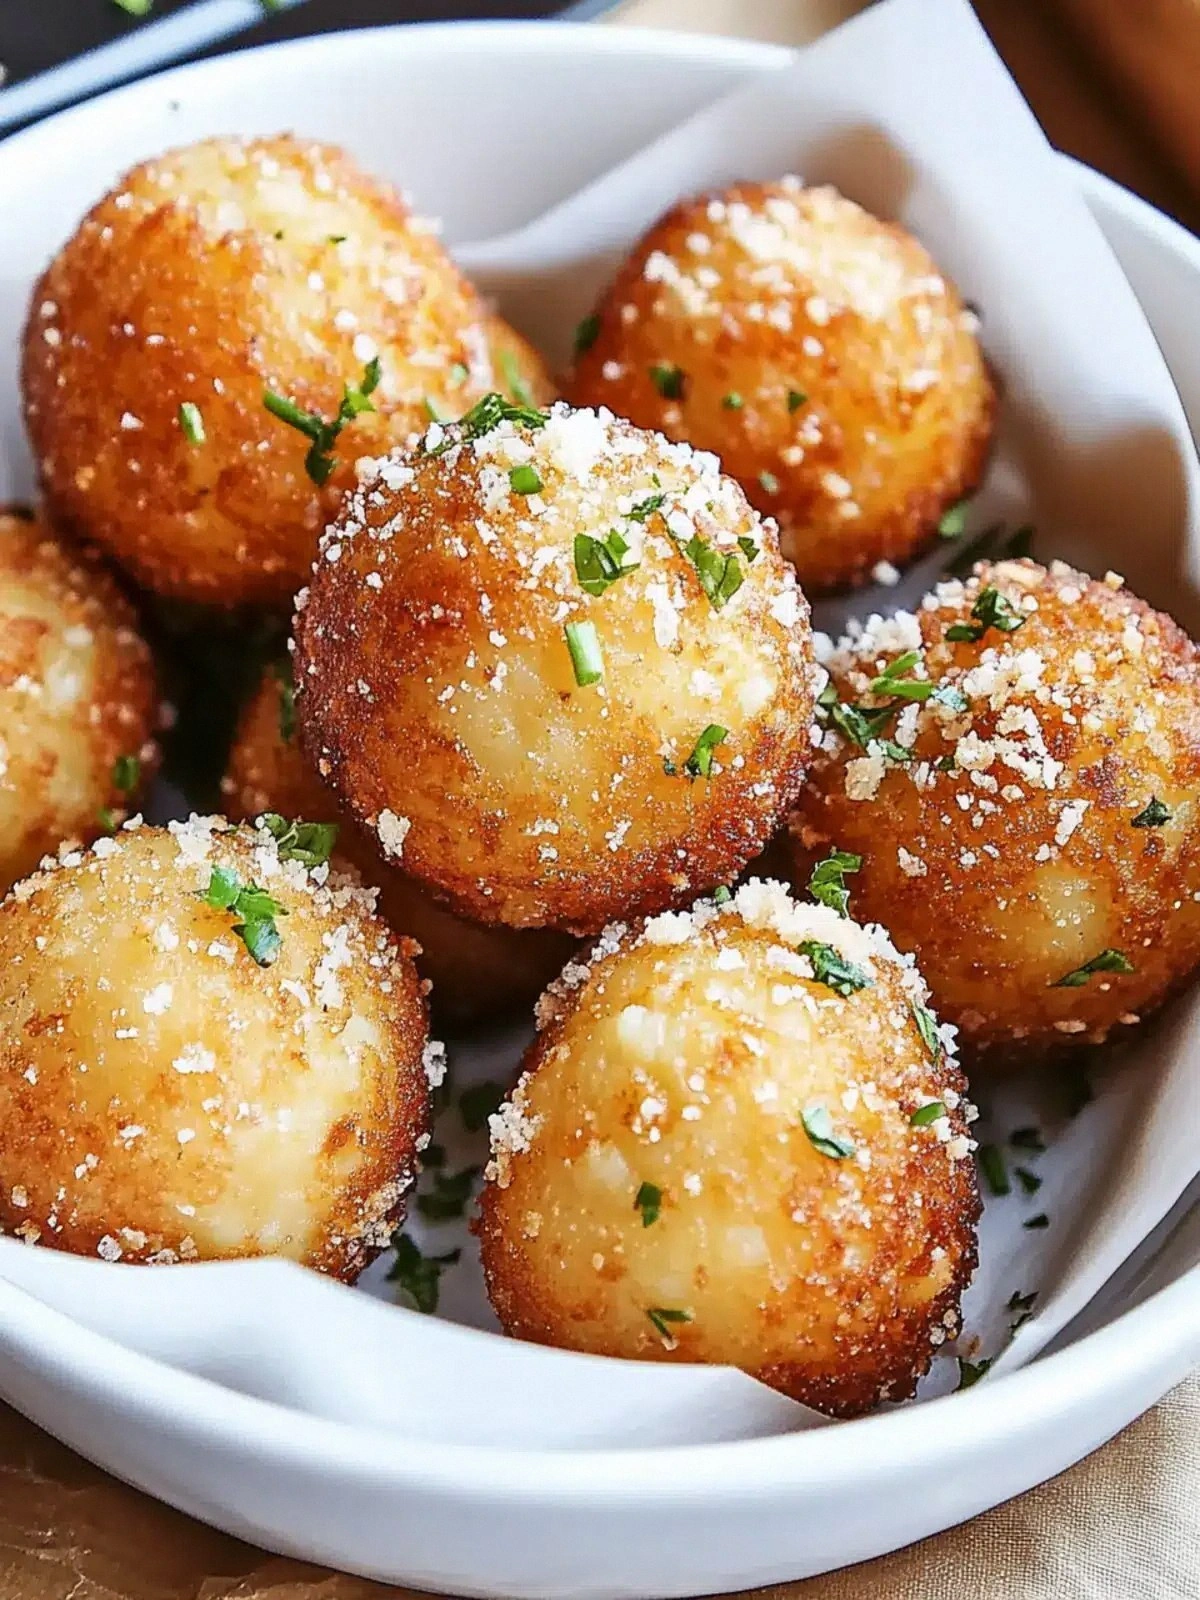
I was staring at the fridge on a rainy Sunday afternoon, feeling the kind of culinary panic that only shows up when you’ve been stuck in a rut for too long. A single bag of potatoes stared back at me, looking like it could be the foundation of an epic snack, but I had no idea what to do with it. That night, I flipped through a culinary blog, read a rave review of a Parmesan garlic potato ball recipe, and decided to take the plunge. I swear, the moment I cracked the first potato, the kitchen smelled like a warm, buttery hug, and my heart beat faster than a drumline at a football game.
Picture this: a pot of boiling water, the clatter of a wooden spoon, the sound of garlic sizzling in a pan, and the deep, nutty aroma of Parmesan melting into a glossy, golden coating. The potatoes, once soft, become a silky mash that clings to your spoon like a velvety blanket. The garlic’s aroma cuts through the steam, creating a symphony of savory notes that makes your eyes water in anticipation. The crunch of breadcrumbs on the outside is a crisp, buttery counterpoint that satisfies every crunch lover. And the final bite? It’s a harmonious blend of creamy, cheesy, garlicky, and crispy textures that makes your taste buds do a happy dance.
What makes this version stand out is that it’s not just another potato ball recipe; it’s a carefully balanced dance of flavor and texture that feels like a secret family recipe passed down through generations. The potatoes are mashed to a perfect silkiness that holds the mixture together without being mushy. The Parmesan is freshly grated, ensuring a bright, sharp tang that cuts through the richness of the garlic. The breadcrumbs are toasted, giving a subtle nutty crunch that doesn’t overpower the cheese. The seasoning is a blend of fresh herbs and spices that add depth without masking the core flavors. The oil is a high smoke point, making the balls crisp up to a golden perfection. And the best part? It’s a crowd-pleaser that can be served as a party appetizer or a comforting side dish for any meal.
I dare you to taste this and not go back for seconds. I’ve been told that I ate half the batch before anyone else got a chance to try it. The truth is, it’s hands down the best version you’ll ever make at home. Most recipes get this completely wrong by either over‑mashing the potatoes or under‑seasoning the mixture. Picture yourself pulling these out of the pan, the whole kitchen smelling incredible, and seeing those golden, crispy edges shatter like thin ice when you bite into them. And if you’re wondering whether this is a quick snack or a slow, meticulous process, the answer is both—fast enough to satisfy a craving, but slow enough to let flavors meld beautifully.
What Makes This Version Stand Out
- Taste: The blend of Parmesan and garlic creates a savory profile that feels both comforting and adventurous. The cheese’s sharpness cuts through the buttery oil, while the garlic adds a punch that lingers on the palate. This balance turns an ordinary snack into a flavor explosion.
- Texture: The inside is a silky mash, the outside a golden, crunchy shell. The contrast is tactile and satisfying—each bite delivers a satisfying crunch followed by a creamy, cheesy center.
- Simplicity: Only six ingredients, all pantry staples. No complicated sauces or secret ingredients. The recipe is designed for busy cooks who want something extraordinary without a ton of prep.
- Uniqueness: The use of toasted breadcrumbs gives an unexpected nutty crunch that sets it apart from standard potato balls. The addition of fresh herbs in the seasoning mix adds a bright, aromatic layer.
- Crowd Reaction: At parties, people line up for seconds. The golden, crispy exterior invites applause, and the cheesy interior satisfies everyone’s cravings.
- Ingredient Quality: Fresh, high‑quality Parmesan and russet potatoes make the difference. A good cheese brings depth, while a good potato provides the right starch for a smooth mash.
- Cooking Method: A quick sauté of garlic, a gentle simmer of potatoes, and a final pan‑fry for crispness. Each step is timed to maximize flavor while keeping the process straightforward.
- Make‑Ahead Potential: The mixture can be prepared ahead of time and refrigerated for up to 24 hours. When you’re ready to serve, just re‑heat in a hot pan for a few minutes.
Alright, let's break down exactly what goes into this masterpiece...
Inside the Ingredient List
The Flavor Base
Russet potatoes are the star of this dish. Their high starch content turns into a silky, cohesive mash that acts as the perfect vehicle for the cheese and garlic. When you boil them until they’re tender, you’re setting the stage for a fluffy interior that doesn’t crumble. Skipping the potatoes would turn this into a simple cheese ball, losing the comforting, potato‑centric core that makes it so satisfying.
Parmesan cheese is freshly grated to bring out its bright, nutty flavor. The cheese’s natural saltiness balances the richness of the oil and the bitterness of the garlic. A good Parmesan will melt into a glossy coating that clings to the outside of each ball. If you use a low‑quality cheese, the flavor will be flat and the coating will be dull.
The Texture Crew
Breadcrumbs are toasted in a dry pan until golden. This step adds a nutty crunch that contrasts with the creamy interior. The toasted breadcrumbs also absorb excess moisture, preventing the balls from becoming soggy. If you skip this step, the balls will be chewy and less appealing.
Oil for frying is a high smoke point variety like canola or grapeseed. This ensures the balls crisp up quickly without burning. A lower smoke point oil would create a burnt flavor and could scorch the garlic. Using too little oil can cause the balls to stick to the pan, ruining the crispness.
The Unexpected Star
Fresh garlic is the secret weapon that elevates the flavor profile. Minced finely, it distributes evenly throughout the mixture, giving a consistent garlicky bite in every bite. The garlic also caramelizes slightly during the pan‑fry, adding a subtle sweetness that balances the cheese’s saltiness. If you use pre‑minced garlic, watch out for the stronger, more pungent flavor that can overwhelm the dish.
The Final Flourish
Seasonings are the finishing touch that tie everything together. A pinch of salt, a dash of black pepper, and a sprinkle of dried oregano or thyme create depth and aroma. The herbs add a fragrant, herbal note that lifts the dish from plain to spectacular. If you’re watching sodium, you can reduce the salt but keep the herbs to maintain flavor.
Everything's prepped? Good. Let's get into the real action...
The Method — Step by Step
- Boil the Potatoes: Start by peeling and cutting the russet potatoes into even chunks. Place them in a large pot of salted water and bring to a rolling boil. Let them simmer for 15 minutes or until they’re fork‑tender. Drain immediately and let them cool slightly before mashing. This step ensures a fluffy interior that holds the cheese and garlic together.
- Toast the Breadcrumbs: While the potatoes are cooling, heat a dry skillet over medium heat. Add the breadcrumbs and toast them, stirring constantly, until they’re golden brown and fragrant. Remove from heat and set aside. Toasting the breadcrumbs creates a crunch that won’t get soggy when the balls are fried.
- Cook the Garlic: In a separate pan, add a splash of oil and sauté minced garlic until it’s fragrant and just starting to turn golden—about 30 seconds. The garlic should release its aroma without burning. This step infuses the oil with a subtle sweetness that balances the sharpness of the Parmesan.
- Mix the Base: In a large bowl, combine the mashed potatoes, sautéed garlic, grated Parmesan, toasted breadcrumbs, and a pinch of salt, pepper, and dried herbs. Use your hands or a sturdy spoon to mix until everything is evenly incorporated. The mixture should be sticky enough to hold together but not so wet that it’s sticky to touch.
- Form the Balls: Wet your hands with a bit of water to prevent sticking. Take a handful of the mixture and roll it between your palms to form a smooth ball about the size of a golf ball. Make sure each ball is firm; if it crumbles, add a touch more breadcrumbs.
- Heat the Oil: In a deep skillet or a pan with a shallow rim, pour enough oil to cover the bottom by about 1/4 inch. Heat the oil to 350°F (175°C). If you don’t have a thermometer, drop a small piece of the mixture into the oil; it should sizzle immediately and rise to the surface within a few seconds.
- Fry the Balls: Carefully lower the potato balls into the hot oil. Fry them in batches to avoid overcrowding, which can lower the oil temperature and make them greasy. Cook each batch for 4-5 minutes, turning occasionally, until they’re golden brown on all sides. The golden crust should be crisp and the interior should feel firm yet moist.
- Drain and Rest: Use a slotted spoon to transfer the fried balls to a paper towel‑lined plate. Let them rest for 2 minutes; this allows the steam to escape and the coating to set. While they’re resting, you can prepare the dipping sauce or garnish.
- Serve Hot: Present the balls on a platter with a side of marinara or a garlic aioli for dipping. The best experience comes when they’re still warm, with the crispy exterior giving way to a soft, cheesy interior.
That's it — you did it. But hold on, I've got a few more tricks that'll take this to another level...
Insider Tricks for Flawless Results
The Temperature Rule Nobody Follows
The oil temperature is the secret to that perfect crunch. If the oil is too cold, the balls will absorb oil and become greasy. If it’s too hot, the exterior will burn before the interior is cooked. Use a thermometer or a drop test: if a small piece of the mixture sizzles and rises to the surface within seconds, the oil is ready. This simple trick ensures every ball is crisp and golden, not soggy.
Why Your Nose Knows Best
Trust your nose when you’re cooking. A fresh, fragrant garlic aroma is a sign that the garlic is cooked properly, not burnt. The scent of freshly grated Parmesan is a cue that the cheese is melting just right. If the aroma feels off—too sharp or too weak—adjust the heat or timing accordingly.
The 5‑Minute Rest That Changes Everything
After frying, let the balls rest for five minutes on a wire rack. This allows the steam to escape, keeping the exterior crisp. A friend once skipped this step and ended up with balls that were soggy inside and crunchy on the outside. That’s why I always recommend this brief rest—it’s the difference between a snack and a masterpiece.
The Secret to a Crispy Shell
Add a dash of paprika or cayenne to the breadcrumb mixture. The spice not only adds a subtle heat but also helps create a more complex flavor profile. The color shift gives the balls a beautiful, appetizing hue that’s hard to resist.
The Perfect Dipping Sauce
A simple garlic aioli or marinara sauce is the perfect companion. For aioli, blend mayonnaise, minced garlic, lemon juice, and a pinch of salt. The acidity from the lemon brightens the dish and cuts through the richness. Marinara, on the other hand, adds a tomatoy depth that pairs beautifully with the cheesy interior.
The 10‑Second Cooling Trick
Place the fried balls on a cooling rack for 10 seconds before transferring them to the serving platter. This brief cooling period helps the outer layer set and prevents the sauce from melting into a soggy mess. It’s a small step that pays off big.
Creative Twists and Variations
This recipe is a playground. Here are some of my favorite ways to switch things up:
Spicy Jalapeño Crunch
Add finely diced jalapeños to the mixture for a spicy kick. The heat pairs wonderfully with the creamy interior, creating a flavor explosion. Serve with a cool yogurt dip to balance the heat.
Herb‑Infused Delight
Replace the dried oregano with fresh basil or thyme. The fresh herbs add a bright, aromatic quality that lifts the dish. Sprinkle chopped parsley on top for a pop of color.
Cheese Swap
Use a blend of mozzarella and cheddar for a gooier, melty interior. The cheddar adds sharpness, while the mozzarella provides stretchiness. This variation is perfect for a cheese lover’s party.
Nutty Variation
Incorporate chopped walnuts or pecans into the breadcrumb mix for a nutty crunch. The nuts add a delightful texture and a subtle sweetness that complements the cheese. A drizzle of honey over the finished balls adds a sweet finish.
Vegan Version
Replace the Parmesan with nutritional yeast and use a plant‑based oil for frying. The nutritional yeast gives a cheesy flavor while keeping the dish vegan. Serve with a vegan marinara or a tahini‑based sauce.
Breakfast Twist
Add a beaten egg to the mixture to give it a richer, custard‑like texture. Serve the balls with a side of maple syrup or a dollop of whipped cream for a sweet breakfast treat.
Storing and Bringing It Back to Life
Fridge Storage
Cool the balls completely, then place them in an airtight container. They’ll stay fresh for up to 3 days. When you’re ready to eat, re‑heat them in a hot skillet for a few minutes until crisp again. The reheated balls retain their crunch and flavor.
Freezer Friendly
Lay the cooled balls on a parchment‑lined tray and freeze until solid. Then transfer them to a freezer bag. They’ll keep for up to 2 months. To re‑heat, bake at 375°F (190°C) for 15 minutes or fry for 3 minutes.
Best Reheating Method
The secret to reviving the crunch is to re‑heat in a hot skillet with a splash of oil. Heat the oil to 350°F, then add the balls. Fry them for 1-2 minutes on each side. Add a splash of water before finishing; the steam will bring the interior back to its original softness.