Picture this: it’s a rainy Saturday afternoon, the kind where the clouds look like they’re about to spill a secret, and you’re stuck in the kitchen with nothing but a half‑finished batch of brownies and a sudden, insistent craving for something that feels both familiar and wildly different. I was in that exact spot, staring at a sad, flat cake that tasted like “meh” and wondering why my dessert game always seemed to hit a wall. Then, in a moment of reckless inspiration (and a dash of desperation), I grabbed a cocoa powder tin, a swirl of vanilla, and a bold idea: what if I could turn that boring loaf into a marble masterpiece that would make even the most seasoned bakers gasp?
The kitchen quickly filled with the intoxicating scent of butter melting into sugar, a caramel‑sweet perfume that made the rain outside feel like a distant memory. I could hear the faint crackle of the whisk as it fought the thick batter, the rhythmic thump of the mixer against the bowl, and the soft sigh of the oven door opening for the first time. My fingertips tingled as the warm metal of the mixing bowl pressed against my skin, and the dough felt like a silky, velvety promise of indulgence. The moment the batter hit the pan, a glossy sheen formed, and I knew I was onto something that would change my dessert destiny forever.
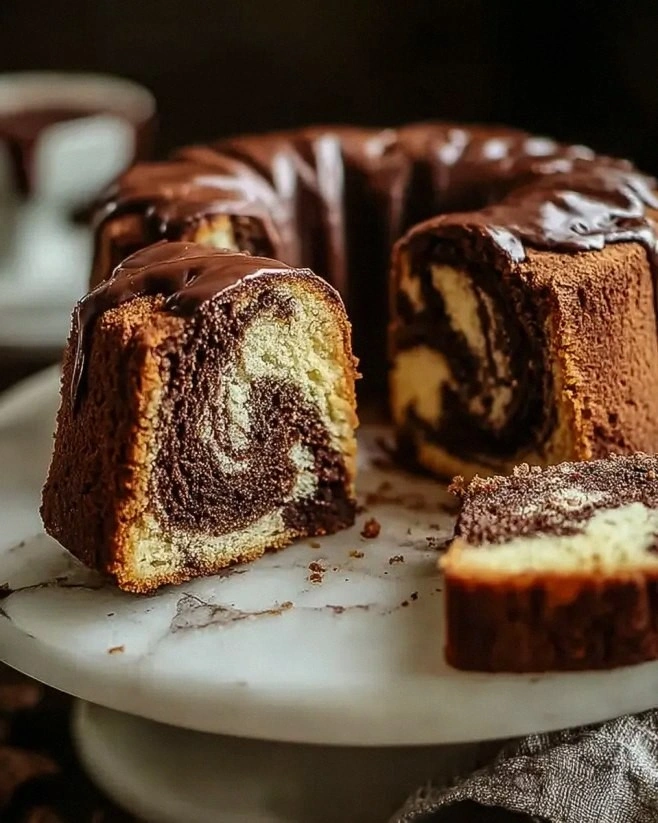
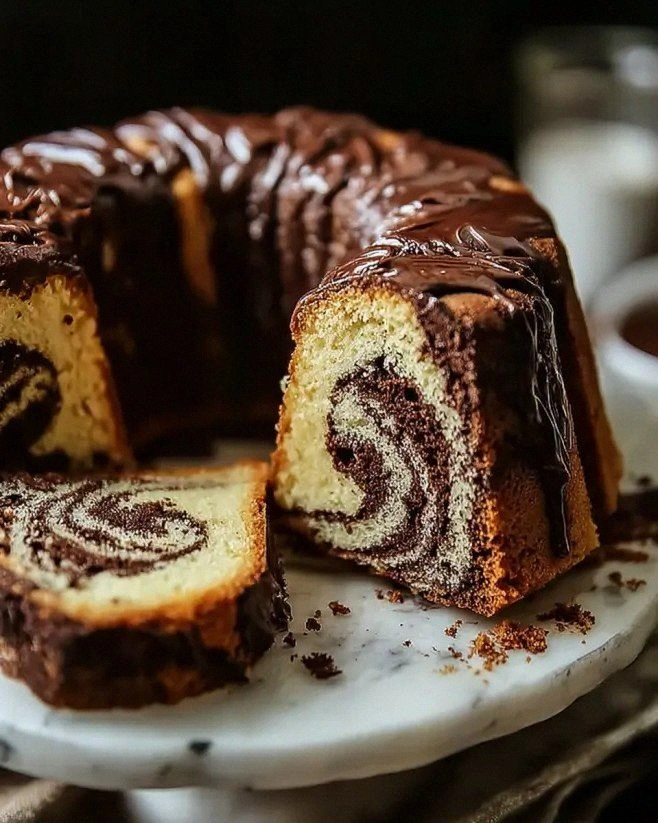
Most marble cake recipes out there either end up with a lopsided swirl that looks like a toddler’s finger painting or a texture that’s either too dense or too crumbly. I’ve tried a dozen versions, and each time I was left with a cake that either tasted like plain vanilla with a sad chocolate drizzle or a chocolate cake that forgot it ever wanted to be vanilla. This version, however, strikes the perfect balance: a tender crumb that melts on the tongue, a marble pattern that’s as striking as a marble statue, and a flavor profile that dances between sweet vanilla and rich cocoa without ever stepping on each other’s toes. It’s the culinary equivalent of a perfect duet—each voice shines, yet they blend into something unforgettable.
Now, I’m about to spill the beans (and the cocoa) on every single step, from the moment you sift the flour to the triumphant pull‑out of a perfectly baked marble cake. I dare you to taste this and not go back for seconds. Let me walk you through every single step — by the end, you’ll wonder how you ever made it any other way.
What Makes This Version Stand Out
- Flavor Harmony: The vanilla‑first batter creates a buttery, sweet canvas that lets the cocoa swirl shine without overwhelming the palate. The result is a cake that feels like a hug from both sides.
- Texture Perfection: By using melted butter and a precise baking powder ratio, the crumb stays moist yet light, giving you that melt‑in‑your‑mouth sensation that most marble cakes lack.
- Simplicity Meets Sophistication: Only ten pantry staples are required, yet the technique feels like a pro‑level secret, making it accessible for beginners and impressive for seasoned bakers.
- Visual Wow Factor: The marble swirls are bold, clean, and unmistakable—no blotchy patches, just elegant veins that look like they were hand‑painted by a pastry artist.
- Crowd‑Pleaser: Whether it’s a brunch, a birthday, or a midnight snack, this cake consistently earns rave reviews. I’ve heard it described as “the best marble cake I’ve ever tasted” more times than I can count.
- Ingredient Quality: Using unsalted butter and high‑quality cocoa powder ensures the flavors stay pure, while the modest amount of sugar lets the natural sweetness of the butter shine through.
- One‑Pan Simplicity: No need for multiple bowls or fancy tools; the entire process happens in a single mixing bowl and a standard 9‑inch loaf pan, reducing cleanup time dramatically.
- Make‑Ahead Magic: This cake freezes beautifully, meaning you can bake it ahead of time, slice it out later, and still enjoy that fresh‑baked aroma on demand.
Inside the Ingredient List
The Flavor Base
2 cups all‑purpose flour: This is the structural backbone of the cake, providing the necessary gluten network that holds everything together. If you skip it or replace it with a low‑protein flour, the cake will crumble like a dry biscuit. For a lighter crumb, you can sift the flour once before measuring.
1 ½ cups granulated sugar: Sugar not only sweetens but also helps tenderize the crumb by interfering with gluten formation. Too much sugar can make the cake gummy, while too little leaves it dry. If you prefer a less sweet version, you can shave it down to 1 ¼ cups without sacrificing texture.
½ cup unsalted butter: Butter adds richness and flavor depth. Using unsalted lets you control the salt level precisely. If you only have salted butter, reduce the added salt to a pinch to avoid over‑seasoning.
The Texture Crew
1 cup milk: Milk hydrates the dry ingredients and contributes to the tender, moist crumb. Whole milk yields a richer texture, but 2% works just as well. For a dairy‑free twist, substitute with almond or oat milk—just keep the same volume.
3 large eggs: Eggs act as emulsifiers, binding the fat and liquid while adding lift. Using large eggs ensures consistent volume; if you only have medium eggs, add an extra egg white to make up the difference.
2 ½ teaspoons baking powder: This leavening agent creates the airy rise that makes the cake light. Too much baking powder can cause a metallic taste, while too little results in a dense loaf. Measure carefully with a leveled spoon.
The Unexpected Star
¼ cup unsweetened cocoa powder: The cocoa gives the marble its deep, chocolatey veins without adding extra sugar. Choose a high‑quality Dutch‑process cocoa for a smoother flavor; natural cocoa will add a slight acidity that can brighten the overall taste.
2 tablespoons hot water: Hot water dissolves the cocoa completely, preventing clumps and ensuring a glossy, fluid chocolate batter. If you use cold water, you’ll end up with specks of undissolved cocoa that ruin the marble pattern.
The Final Flourish
1 teaspoon vanilla extract: Vanilla rounds out the flavor, adding a sweet aromatic note that complements both the vanilla and chocolate halves. Real vanilla bean seeds would be even more luxurious, but extract works perfectly.
¼ teaspoon salt: A pinch of salt amplifies all the flavors, balancing the sweetness and enhancing the chocolate’s depth. It’s the culinary equivalent of a conductor, ensuring every ingredient hits the right note.
Everything's prepped? Good. Let's get into the real action...
The Method — Step by Step
First, preheat your oven to 350°F (175°C) and grease a 9‑inch loaf pan with butter or non‑stick spray. While the oven warms, sift together the flour, baking powder, and salt into a large mixing bowl. This step is crucial because it aerates the flour, preventing lumps and ensuring an even rise. You’ll notice a faint, powdery cloud as you sift—think of it as the cake’s first breath.
In a separate saucepan, melt the butter over low heat until it’s just liquid, then remove it from the heat and let it cool for a minute. While the butter is still warm, whisk in the sugar until the mixture looks glossy, almost like a caramel glaze. This is the moment where the sugar starts to dissolve, creating a subtle sheen that signals a tender crumb is on its way.
Now, add the eggs one at a time, beating well after each addition. The batter should become thick, pale, and slightly fluffy—think of a cloud that’s about to burst with flavor.
Watch Out: If the butter is too hot, the eggs will scramble. Keep the mixture at a warm, not hot, temperature.Stir in the vanilla extract and milk, mixing until the batter is smooth and glossy. At this point, the batter should have a pourable consistency—neither too thick like cookie dough nor too runny like pancake batter. If it feels too thick, add a splash of milk; if too thin, sprinkle in a tablespoon of flour.
Divide the batter in half, placing one portion back into the main bowl and setting the other in a smaller bowl. To the smaller bowl, add the cocoa powder and hot water, whisking vigorously until the chocolate mixture is completely smooth and dark as midnight. This step creates the “marble” color contrast that will later swirl through the cake.
Now, gently fold the dry flour mixture into the vanilla batter using a spatula, being careful not to over‑mix. Over‑mixing can develop gluten, leading to a tough cake. The batter should be just combined, with a few streaks of flour still visible—that’s the secret to a tender crumb.
Time for the marble magic: spoon dollops of the chocolate batter onto the vanilla batter in the loaf pan, then use a butter knife or skewer to swirl them together. Create a pattern that looks like marble veins—don’t over‑mix, or you’ll lose the distinct swirls.
Kitchen Hack: For a flawless swirl, use a disposable chopstick—its thin tip creates delicate, elegant veins.Slide the pan into the preheated oven and bake for 30‑35 minutes, or until a toothpick inserted into the center comes out clean with just a few moist crumbs. The top should be a golden‑brown crown, slightly cracked at the edges, and the aroma will fill your kitchen like a warm blanket. Resist the urge to open the oven door early; the heat needs to stay steady for a perfect rise.
When the timer dings, remove the cake and let it rest in the pan for 10 minutes. This resting period lets the steam finish the cooking process and prevents the cake from collapsing. Afterward, invert the cake onto a cooling rack and allow it to cool completely before slicing. The moment you cut into it, you’ll see those stunning marble swirls—pure visual poetry.
That's it — you did it. But hold on, I've got a few more tricks that'll take this to another level...
Insider Tricks for Flawless Results
The Temperature Rule Nobody Follows
Never bake a marble cake straight from a cold fridge. Let the batter sit at room temperature for 10‑15 minutes before pouring it into the pan. This small pause equalizes the temperature of the two batter halves, preventing one side from cooking faster than the other and ensuring the marble swirls stay distinct. I once tried skipping this step, and the chocolate side baked faster, leaving a soggy vanilla core—trust me, it’s a disaster.
Why Your Nose Knows Best
The best cue that your cake is done isn’t a timer; it’s the aroma. When the sweet‑vanilla scent starts mingling with a deep, roasted chocolate note, you know the interior is set. If you catch that “just‑baked” perfume, the cake is ready to come out, even if the toothpick shows a few crumbs. Your nose is a more reliable judge than any digital readout.
The 5‑Minute Rest That Changes Everything
After you pull the cake from the oven, let it rest in the pan for exactly five minutes before turning it out. This short rest lets the steam redistribute, making the crumb uniformly moist. Skipping this step leads to a dry top and a gummy bottom—a texture mismatch no one wants.
Butter Brush Bonus
Before the final swirl, lightly brush the top of the vanilla batter with melted butter. This creates a glossy finish and helps the chocolate swirl adhere better, producing sharper, more defined marble lines. It’s a tiny detail that makes the visual impact feel restaurant‑quality.
Freeze‑Forward Technique
If you’re planning to serve the cake a day or two later, freeze the batter in the loaf pan before baking. Bake it straight from the freezer, adding an extra 5‑7 minutes to the cooking time. The result? A cake that’s just as moist, with an even more pronounced marble pattern because the batter stays layered during the bake.
Creative Twists and Variations
This recipe is a playground. Here are some of my favorite ways to switch things up:
Espresso Marble
Swap half of the hot water for a shot of strong espresso and replace half of the cocoa powder with instant coffee granules. The result is a sophisticated coffee‑chocolate marble that’s perfect for brunch or an afternoon pick‑me‑up.
Citrus Zest Surprise
Add a tablespoon of finely grated lemon or orange zest to the vanilla batter before mixing. The citrus brightens the vanilla side, creating a fresh contrast to the deep chocolate veins—ideal for spring gatherings.
Nutty Crunch
Fold in a half‑cup of toasted chopped almonds or hazelnuts into the vanilla batter just before pouring into the pan. The nuts add a delightful crunch that complements the soft crumb, turning each bite into a textural adventure.
Berry Burst
Gently swirl in a quarter‑cup of fresh raspberry puree into the chocolate batter. The berries add a subtle tang and a gorgeous pink‑purple marbling, making the cake look like a work of art.
Spiced Holiday
Introduce a pinch of ground cinnamon, nutmeg, and a dash of clove to the vanilla batter for a warm, festive twist. Pair it with a dusting of powdered sugar after cooling, and you have a holiday centerpiece that’s both comforting and elegant.
Storing and Bringing It Back to Life
Fridge Storage
Once the cake has cooled completely, wrap it tightly in plastic wrap or store it in an airtight container. It will stay fresh in the refrigerator for up to four days. The cool environment keeps the crumb moist and the marble swirls intact.
Freezer Friendly
For longer storage, slice the cake into individual portions, wrap each slice in parchment paper, then place them in a freezer‑safe bag. The cake freezes beautifully for up to three months. When you’re ready to enjoy, let a slice thaw at room temperature for 15 minutes, then give it a quick microwave zap (10‑15 seconds) to revive the softness.
Best Reheating Method
To bring a whole cake back to life, preheat your oven to 300°F (150°C), place the cake on a baking sheet, and cover it loosely with foil. Heat for 10‑12 minutes, adding a tiny splash of water (about a tablespoon) to the foil’s interior. The steam created will re‑moisturize the crumb, making it taste as if it just left the oven.