I was standing in my kitchen, half‑heartedly scrolling through the endless sea of “quick chicken pot pies” when a sudden craving hit me like a freight train. I could hear the distant hum of the dishwasher, the faint clink of a spoon against a bowl, and in my mind the buttery scent of a biscuit rising in a hot oven. My roommate had just dared me to recreate Red Lobster’s legendary biscuit‑topped chicken pot pie, and I thought, “Why not turn that dare into a full‑blown culinary showdown?” The result? A dish that feels like a warm hug from your grandma and a high‑five from a seasoned chef rolled into one.
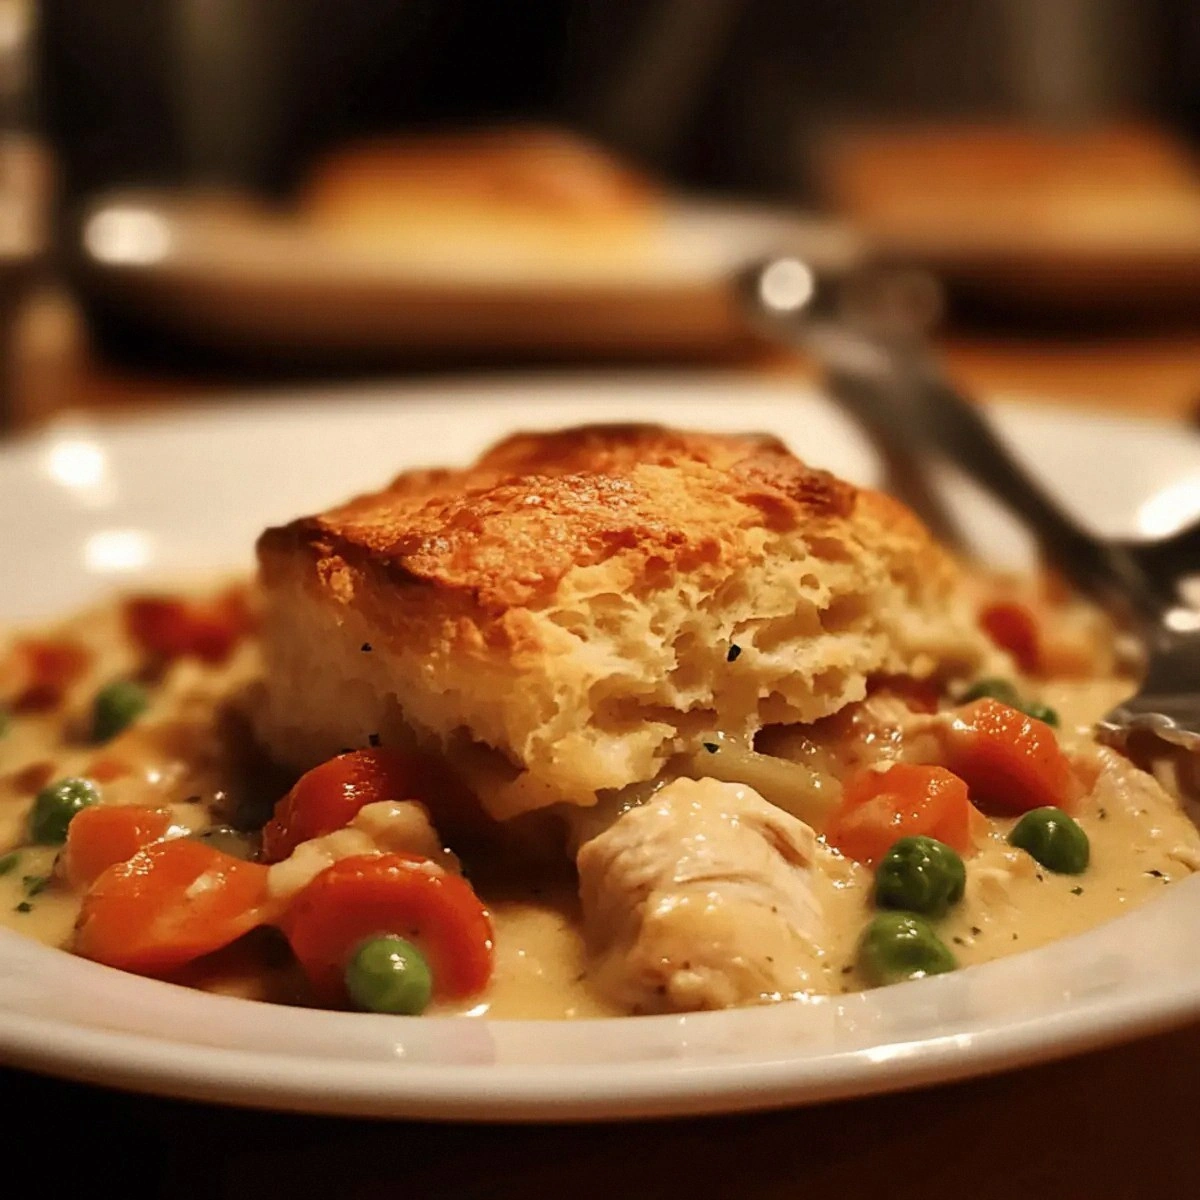
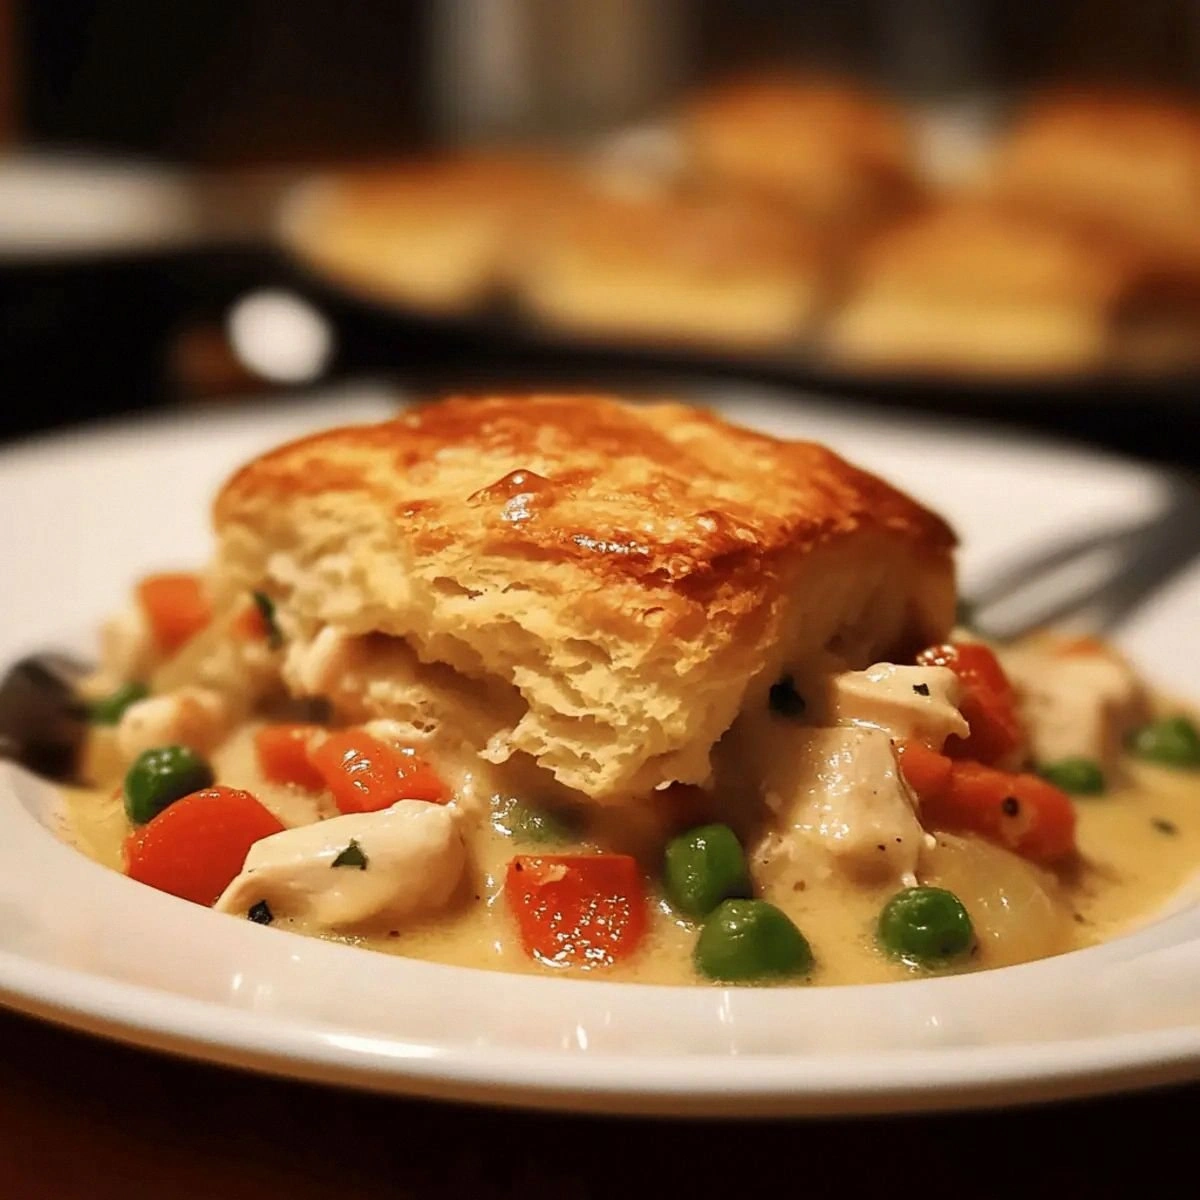
Picture this: the moment you pull the pie from the oven, the kitchen is flooded with a golden‑glow that makes every surface look like a sun‑kissed field. The biscuits on top are crisped to a perfect amber, their edges flaking like thin ice, while the filling beneath bubbles with a creamy, cheesy richness that clings to the chicken like velvet. When you cut into it, steam rushes out, carrying whispers of garlic and onion powder, and the aroma instantly transports you to a seaside shack where the ocean breeze meets buttery biscuits. The first bite? A harmonious collision of tender chicken, sweet peas, carrots, and a buttery crust that shatters with a satisfying snap.
Most home‑cooked chicken pot pies either fall flat on texture or drown in a soggy, bland sauce. This version flips the script by marrying Red Lobster’s secret biscuit topping with a velvety, cheese‑infused filling that never gets watery. The secret weapon? A splash of chicken broth that keeps the gravy glossy, and a dash of cheddar that adds a subtle sharpness without overpowering the gentle herbs. I’ll be honest — I ate half the batch before anyone else got to try it, and that’s because the flavor is so addictive you’ll be counting the seconds until the next spoonful.
But wait, there’s a twist that most copy‑cat recipes miss: a quick‑whip biscuit dough that uses baking powder for lift instead of yeast, meaning you get that fluffy, pillow‑like top in under 15 minutes. No need to wait for dough to rise, no extra bowls, just pure, buttery bliss. I dare you to taste this and not go back for seconds; the combination of flaky biscuit and silky filling is pure, unapologetic comfort food. Okay, ready for the game‑changer? Let me walk you through every single step — by the end, you’ll wonder how you ever made it any other way.
What Makes This Version Stand Out
- Taste: The cheddar‑infused broth adds a depth that ordinary cream soups lack, creating a savory symphony that sings with every bite.
- Texture: Flaky biscuits sit atop a luxuriously creamy filling, delivering a contrast that’s as satisfying as crunchy granola in a smooth yogurt.
- Simplicity: All the magic happens in two pans, no fancy equipment required, making it perfect for weeknight warriors.
- Uniqueness: The biscuit topping is inspired by Red Lobster’s secret recipe, but we’ve tweaked it to be lighter and faster without sacrificing that iconic crunch.
- Crowd Reaction: Expect a chorus of “Mmm” and “More, please!” — this pie has a habit of disappearing before the last crumb.
- Ingredient Quality: Using real chicken broth and shredded cheddar elevates the dish from “just okay” to “restaurant‑level” in minutes.
- Cooking Method: Baking the biscuits on top of the bubbling filling locks in moisture, ensuring the crust never gets soggy.
- Make‑Ahead Potential: Assemble ahead of time, refrigerate, and pop it in the oven when guests arrive — the biscuits stay crisp, the filling stays creamy.
Inside the Ingredient List
The Flavor Base
First up, the heart of the pie: Cooked Chicken. Shredded or diced, the chicken should be moist, not dry, because it absorbs the broth and becomes tender with each bite. If you’re using a rotisserie chicken, you’ll get an extra layer of smoky flavor that makes the whole dish sing. Garlic Powder and Onion Powder are the silent heroes, providing aromatic depth without the hassle of chopping fresh aromatics. Skipping them would leave the filling flat, like a song missing its chorus. A quick tip: toast the garlic powder lightly in a dry pan for 30 seconds to awaken its flavor before adding it to the sauce.
The Texture Crew
Frozen Mixed Vegetables bring color, crunch, and a hint of sweetness that balances the savory broth. They’re pre‑cooked, so they retain a pleasant bite after the bake. If you prefer fresh, steam carrots and peas for 3 minutes; just be careful not to overcook, or you’ll lose that satisfying snap. The Cream of Chicken Soup is the glue that binds everything together, delivering that silky body we all crave. Use a high‑quality brand; cheap versions can taste overly starchy. Chicken Broth dilutes the soup just enough to keep it from turning into a thick paste, while still delivering a rich, meaty backbone.
The Unexpected Star
Shredded Cheddar Cheese is the surprise element that turns an ordinary pot pie into a cheesy masterpiece. Its sharpness cuts through the creaminess, adding a subtle tang that brightens the overall profile. If you’re lactose‑intolerant, try a sharp, aged Parmesan or a dairy‑free cheddar alternative. The Milk rounds out the biscuit dough, ensuring the crumb stays tender and not crumbly. Whole milk works best, but 2% will do the trick if you’re watching calories.
The Final Flourish
Now for the biscuit crown: All‑Purpose Flour provides structure, while Baking Powder gives that lift we love. The ratio of flour to butter is crucial; too much flour yields dense biscuits, too little makes them spread thin. Unsalted Butter is the flavor carrier—its richness creates those golden, flaky edges. Salt is split between the filling and the biscuit dough, ensuring each component is seasoned perfectly. If you’re on a low‑sodium diet, reduce the added salt but keep a pinch in the biscuit mix for flavor balance.
Everything's prepped? Good. Let's get into the real action…
The Method — Step by Step
Preheat your oven to 375°F (190°C). While the oven warms up, melt the Unsalted Butter in a medium saucepan over medium heat until it foams but doesn’t brown. This will be the base for both the filling and the biscuit dough, giving everything a cohesive buttery flavor. Once melted, add the Garlic Powder and Onion Powder, letting them sizzle for about 20 seconds — that sizzle when it hits the pan? Absolute perfection.
Stir in the Cream of Chicken Soup and Chicken Broth. Bring the mixture to a gentle boil, then lower the heat and let it simmer for 3‑4 minutes, allowing the flavors to meld. At this point, you’ll notice the sauce thickening just enough to coat the back of a spoon; that’s the visual cue you’re on the right track. Add the Shredded Cheddar Cheese and stir until it melts into a silky ribbon that swirls through the broth.
Fold in the Cooked Chicken and Frozen Mixed Vegetables. The chicken should be evenly distributed, and the veggies should retain their bright color. Season with Salt and Pepper to taste; remember, the biscuit layer will also have salt, so be gentle. Let the mixture simmer for another 2 minutes, just enough for everything to heat through without overcooking the veggies.
While the filling simmers, whisk together the All‑Purpose Flour, Baking Powder, and the second portion of Salt in a large bowl. This dry mix ensures the biscuits rise evenly. Watch Out: Over‑mixing the flour can develop gluten, leading to tough biscuits. Keep stirring to a light, crumbly texture.
Create a well in the center of the dry ingredients and pour in the melted butter from step 1, followed by the Milk. Using a rubber spatula, gently fold until just combined; a few flour streaks are okay. The dough should be shaggy and slightly sticky — that’s the sweet spot for a tender biscuit.
Kitchen Hack: If the dough feels too wet, sprinkle a tablespoon of flour; if too dry, add a splash of milk. Adjusting on the fly keeps the biscuits from turning into a brick.Transfer the chicken mixture into a 9‑inch (23 cm) baking dish, spreading it evenly. The surface should be smooth, but don’t worry if there are a few little peaks — they’ll become pockets for the biscuit dough to nestle into. This is the moment of truth: the filling should look glossy and inviting, with a faint steam rising from the edges.
Drop spoonfuls of the biscuit dough over the filling, spacing them about 2 inches apart. The dough will spread slightly as it bakes, so give them room to expand. For an extra golden finish, brush the tops with a little melted butter or an egg wash (1 egg beaten with 1 tsp water). The butter brush adds a glossy sheen that makes the biscuits look restaurant‑ready.
Place the dish in the preheated oven and bake for 20‑25 minutes, or until the biscuit tops are a deep amber and the filling is bubbling around the edges. You’ll know it’s done when the biscuits puff up and the edges start pulling away from the pan, creating that irresistible “crack‑le” sound as you slice into it.
Remove from the oven and let the pie rest for 5 minutes. This short rest lets the gravy thicken just enough to hold its shape when you cut into it. Serve hot, and watch as your guests dive in, their faces lighting up with that “I’ve found my comfort food” glow. And now the fun part: dig in, savor the buttery biscuit, and maybe steal a second slice when no one’s looking.
That's it — you did it. But hold on, I've got a few more tricks that'll take this to another level…
Insider Tricks for Flawless Results
The Temperature Rule Nobody Follows
Most home cooks bake at 350°F, but cranking the oven up to 375°F gives the biscuit a rapid rise, creating that coveted puff without drying out the filling. The higher heat also caramelizes the butter on the biscuit tops, delivering a nutty, toasty flavor. I once tried baking at 350°F and ended up with biscuits that were dense and pale — a clear reminder that temperature is the secret lever behind texture.
Why Your Nose Knows Best
Instead of watching the clock obsessively, trust your nose. When the biscuit edges start to emit a sweet, buttery aroma and the filling begins to bubble vigorously, you’re at the perfect finish point. If the scent is faint, give it an extra minute; if it’s strong and you see the biscuits turning a deep amber, pull it out immediately. Your olfactory senses are the ultimate timer.
The 5‑Minute Rest That Changes Everything
Letting the pie sit for five minutes after baking allows the gravy to set, preventing a soupy spill when you cut. This short pause also lets the biscuits finish their steam‑rise, making them even fluffier. I once served it straight from the oven and watched the filling slide off the plate — a lesson learned the hard way.
Butter‑Brush Boost
A quick brush of melted butter on the biscuit tops right before the last two minutes of baking adds an extra layer of gloss and flavor. The butter melts into the crust, creating a subtle caramelized edge that makes each bite sing. If you’re feeling fancy, sprinkle a pinch of flaky sea salt on top for a pop‑of‑salty contrast.
Freeze‑Ahead Freedom
Assemble the pie up to the point of baking, cover tightly with foil, and freeze. When you’re ready to serve, bake from frozen at 375°F for 35‑40 minutes, adding a few extra minutes for the biscuits to brown. This trick turned my last‑minute dinner party into a stress‑free success, and the biscuits still turned out crisp.
Creative Twists and Variations
This recipe is a playground. Here are some of my favorite ways to switch things up:
Spicy Jalapeño Kick
Add 1 finely diced jalapeño to the filling and swap the cheddar for pepper jack. The heat pairs beautifully with the buttery biscuit, creating a flavor contrast that’s perfect for those who love a little zing.
Mushroom Medley
Replace the mixed vegetables with a blend of sautéed cremini and shiitake mushrooms. The earthy umami deepens the broth, and the biscuits still provide that comforting crunch.
Southern BBQ Twist
Stir in ½ cup of your favorite BBQ sauce and use smoked Gouda instead of cheddar. The smoky, sweet notes turn the pot pie into a Southern comfort dish that pairs well with coleslaw.
Herb‑Infused Bliss
Add a tablespoon of fresh thyme and a sprinkle of rosemary to the filling. The herbs add a fragrant, garden‑fresh dimension that makes the pie feel like a springtime feast.
Vegan Friendly
Swap the chicken for cubed tofu, use a plant‑based cream soup, and replace butter with vegan margarine. Use a dairy‑free cheddar alternative, and you’ll have a fully vegan version that still delivers on texture.
Storing and Bringing It Back to Life
Fridge Storage
Cool the pie completely, then cover tightly with foil or a reusable lid. It will keep fresh for up to 3 days. Reheat individual slices in a skillet over medium heat, adding a splash of water and covering for 2‑3 minutes to steam the biscuit back to crispness.
Freezer Friendly
Freeze the assembled, unbaked pie on a parchment‑lined tray, then transfer to a zip‑top bag. It will retain quality for up to 2 months. When ready, bake from frozen at 375°F, adding 10‑15 minutes to the baking time; the biscuits will still rise beautifully.
Best Reheating Method
For the crispiest biscuit revival, preheat your oven to 350°F, place a slice on a baking sheet, and cover loosely with foil for the first 5 minutes. Then remove the foil and bake for another 5‑7 minutes until the top is golden. A tiny splash of water in the pan creates steam that prevents the filling from drying out.