I remember the night I tried to impress my roommate with a cookie that would outshine every other treat on the table. The kitchen was a battlefield—flour clouds, a rogue spatula, and the faint scent of vanilla that lingered like a promise. The moment my first batch hit the counter, the aroma hit me like a warm hug, but the taste was underwhelming, a bland echo of ordinary cookie bliss. That disaster sparked a mission: to create a cookie that would not only satisfy but demand a second bite, and I swear I’m still not done bragging about it.
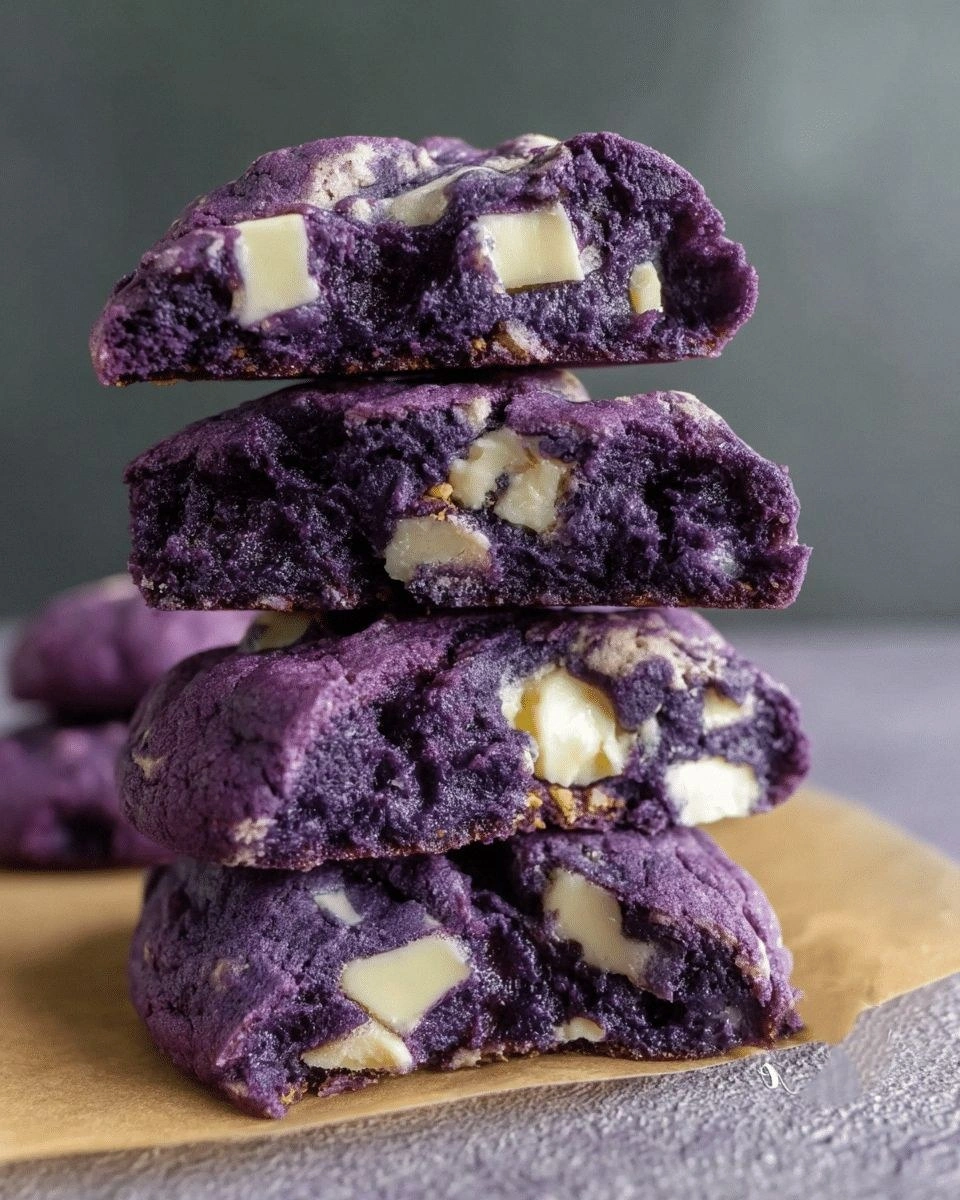
Picture this: a glossy, deep purple dough that glistens under the oven light, each bite melting into a velvety sweetness that lingers on the palate. The sound of the first crack as you break one in half is like a tiny explosion of flavor, a bright burst of ube’s earthy sweetness paired with the buttery crunch of a perfect edge. Imagine the gentle sigh of satisfaction as the buttery, caramelized edges give way to a tender, chewy center that’s soft enough to melt in your mouth. This isn’t just a cookie; it’s a passport to a moment of pure, unadulterated joy that you can share with anyone who’s ever needed a sweet pick‑me‑up.
What makes these cookies a game‑changer is the unexpected marriage of levain, the wild, tangy magic of sourdough starter, with the unmistakable, sweet, and slightly nutty flavor of ube. The levain doesn’t just add flavor; it creates a subtle lift that turns the dough into a light, airy texture that feels almost cake‑like. The ube puree gives a natural sweetness that eliminates the need for excess sugar, while its vibrant color turns every bite into a visual delight. Together, they create a cookie that’s simultaneously crunchy on the outside and chewy on the inside, a perfect balance that most recipes miss.
I dare you to taste this and not go back for seconds. Most cookie recipes get this completely wrong by over‑baking or under‑seasoning, but I’ve cracked the code that keeps the edges crisp while the center stays moist. If you’ve ever struggled to achieve that perfect texture, you’re not alone—and I’ve got the fix. Stay with me here; the next part is pure magic, and by the end, you’ll wonder how you ever made it any other way.
What Makes This Version Stand Out
- Taste: The natural sweetness of ube balances perfectly with the subtle tang from the levain, creating a flavor profile that feels both familiar and adventurous.
- Texture: The combination of butter and oil gives a buttery, melt‑in‑your‑mouth chew, while the levain adds a slight airy lift that keeps the cookies from feeling dense.
- Simplicity: You only need a handful of pantry staples plus a cup of ube puree—no exotic ingredients or advanced techniques.
- Uniqueness: The deep purple hue is eye‑catching, making these cookies a show‑stopper at any gathering.
- Crowd Reaction: Friends who taste them often comment that they taste like a holiday treat, even though this recipe is year‑round.
- Ingredient Quality: Using fresh ube puree or high‑quality store‑bought puree makes all the difference in flavor depth.
- Cooking Method: The levain’s natural leavening eliminates the need for chemical leaveners, giving the cookies a natural rise.
- Make‑Ahead Potential: These cookies can be baked ahead and stored in an airtight container for up to a week, making them ideal for busy weeknights.
Inside the Ingredient List
The Flavor Base
All‑purpose flour is the backbone of this cookie, providing structure while keeping the dough tender. The flour’s protein content ensures a slight chew that pairs well with the soft ube. If you’re looking for a gluten‑free version, swap for a 1:1 gluten‑free blend, but be aware it may yield a slightly crumblier texture. The key is to sift the flour before mixing to avoid clumps and to ensure an airy crumb.
The Sweet & Fat Crew
Granulated sugar and brown sugar work together to create a caramelized crust that’s both sweet and slightly molasses‑rich. Unsalted butter, softened to room temperature, adds a buttery richness that melts beautifully in the oven. Vegetable oil contributes moisture and prevents the cookies from drying out, ensuring a chewy center. Together, these fats give the cookies a luxuriously soft mouthfeel.
The Unexpected Star
Ube puree is the star of the show, delivering a natural sweetness and a striking purple hue that’s impossible to ignore. Fresh ube can be boiled and mashed, but store‑bought puree is a convenient alternative that still offers a robust flavor. The puree’s moisture content also helps bind the dough, so if it’s too dry, add a splash of coconut milk to keep the dough from cracking. Remember, the richer the ube, the more vibrant the color.
The Final Flourish
Dark chocolate chips add a burst of bittersweet richness that contrasts nicely with the sweet ube. Chopped macadamia nuts introduce a buttery crunch that elevates the texture profile. The levain, or sourdough starter, brings a subtle tang that balances the sweetness and adds a natural leavening effect. Finally, vanilla extract and a pinch of salt tie all the flavors together, enhancing the overall depth.
Everything’s prepped? Good. Let’s get into the real action.
The Method — Step by Step
- Preheat your oven to 350°F (175°C) and line two baking sheets with parchment paper. This step ensures even baking and prevents the cookies from sticking. While the oven is heating, let the levain sit at room temperature for about 30 minutes to activate; you’ll notice a pleasant, yeasty aroma. Once the oven is ready, set a timer for 12 minutes; you’ll want the edges to just start pulling away from the parchment.
- In a medium bowl, whisk together the all‑purpose flour, baking powder, baking soda, and salt until well combined. Sifting the flour beforehand helps avoid lumps and creates a smoother dough. This dry mix will later absorb the wet ingredients and form the cookie’s structure. Keep this bowl aside while you work on the wet mixture.
- In a larger bowl, beat the softened butter and both sugars until light and fluffy—about 3 to 4 minutes on medium speed. The goal is to incorporate air, giving the cookies a lightness that will contrast with the dense ube. Once the mixture is pale and airy, add the vegetable oil, vanilla extract, and the egg, beating until fully combined. The wet mixture should feel silky and smooth.
- Fold in the ube puree and the levain, mixing gently until the dough is a uniform purple hue. The levain will give the dough a subtle tang and a slight lift, so don’t overmix; you want a gentle fold that keeps the dough soft. The color should be vivid but not too deep—if it’s too dark, add a splash of coconut milk to brighten it slightly. This step is where the magic happens, and the aroma will fill your kitchen like a sweet, yeasty perfume.
- Combine the dry and wet mixtures, folding until just incorporated. The dough should be thick and slightly sticky—if it’s too dry, add a tablespoon of milk or water. Over‑mixing can develop gluten, resulting in a tough cookie, so stop as soon as the flour is visible. The dough should hold together but still be pliable, like a soft dough used for shortbread.
- Fold in the chocolate chips and chopped macadamia nuts. The chips should be evenly distributed, ensuring every bite has that delightful chocolate burst. If you prefer a nutier cookie, increase the nut amount; if you’re allergic, simply omit them. This step adds texture and a subtle nutty aroma that complements the ube.
- Drop rounded tablespoons of dough onto the prepared baking sheets, spacing them about 2 inches apart. The cookies will spread slightly, so give them enough room. After placing the first batch, you can bake the cookies for 10-12 minutes, until the edges are just beginning to turn golden. Keep an eye on them; the oven’s heat can vary, so adjust accordingly.
- Bake for an additional 8-10 minutes, or until the tops are set and the edges have a faint golden color. Remove the cookies from the oven and let them cool on the sheet for 5 minutes before transferring them to a wire rack to finish cooling. The cookies will firm up as they cool, giving that perfect bite. Store any leftovers in an airtight container at room temperature for up to a week.
That’s it—you did it. But hold on, I’ve got a few more tricks that will take this to another level. The next section will dive into insider tips that will elevate your cookie game from good to legendary.
Insider Tricks for Flawless Results
The Temperature Rule Nobody Follows
Many bakers bake cookies at a higher temperature to get a crisp edge, but for these ube cookies, a lower temperature is key. Baking at 350°F (175°C) allows the cookies to rise slowly, creating a tender center while the edges crisp up just enough. If you increase the temperature, the cookies will brown too quickly on the outside, leaving a raw center. Keep the oven rack in the middle to ensure even heat distribution.
Why Your Nose Knows Best
Before you lift the cookies from the oven, smell them. The aroma should be sweet, buttery, and slightly yeasty. If you notice a sour or off scent, it might be a sign that the levain is overactive or that the dough was overmixed. Trust your nose; it’s a reliable indicator of doneness. The smell is the first clue that the cookies are ready to be enjoyed.
The 5-Minute Rest That Changes Everything
After removing the cookies from the oven, let them rest on the baking sheet for 5 minutes. During this time, the cookies finish cooking internally while the edges set. This rest period also prevents the cookies from cracking when you transfer them to a rack. If you skip this step, the cookies may crumble or lose their shape.
Chill the Dough for Crunchier Cookies
If you prefer a crunchier cookie, chill the dough for 30 minutes before scooping. The cold dough holds its shape better and spreads less in the oven, giving a firmer bite. Just be careful not to chill for too long, or the dough will become too hard to scoop. A short chill is the sweet spot for a crisp exterior.
Use a Silicone Baking Mat for Even Baking
Parchment paper is great, but a silicone mat provides a non‑stick surface that ensures even heat distribution. The mat also makes cleanup easier, as the cookies don’t stick to the paper. If you’re baking in bulk, a silicone mat can help you maintain consistent results across batches. Try it next time for a professional finish.
Add a Pinch of Sea Salt on Top
A light dusting of flaky sea salt on top of the cookies before baking adds a savory contrast that enhances the sweet flavors. The salt crystals pop against the soft dough, giving a pleasant crunch. Be generous but not excessive; a single pinch is enough to elevate the taste profile. This final touch turns an ordinary cookie into a gourmet treat.
Creative Twists and Variations
This recipe is a playground. Here are some of my favorite ways to switch things up:
Chocolate‑Covered Ube Cookies
Dip half of the cooled cookies in melted dark chocolate, then drizzle with white chocolate for a stunning contrast. Let the chocolate set in the refrigerator for 15 minutes. The result is a decadent, glossy treat that’s perfect for dessert parties. The chocolate adds richness that balances the natural sweetness of ube.
Spiced Ube Cookies
Add 1/2 teaspoon of ground ginger and a pinch of cinnamon to the dry mix for a warm, aromatic twist. The spices complement the earthy flavor of ube, creating a comforting cookie that’s ideal for fall gatherings. Serve with a cup of chai for a cozy pairing. The spices elevate the cookie’s profile without overpowering it.
Nut‑Infused Ube Cookies
Swap macadamia nuts for toasted walnuts or pecans for a different crunch and flavor profile. The nuts’ natural oils add depth and a subtle caramel note. Toast the nuts beforehand to bring out their aroma. This variation is great for those who love a nutty bite.
Gluten‑Free Ube Cookies
Use a 1:1 gluten‑free flour blend, and replace the baking soda with an equal amount of baking powder. The texture will be slightly denser but still tender. Be mindful of the leavening, as gluten‑free flours can behave differently. This version allows everyone to indulge in the magic of ube.
Vegan Ube Cookies
Swap butter for vegan butter or coconut oil, and use a flax egg (1 tablespoon ground flaxseed mixed with 3 tablespoons water) in place of the egg. The cookies will still rise beautifully thanks to the levain. The vegan version retains the same vibrant color and flavor profile. Perfect for plant‑based bakers.
Mini Ube Biscotti
Shape the dough into a log, bake, then slice and bake again until crisp. The biscotti can be dipped in coffee or tea for a delightful treat. The chewy interior contrasts with the crisp exterior. This variation is great for an afternoon snack.
Storing and Bringing It Back to Life
Fridge Storage
Store the cooled cookies in an airtight container at room temperature for up to a week. The airtight seal preserves moisture, keeping the cookies soft. If you notice any dryness, add a slice of apple or a damp paper towel to the container. This trick helps maintain the cookie’s tenderness.
Freezer Friendly
Place the cookies on a parchment‑lined tray and freeze until solid, then transfer them to a freezer bag. They’ll stay fresh for up to 3 months. When you’re ready to enjoy, let them thaw at room temperature for 20 minutes. This method preserves the cookies’ texture and flavor.
Best Reheating Method
To revive the cookies, place them on a baking sheet and warm them in a 300°F (150°C) oven for 5 minutes. Add a tiny splash of water to the bottom of the pan; the steam will help restore moisture. The cookies will regain their softness and aromatic freshness. This simple trick is a lifesaver for leftovers.
The final touch before serving is to dust the cookies with powdered sugar or drizzle with a simple glaze. The glaze adds a glossy finish and a subtle sweetness that complements the ube. Pair the cookies with a cup of cold milk or a light tea for a balanced treat. The combination of textures and flavors will leave everyone asking for more.
If you’ve ever struggled to achieve that perfect texture, you’re not alone—and I’ve got the fix. The secret lies in the levain, which adds a natural lift and a subtle tang that balances the sweetness. The key is to fold gently, keep the dough chilled if you want crunch, and trust your senses—especially your nose—to judge doneness. With these tips, you’ll consistently bake cookies that are a crowd‑pleaser every time.
Cleaning up is a breeze if you use parchment paper or a silicone mat. After baking, let the sheet cool before discarding the paper; you can reuse it for the next batch. If you used a silicone mat, wipe it with a damp cloth and let it air dry. The cookies themselves are the real star, but a tidy kitchen makes the whole experience more enjoyable.
Final thoughts: these Ube Levain‑Style Cookies are a testament to the power of combining traditional baking with a twist of modern technique. The levain adds a depth that’s rarely seen in cookie recipes, while the ube provides a natural sweetness and a striking color that makes them Instagram‑worthy. Whether you’re a seasoned baker or a kitchen newbie, this recipe will elevate your cookie game and leave you craving more. Grab your ingredients, follow the steps, and let the magic unfold.