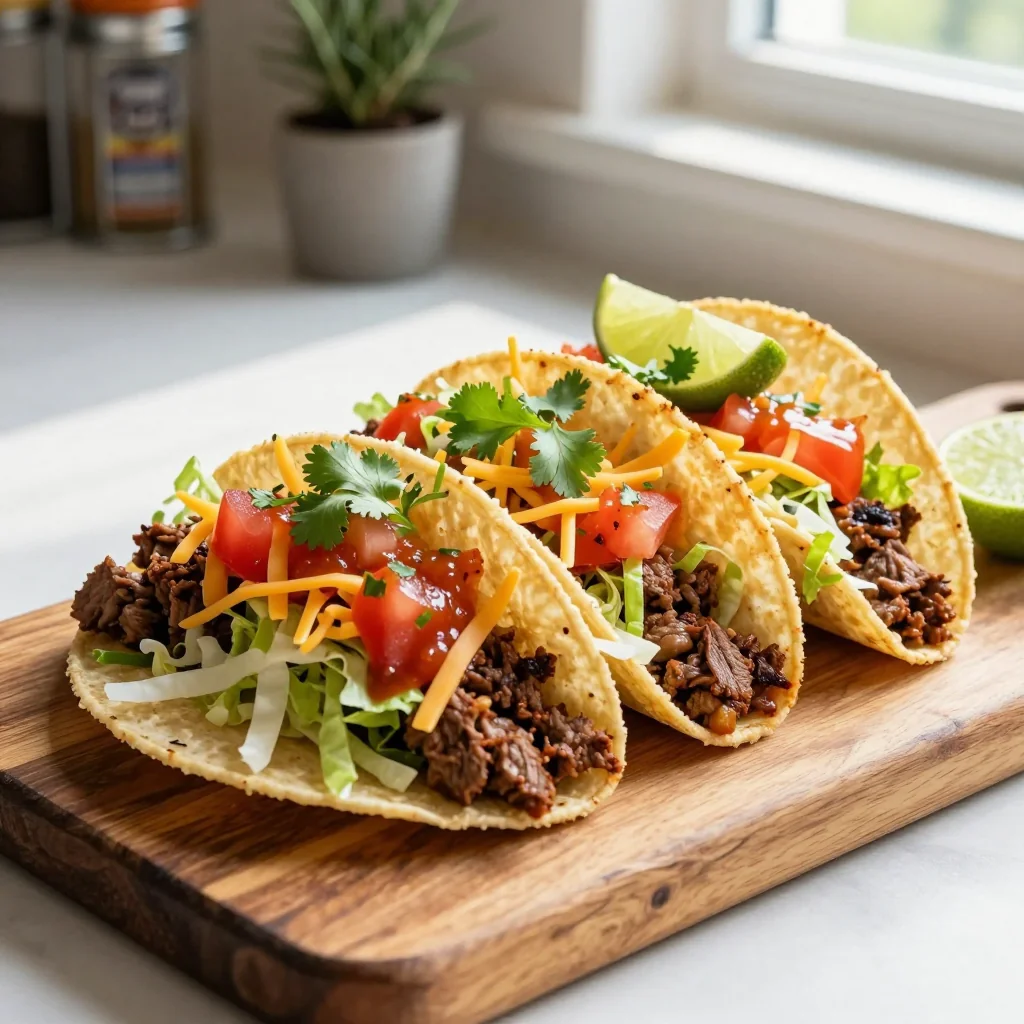
Crispy corn shells filled with seasoned beef, fresh toppings, and a burst of Mexican sunshine.
When I was a teenager, my family would gather around the kitchen every Friday night for a taco fiesta. I remember the sizzling sound of ground beef hitting the hot skillet, the aromatic cloud of cumin and smoked paprika that filled the house, and the way the kids would scramble for the crunchy shells. Those evenings taught me that food is more than sustenance; it’s a memory maker, a bridge between generations.
Beef tacos are a staple of Mexican street food, traditionally served on soft corn tortillas, but the hard shell version has a special place in American homes. The crunchy shell adds a satisfying contrast to the juicy, spiced beef, making each bite a delightful texture adventure. This recipe captures the authentic flavors while keeping the preparation simple enough for a weeknight dinner.
In this article, you’ll discover why the balance of spices, the secret to perfectly crisp shells, and the art of layering fresh toppings work together to create a taco that sings. I’ll walk you through each step, share pro tips for scaling the recipe, and even give you variations for vegetarians and spice lovers.
Let’s dive in, roll up our sleeves, and bring a piece of Mexican street culture to your own kitchen.
🌟 Why This Recipe Will Win Your Heart
Beef Tacos with Hard Shells combine bold flavors, easy preparation, and crowd‑pleasing appeal, making them perfect for any occasion.
- ✨ Perfectly Balanced Seasoning: The blend of cumin, smoked paprika, chili powder, and oregano creates a deep, smoky profile without overwhelming heat, appealing to both mild and adventurous palates.
- ✨ Crunch That Craves Attention: Baking the shells with a light brush of oil guarantees an even golden crisp that stays crunchy even after being topped.
- ✨ Quick Weeknight Solution: From prep to plate in just 35 minutes, this dish fits perfectly into a busy schedule while still feeling special.
- ✨ Customizable Toppings: Fresh lettuce, juicy tomatoes, sharp cheddar, and cool sour cream let each diner craft their own flavor masterpiece.
- ✨ Nutrient‑Rich Protein Boost: Ground beef provides high‑quality protein, iron, and zinc, supporting muscle recovery and overall health.
- ✨ Fun for All Ages: The interactive nature of assembling tacos makes it a hit with kids, fostering a hands‑on dining experience.
🥗 The Ingredients
📝 Complete Ingredient List
For the Beef Filling:
For the Hard Taco Shells:
For the Fresh Toppings:
🔍 Focus on the Key Ingredients
Ground Beef (80% Lean)
The heart of the taco is the beef. An 80% lean ratio gives enough fat to stay juicy while keeping the dish from becoming overly greasy. When browning, let the meat develop a deep caramelized crust before adding liquids; this Maillard reaction adds a savory depth that you can’t achieve with leaner cuts.
Smoked Paprika
Smoked paprika brings a subtle wood‑fire aroma without the heat of chipotle. It pairs beautifully with cumin to create a smoky base that evokes a street‑side grill. Use a high‑quality Spanish paprika for the most authentic flavor.
Hard Taco Shells
Choosing sturdy corn shells gives a pleasant crunch, while flour shells offer a milder flavor and a slightly softer bite. Brushing them lightly with oil before baking ensures they stay crisp even after being topped with juicy fillings.
🔄 Quick Substitutions
| If you don’t have... | Use instead... |
|---|---|
| Ground beef | Ground turkey or chicken (keep seasoning the same) |
| Smoked paprika | Regular paprika + a dash of liquid smoke |
| Corn taco shells | Flour taco shells or even crispy lettuce cups for a low‑carb option |
👨🍳 Step‑by‑Step Instructions
Follow these detailed steps to create perfectly seasoned beef and irresistibly crunchy tacos. Feel free to pause between phases to prep your toppings.
📋 Phase 1: Preparation & Mise en Place
Gather and prep all ingredients before you start cooking; this ensures a smooth workflow.
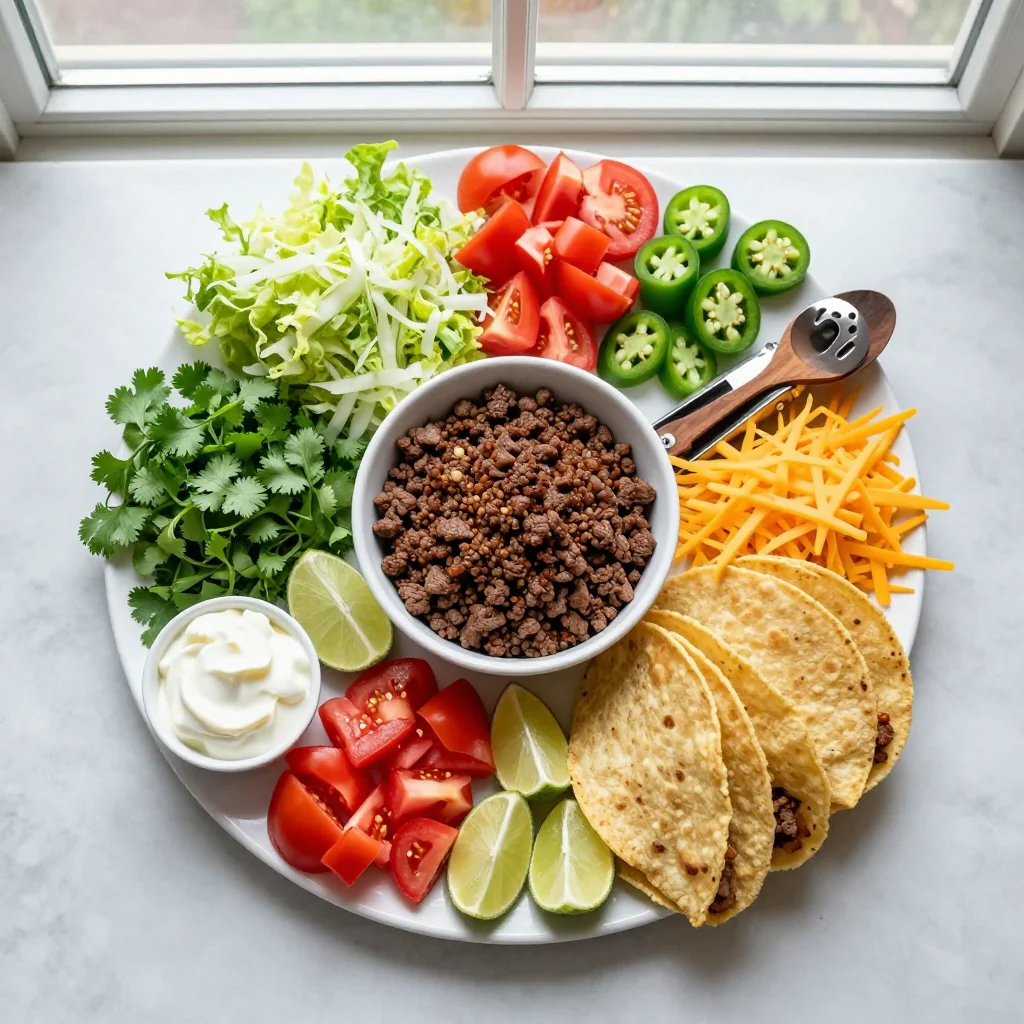
Chop the vegetables
Dice the onion finely, mince the garlic, and set aside. Wash the lettuce, pat it dry, and shred it. Dice the tomatoes, slice the olives, and crumble the cheese. Place each component in separate bowls so they stay fresh and ready for assembly.
Measure spices and liquids
Combine cumin, smoked paprika, chili powder, oregano, and cayenne (if using) in a small bowl. Measure out the beef broth and tomato paste. Having these measured ahead prevents the meat from over‑cooking while you search for seasonings.
🔥 Phase 2: Cooking & Assembly
Now we bring the flavors together, starting with the beef.
Sauté the aromatics
Heat olive oil in a large skillet over medium heat. Add the diced onion and sauté until translucent, about 3‑4 minutes. Add the minced garlic and cook for another 30 seconds, being careful not to let it brown.
Brown the ground beef
Increase the heat to medium‑high and add the ground beef. Break it up with a wooden spoon, letting it brown without stirring for the first 2‑3 minutes. This helps develop a deeper flavor. Continue to crumble and cook until no pink remains, about 6‑8 minutes.
Add spices and liquids
Stir in the spice blend, ensuring each grain coats the meat evenly. Pour in the beef broth and add the tomato paste. Reduce the heat to low and let the mixture simmer for 5‑7 minutes, or until the sauce thickens and clings to the meat. Season with salt and pepper to taste.
✨ Phase 3: Finishing Touches & Serving
Crisp the shells, assemble, and enjoy.
Crisp the taco shells
Preheat your oven to 190°C (375°F). Lightly brush each hard shell with vegetable oil on the inside, place them on a baking sheet, and bake for 5‑7 minutes until golden and firm. Keep an eye on them; they can go from perfect to burnt quickly.
Assemble the tacos
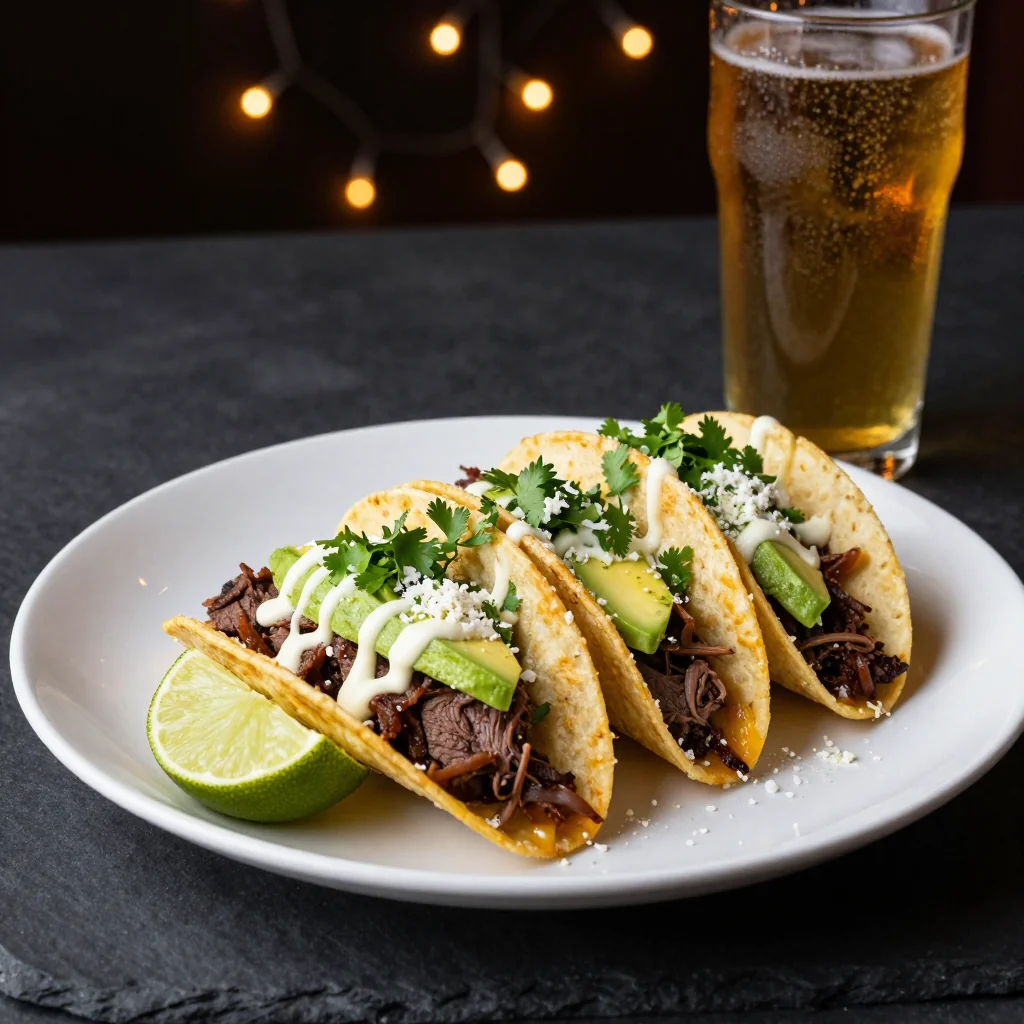
Fill each shell with a generous spoonful of the seasoned beef. Top with shredded lettuce, diced tomatoes, cheese, olives, a dollop of sour cream, and a sprinkle of fresh cilantro. Finish with a squeeze of lime for brightness.
Serve immediately
Serve the tacos while the shells are still warm and crunchy. Pair with a cold Mexican lager or a refreshing agua fresca for a complete experience.
💡 Expert Tips & Tricks
🛒 Choosing the Best Ingredients
When selecting ground beef, look for a bright red color and a firm texture; avoid meat that looks grayish or has a strong metallic smell. For the lettuce, choose heads with crisp leaves and no wilting. Fresh cilantro should be aromatic, not limp. Finally, opt for high‑quality corn shells that are not pre‑baked, as they crisp up better when you bake them yourself.
🔪 Preparation Techniques
Dice onions uniformly so they cook evenly, and mince garlic just before adding it to the pan to preserve its pungent flavor. When browning the beef, avoid overcrowding the pan; use two pans if necessary. This ensures each piece gets a chance to sear rather than steam.
🌡️ Mastering the Cooking
Maintain medium‑high heat when browning the meat to develop a deep caramel color. After adding broth and tomato paste, lower the heat to a gentle simmer; high heat will evaporate the liquid too quickly, leaving the meat dry. Use a wooden spoon to scrape the browned bits from the bottom of the pan – they’re flavor gold.
🍽️ Presentation & Service
Arrange the assembled tacos on a wide platter with lime wedges and a small bowl of extra sour cream for dipping. Garnish the platter with fresh cilantro sprigs for a pop of color. Encourage guests to add their own toppings, turning the meal into an interactive experience.
🏆 Pro Tips
Elevate your taco game from great to restaurant‑level with these insider secrets.
- 🎯 Toast the spices first: Before adding them to the meat, briefly toast cumin, smoked paprika, and oregano in a dry skillet for 30 seconds. This releases essential oils, intensifying the aroma and flavor.
- 🎯 Use a press to shape the shells: If you prefer a uniform shape, gently press each shell with a tortilla press before baking; this prevents them from cracking during cooking.
- 🎯 Finish with a drizzle of chipotle mayo: Blend chipotle in adobo with mayonnaise for a smoky, creamy sauce that adds depth without overpowering the beef.
- 🎯 Rest the beef mixture: After simmering, let the beef rest for 5 minutes off the heat. This allows the juices to redistribute, keeping the filling moist.
- 🎯 Add a splash of lime juice to the beef: A teaspoon of fresh lime juice at the end brightens the flavor and balances the richness of the meat.
- 🎯 Serve on a warmed plate: Warm your serving plates in the oven for 2 minutes. The heat keeps the shells crisp longer, especially in a bustling dinner setting.
"The secret to unforgettable tacos is not just the spice, but the love you fold into each shell." — Chef Gabriela Sánchez
🔄 Variations & Adaptations
The beauty of tacos lies in their flexibility. Below are several ways to tailor this recipe to different dietary needs, flavor preferences, and occasions.
🥬 Vegetarian / Vegan Version
Swap the ground beef for 500 g of crumbled firm tofu or cooked lentils. Marinate the tofu in the same spice blend, then sauté with a splash of soy sauce for umami. Use vegan cheese and a cashew‑based sour cream alternative. The result is a hearty, plant‑based taco that retains the smoky profile.
- Use 400 g extra‑firm tofu, pressed and crumbled.
- Replace sour cream with 30 ml of blended silken tofu, lemon juice, and a pinch of salt.
🌶️ Flavor Variations
Experiment with regional twists to keep the taco night exciting.
Spicy Version
Increase the cayenne to 1 tsp, add 1 finely chopped jalapeño, and finish with a drizzle of hot sauce.
Mediterranean Version
Replace cumin with 1 tsp dried oregano, add chopped Kalamata olives to the topping, and sprinkle feta cheese instead of cheddar.
Asian Fusion Version
Swap smoked paprika for 1 tsp five‑spice powder, use soy sauce in place of beef broth, and garnish with pickled ginger and sesame seeds.
⚠️ Dietary Adaptations
Gluten‑Free
Choose corn taco shells that are certified gluten‑free and ensure the broth and tomato paste contain no hidden wheat.
Lactose‑Free
Omit the cheddar cheese or replace it with a lactose‑free cheese alternative. Use a dairy‑free sour cream made from coconut or almond milk.
Low‑Calorie
Use 300 g of lean ground turkey, halve the cheese, and increase the lettuce proportion. Replace the oil for baking shells with a light spray.
👶 Family / Kids Version
Kids often prefer milder flavors. Reduce the cayenne and chili powder, use shredded mozzarella instead of cheddar, and serve the toppings in separate bowls so each child can customize their taco.
📦 Storage & Reheating
🧊 Conservation
Refrigerator:
- Duration: 3 days
- Container: Airtight glass container
- Tip: Store the beef filling separately from the shells to maintain crispness.
Freezer:
- Duration: 2 months
- Method: Portion the beef filling into freezer‑safe bags, label with date.
- Defrost: Thaw overnight in the refrigerator, then reheat gently.
💡 For best texture, re‑bake the shells for a minute before serving after refrigeration.
♨️ Reheating
🔥 Oven (Recommended):
- Preheat to 180°C (350°F).
- Cover shells with aluminum foil to prevent burning.
- Reheat for 8‑10 minutes.
- Remove foil and bake an additional 2 minutes to restore crispness.
⚡ Microwave (Quick):
- Place the filling in a microwave‑safe dish, cover with a vented lid.
- Heat on medium power for 1‑2 minutes, stirring halfway.
- Warm shells separately for 30 seconds on high.
🍳 Stovetop:
Reheat the beef in a skillet over medium heat, adding a splash of broth if it looks dry. Warm shells in a dry skillet for 1 minute, flipping once.
🍷 Perfect Pairings
🥗 Side Dishes
- Mexican Street Corn (Elote): Grilled corn slathered with mayo, cotija, chili powder, and lime adds a sweet‑smoky side.
- Black Bean Salad: A refreshing mix of black beans, corn, red onion, cilantro, and lime dressing balances the richness.
- Guacamole: Creamy avocado with red onion, jalapeño, and lime offers a cool contrast.
🍷 Wine & Drink Pairings
- Mexican Lager (e.g., Pacifico): Light, crisp, and slightly bitter, it cuts through the beef’s richness.
- Riesling (Off‑dry): The subtle sweetness balances the spice and enhances the lime zest.
- Non‑Alcoholic: A sparkling agua de jamaica (hibiscus water) with a hint of orange provides a bright, fruity finish.
🍰 To Complete the Meal
Start with a light citrus salad or a chilled gazpacho, then move to the tacos. Finish with a simple tres leches cake or churros dusted with cinnamon sugar for a sweet ending that echoes the Mexican theme.
❓ Frequently Asked Questions
Q: Can I use pre‑made taco seasoning instead of the individual spices?
Yes, a high‑quality pre‑made taco seasoning works well, but you may need to adjust the salt level. Typically, one packet (≈2 tbsp) replaces the cumin, smoked paprika, chili powder, oregano, and cayenne. Add it after browning the beef and before the broth.
Q: How do I keep the taco shells from getting soggy after adding the filling?
Store the shells and the beef filling separately until you’re ready to serve. If you must assemble ahead of time, place a thin layer of shredded lettuce between the shell and the beef; the lettuce acts as a moisture barrier.
Q: What’s the best way to reheat the beef without losing flavor?
Reheat the beef gently on the stovetop over medium heat, adding a splash of broth if it looks dry. This method preserves the sauce’s consistency and prevents the meat from drying out.
Q: I don’t have a lime; can I substitute another acid?
Yes, a splash of white wine vinegar or a squeeze of fresh lemon juice works as a substitute. The goal is to add a bright acidity that lifts the flavors.
Q: Can I make this recipe gluten‑free?
Absolutely. Use certified gluten‑free corn shells and ensure the beef broth and tomato paste are free from added wheat. All other ingredients are naturally gluten‑free.
Q: How far in advance can I prep the toppings?
The lettuce, tomatoes, and cilantro can be chopped up to 12 hours ahead and stored in airtight containers with a damp paper towel to retain freshness. Keep the cheese and sour cream refrigerated and add just before serving.
🎉 Let’s Get Cooking!
This Beef Tacos with Hard Shells recipe brings together the smoky depth of seasoned beef, the satisfying crunch of freshly baked shells, and the bright freshness of garden‑grown toppings. Whether you’re feeding a family, hosting a game night, or simply craving a taste of Mexico, these tacos deliver flavor, texture, and visual appeal in every bite. The step‑by‑step guide ensures even novice cooks can achieve restaurant‑quality results.
Give the recipe a try, snap a photo of your masterpiece, and share your experience in the comments below. Your feedback helps us improve, and we love seeing how you make the dish your own.
Have you tried this recipe?
Leave a comment and rating below! Share your photos on Instagram with #TacoFiesta for a chance to be featured.
Beef Tacos with Hard Shells
Crispy shells filled with smoky beef, fresh toppings, and a burst of lime.
📝 Ingredients
Beef Filling
Hard Taco Shells
Toppings
👨🍳 Instructions
- 1
Dice onion, mince garlic, and prep all toppings; keep them separate for easy assembly.
- 2
Heat olive oil in a skillet, sauté onion until translucent, then add garlic for 30 seconds.
- 3
Add ground beef, break it up, and brown for 6‑8 minutes, allowing a caramelized crust to form.
- 4
Stir in cumin, smoked paprika, chili powder, oregano, cayenne, then pour in beef broth and tomato paste.
- 5
Simmer low for 5‑7 minutes until the sauce thickens; season with salt and pepper.
- 6
Preheat oven to 190 °C, brush taco shells with oil, and bake 5‑7 minutes until crisp.
- 7
Fill each shell with beef, then add lettuce, tomatoes, cheese, olives, sour cream, cilantro, and a lime wedge.
- 8
Serve immediately while shells are hot and crunchy.
- 9
Optional: drizzle chipotle mayo for extra smokiness.
- 10
Enjoy with your chosen side dishes and beverage pairings.
🥗 Nutritional Information (per serving)
*Values are estimates based on standard ingredient data.
📚 You Might Also Like