I remember the night I tried to impress my roommate with a fancy brunch, and the kitchen turned into a battleground. The puff pastry was stuck to the rolling pin, the cream cheese had turned into a stubborn block, and the cherry pie filling was a sticky, uncooperative mess. By the time the oven door opened, the air smelled like burnt sugar and disappointment. That disaster sparked a relentless quest: find a way to make a cherry cheese Danish that would actually rise, taste divine, and not leave me in a sticky kitchen.
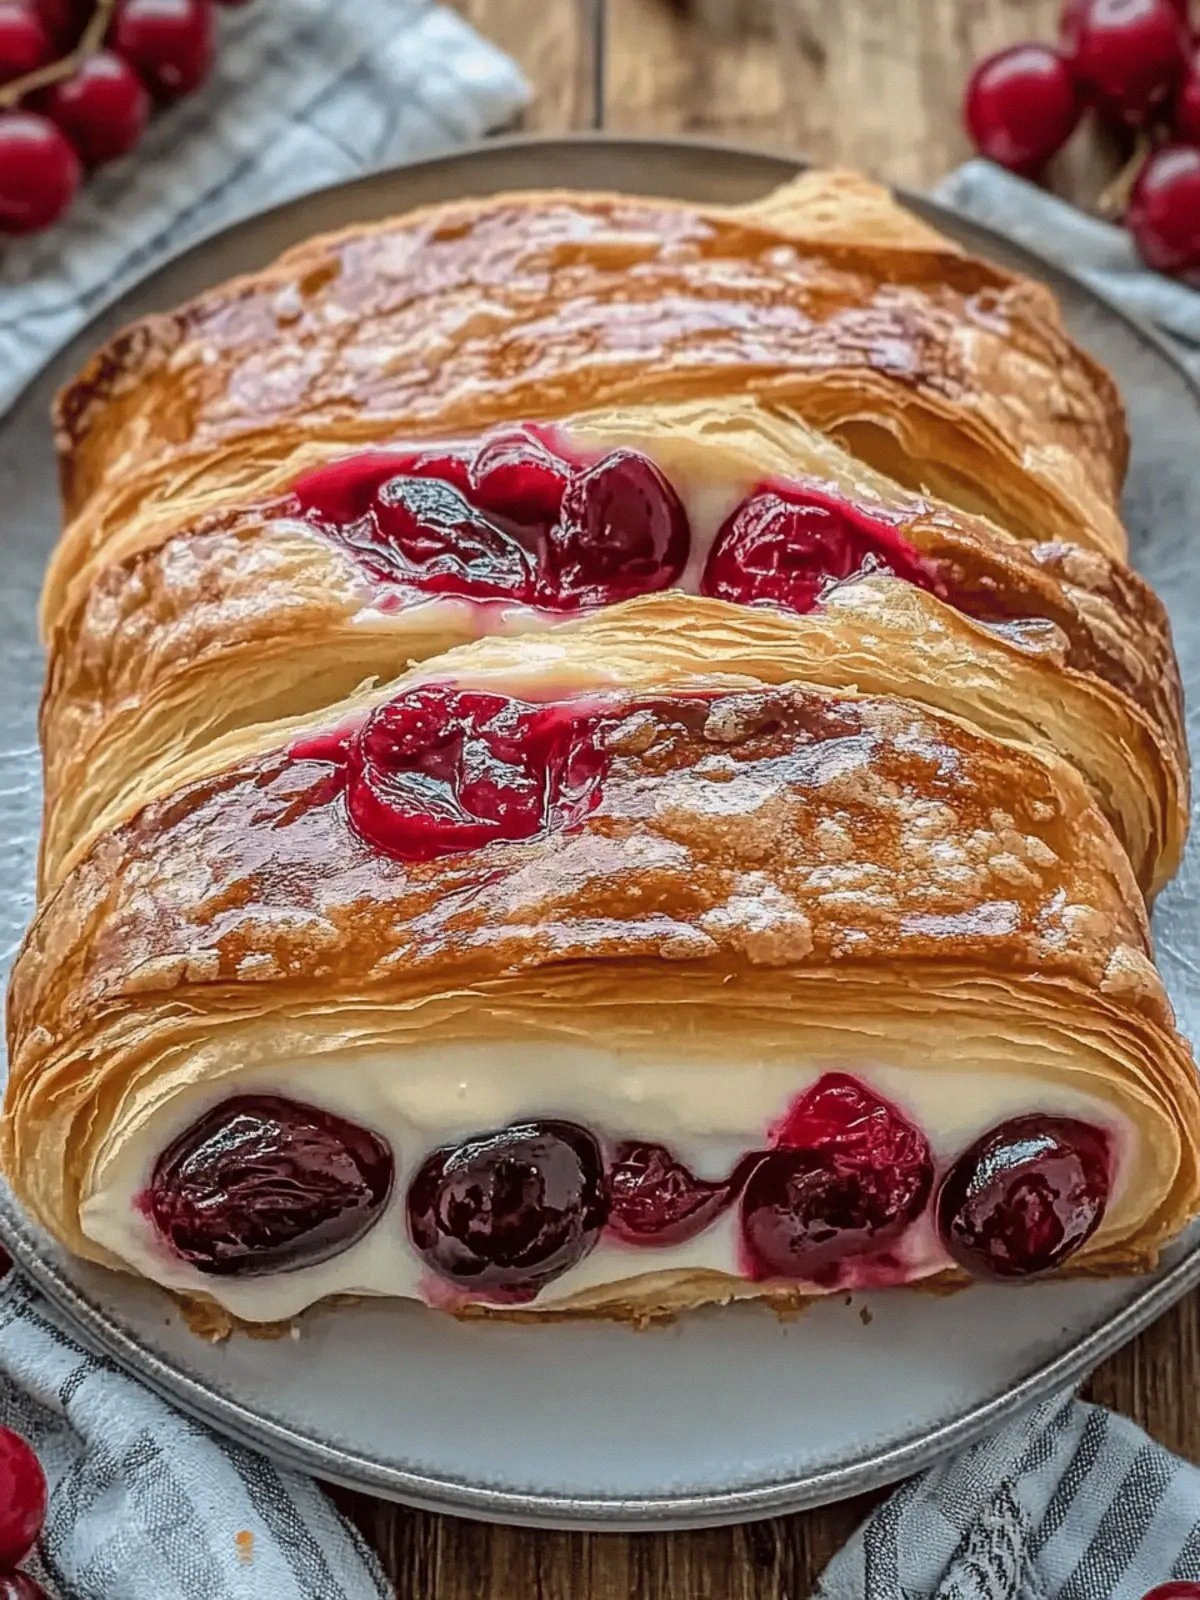
Picture this: a golden, flaky pastry that crackles as you slice through it, revealing a luscious cream cheese core that oozes sweet cherry jam. The first bite delivers a buttery crunch that gives way to a silky, tangy cream cheese filling, then a burst of sweet cherries that dance across your palate. The aroma is a warm, buttery perfume with hints of vanilla and fruit, while the texture is a perfect balance of crisp and creamy. It feels like a secret, indulgent treasure tucked inside a buttery shell, and every bite whispers “I’ve found the best version you’ll ever make at home.”
What makes this version truly stand out is the meticulous attention to detail and the small, game‑changing tweaks that most recipes overlook. From the way the puff pastry is folded to the precise ratio of cream cheese to sugar, every element is calibrated to deliver an explosion of flavor and texture. It’s a recipe that doesn’t just meet expectations—it shatters them. I dare you to taste this and not go back for seconds.
Let me walk you through every single step — by the end, you’ll wonder how you ever made it any other way. I’ve packed this guide with insider hacks, sensory checkpoints, and a few personal confessions that will make you laugh and cry (in a good way). Ready? Let’s dive into the buttery adventure.
What Makes This Version Stand Out
- Flaky Perfection: The pastry is rolled and folded in a way that creates hundreds of layers, each one crisp and buttery. This technique ensures a flaky texture that doesn’t get soggy from the filling.
- Balanced Sweetness: The ratio of cream cheese to sugar is fine‑tuned so the filling is sweet enough to complement the cherries but not overpowering. It’s the sweet‑tart harmony that keeps every bite exciting.
- Cherry Intensity: Using a high‑quality cherry pie filling gives depth and a natural fruitiness that fresh cherries can’t match. It’s a jam‑like consistency that spreads beautifully inside the pastry.
- Effortless Assembly: The recipe’s steps are streamlined so even a kitchen novice can follow along. No complicated measurements or obscure techniques—just a clear, straightforward process.
- Make‑Ahead Friendly: You can assemble the Danish a day ahead, refrigerate, and bake when you’re ready. The pastry holds up, and the filling stays fresh.
- Crowd‑Pleaser: Whether you’re serving a brunch crowd or a family dinner, these Danishes wow everyone. They’re the kind of dish that gets compliments before the first bite.
- Visual Appeal: The golden crust, the glossy cherry glaze, and the soft cream cheese inside create a dish that looks as good as it tastes.
- Versatile Base: The core concept can be swapped with other fruit fillings or cheeses, making it a versatile template for countless variations.
Inside the Ingredient List
The Flavor Base
Puff Pastry: The backbone of any good Danish, the pastry provides that buttery, flaky foundation. If you use a pre‑made sheet, keep it cold; if you’re making it from scratch, roll it until it’s thin but sturdy. Skipping this step will leave you with a flat, doughy result that can’t hold the filling.
The Texture Crew
Cream Cheese: At 8 ounces, this ingredient is the creamy heart of the Danish. It melts into a silky, tangy sauce that balances the sweetness of the cherries. If you use a lower fat cheese, the filling will be firmer and less luscious.
The Unexpected Star
Cherry Pie Filling: A can of cherry pie filling brings a natural fruit flavor and a jam‑like consistency that spreads evenly. If you prefer a fresher taste, you can substitute fresh cherries with a small amount of cherry preserve. Using a low‑sugar filling will reduce overall sweetness.
The Final Flourish
Vanilla Extract: A teaspoon of vanilla adds depth and a fragrant undertone that elevates the entire dish. Without it, the filling might taste flat. If you’re vegan, a splash of almond extract works as a suitable alternative.
Granulated Sugar: The quarter cup of sugar sweetens the cream cheese just enough to complement the tart cherries. Reducing the sugar will make the filling less sweet but also less cohesive. For a sugar‑free version, try stevia or a natural sweetener in the same quantity.
Large Egg: The egg acts as a binder and adds richness to the pastry. It also gives the crust a beautiful golden finish. If you’re avoiding eggs, a tablespoon of aquafaba can serve as a substitute.
Everything's prepped? Good. Let's get into the real action.
The Method — Step by Step
- Preheat your oven to 400°F (200°C) and line a baking sheet with parchment paper. This ensures a clean surface and prevents sticking. While the oven warms, gather all your ingredients so you’re not scrambling mid‑process.
- In a medium bowl, mix the cream cheese, granulated sugar, and vanilla extract until smooth and creamy. The mixture should be fluffy and free of lumps. This step is crucial for a silky filling that won’t separate during baking.
- Roll out the puff pastry sheet on a lightly floured surface to a 12×12 inch square. Keep the sheet cold; if it warms, it will become sticky and hard to handle. The dough should feel pliable but not soft.
- Cut the pastry into 16 equal squares. Use a sharp knife or pizza cutter for clean edges. This precision ensures each Danish bakes evenly.
- Place a small spoonful of the cream cheese mixture in the center of each square. Don’t overfill; you want a generous layer that will rise but not overflow. The filling should sit slightly below the pastry edge.
- Top each filling with a spoonful of cherry pie filling. The cherries should be visible through the pastry, giving a visual cue of the sweet surprise inside. This step also adds moisture, so keep an eye on the edges.
- Fold each square into a triangle, pressing the corners together. Seal the edges by crimping them with a fork or your fingertips. This creates a neat pocket that traps the filling.
- Beat the egg in a shallow dish. Brush each Danish with the egg wash to give a glossy, golden finish. The egg also helps the pastry rise and gives it a beautiful sheen.
- Place the Danishes on the prepared baking sheet and bake for 18–20 minutes, or until the pastry is puffed and golden brown. Keep an eye on the edges; they should pull away slightly from the parchment.
- Remove the Danishes from the oven and let them cool on a wire rack for 5 minutes. This rest allows the filling to set and prevents the pastry from becoming soggy. Serve warm for maximum flavor.
That's it — you did it. But hold on, I've got a few more tricks that'll take this to another level.
Insider Tricks for Flawless Results
The Temperature Rule Nobody Follows
Why it matters: Baking at exactly 400°F ensures the pastry puffs without burning. Many people lower the temperature to avoid browning, but this recipe relies on that crisp golden crust. If you’re in a cooler climate, let the dough sit at room temperature for 5 minutes before rolling to prevent it from cracking.
Why Your Nose Knows Best
What to listen for: A faint buttery aroma means the pastry is ready. If you smell a sweet, almost caramel scent, the filling is starting to caramelize and will create a glossy glaze. Trusting your senses prevents over‑baking.
The 5-Minute Rest That Changes Everything
Why it matters: Allowing the Danishes to rest on a rack for 5 minutes lets the steam escape, keeping the pastry crisp. Skipping this step often results in soggy bottoms. I once served them immediately and the crust collapsed.
Keep the Filling Smooth
Pro tip: Use a small whisk to break up any lumps in the cream cheese mixture. A smooth filling ensures even distribution and a silky mouthfeel. If you notice lumps, add a splash of milk to thin it slightly.
Use a Sharp Knife for Cutting
Why it matters: A dull knife leaves ragged edges, which can cause uneven baking. A sharp knife or pizza cutter gives clean cuts and a professional look. I swear by a ceramic blade for pastry.
Chill the Dough Between Layers
Why it matters: Keeping the dough cold between folds preserves the layers. If it warms, the layers merge and you lose that signature flakiness. I always keep a small bowl of ice water nearby for quick chills.
Creative Twists and Variations
This recipe is a playground. Here are some of my favorite ways to switch things up:
Blueberry Cream Cheese Danish
Swap the cherry filling for fresh blueberries simmered with a touch of lemon zest. The tartness pairs beautifully with the creamy base, creating a bright, summery treat.
Chocolate Ganache Twist
Replace the cream cheese with a silky chocolate ganache. Layer the ganache with a drizzle of raspberry coulis for a decadent, dessert‑level indulgence.
Almond Joy Variation
Add shredded coconut to the cream cheese mixture and top with a caramelized almond glaze. This version brings a tropical, nutty flavor profile that’s sure to wow.
Savory Cheese and Herb Danish
Use a mixture of goat cheese and fresh herbs instead of cream cheese. Top with a dollop of sun‑dried tomato jam for a savory bite that’s perfect for brunch.
Low‑Sugar Berry Danish
Use a sugar‑free cherry filling and sweeten the cream cheese with a natural sweetener. Pair with fresh strawberries for a guilt‑free, yet indulgent treat.
Gluten‑Free Puff Pastry
Opt for a gluten‑free puff pastry blend. The texture remains flaky, and the flavor profile stays intact, making it a safe choice for those with dietary restrictions.
Storing and Bringing It Back to Life
Fridge Storage
Store the baked Danishes in an airtight container for up to 2 days. Keep them on a wire rack to prevent condensation from making the pastry soggy. If you need to reheat, a quick 30‑second in the microwave works, but the pastry may soften.
Freezer Friendly
Wrap each Danish individually in parchment paper and place them in a freezer bag. They stay fresh for up to 2 weeks. Thaw at room temperature before reheating to preserve texture.
Best Reheating Method
Reheat in a preheated 350°F oven for 5–7 minutes until the pastry is crisp again. Add a tiny splash of water to the bottom of the baking sheet; the steam will bring back that flaky, buttery quality. Avoid microwaving if you want a crunchy crust.