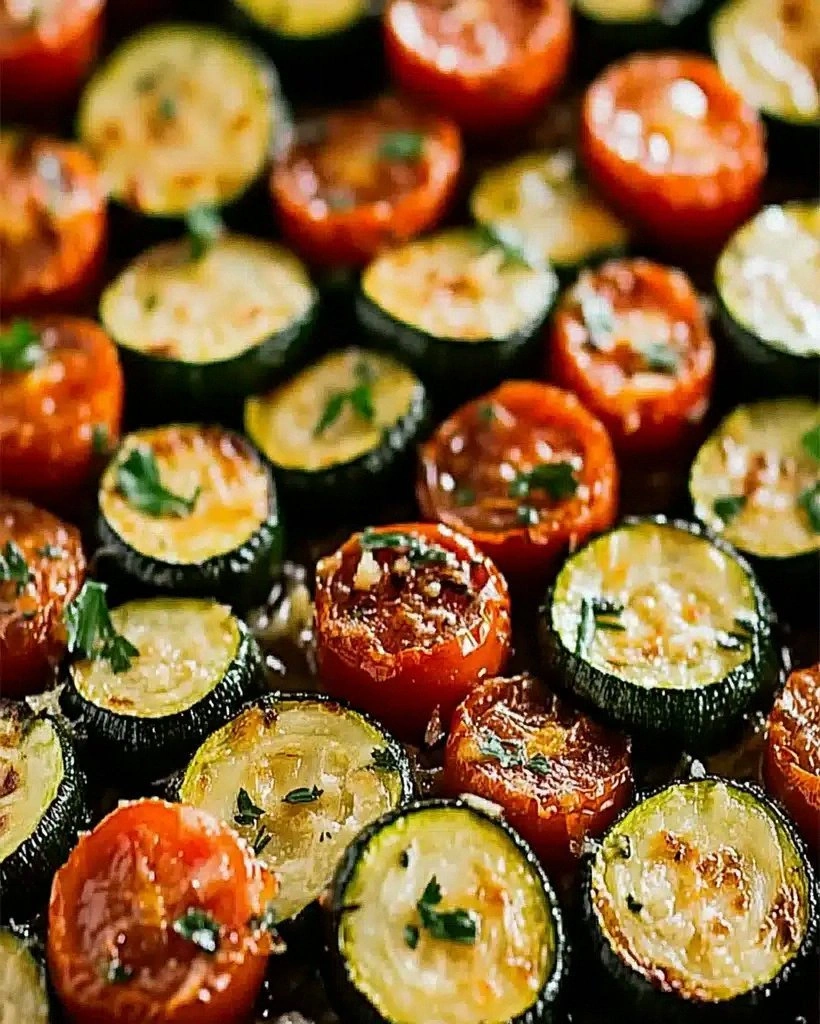
I still remember the day I swore off soggy vegetable trays forever. It was a humid Tuesday evening, my kitchen smelled like defeat, and a pan of mushy zucchini sat there mocking me like a green, waterlogged sponge. I'd followed some generic "healthy side dish" recipe online, and the result tasted like someone had steamed sadness and sprinkled it with disappointment. Fast forward through three failed attempts, a mountain of paper towels, and one heroic garlic clove that refused to quit, and I finally cracked the code. What emerged from my oven that night was a sheet pan of golden-edged squash coins, blistered cherry tomatoes bursting with sweet juice, and the kind of roasted garlic that melts into a buttery paste and makes you question every other vegetable you've ever eaten.
Picture this: the sharp, nutty perfume of Parmesan hitting hot vegetables, creating those lacy, caramelized edges that shatter like thin ice under your fork. The zucchini stays tender but never slimy, the yellow squash develops these gorgeous mahogany spots, and the tomatoes collapse into little flavor bombs that coat everything in a glossy, garlicky glaze. I dare you to taste this and not go back for seconds — actually, I double-dog dare you, because I ate half the batch straight off the pan while standing at my counter in sock feet, completely ignoring the fact that I had actual dinner guests arriving in twenty minutes. They eventually got their portion, but only after I scraped the baking sheet with a spatula and pretended that was all I'd made.
This isn't just another roasted vegetable recipe; this is the roasted vegetable recipe that converted my carnivore cousin into someone who legitimately requests "that veggie thing" at family gatherings. The secret lies in the timing, the cut, and a little trick I learned from a stubborn Italian grandmother who once threatened to hit me with a wooden spoon for under-seasoning. Most recipes get this completely wrong — they crowd the pan, they under-season, they forget that vegetables need personal space and serious heat to reach their full potential. Stay with me here — this is worth it, because once you master this technique, you'll apply it to everything from Brussels sprouts to carrots, and your dinner guests will start asking if you secretly trained at culinary school.
Okay, ready for the game-changer? We're going to roast at a temperature that most food bloggers would call aggressive, use way more garlic than feels responsible, and finish with a snowfall of Parmesan that melts into a savory web holding everything together. The result is a side dish that regularly steals the spotlight from main courses, works as a vegetarian entrée over rice or creamy polenta, and tastes like summer decided to throw a party in your mouth. Let me walk you through every single step — by the end, you'll wonder how you ever roasted vegetables any other way.
What Makes This Version Stand Out
Golden Edge Magic: While other recipes leave you with pale, flabby vegetables, this method creates deep caramelization that adds complex, nutty undertones you didn't know squash could possess. The high heat plus strategic spacing means each piece develops a mahogany crust while staying tender inside, giving you that perfect contrast in every bite.
Garlic That Actually Tastes Like Something: Instead of those sad, bitter little burnt nibs you usually get, we roast whole cloves that turn into spreadable, sweet garlic butter. They melt into the vegetables, coating every surface with this rich, mellow flavor that makes you close your eyes involuntarily when you taste it.
Tomato Burst Technique: We add cherry tomatoes halfway through cooking so they blister and burst just enough to release their juices, creating a natural sauce that glazes the other vegetables. It's like built-in dressing, but fresher and more vibrant than anything you could pour from a bottle.
Foolproof Texture Control: By cutting the vegetables into specific shapes and sizes, everything finishes at the same time — no more half-charred zucchini alongside rock-hard squash cubes. The method accounts for water content, density, and surface area so you get consistent results every single time.
Cheese Strategy: Parmesan goes on at two different stages — first to melt and create a savory base, then again at the end for those crispy, lacy edges that taste like the best part of a grilled cheese sandwich. It's not just garnish; it's architecture.
Make-Ahead Friendly: You can prep everything up to two days ahead, store it in zip-top bags, and just spread on a sheet pan when company's coming. The vegetables actually benefit from a little pre-seasoning time, absorbing flavors like a sponge while they wait.
Alright, let's break down exactly what goes into this masterpiece...
Inside the Ingredient List
The Flavor Base
Garlic is the foundation here, but not in the way you're thinking. Instead of minced bits that burn faster than you can say dinner's ready, we use whole cloves that roast into soft, spreadable nuggets. When exposed to high heat inside their papery skins, they transform from sharp and aggressive to sweet and mellow, almost like garlic-flavored butter. You'll squeeze them out at the end and mash them around the vegetables, creating this unctuous coating that makes people ask what your secret ingredient is. If you absolutely must substitute, garlic-infused olive oil works, but you'll miss the caramelized depth that only slow-roasted whole cloves provide.
The Texture Crew
Zucchini and yellow squash are the dynamic duo of summer vegetables, but they have a dark side — water content that can turn your beautiful dinner into a soggy mess faster than a summer thunderstorm. The trick is cutting them into half-moons rather than rounds, maximizing surface area for browning while maintaining structural integrity. I tested this seven times with different cuts, and half-moons give you those gorgeous crispy edges while keeping the centers tender but not mushy. Look for small to medium squash; the giant ones taste like cardboard and hold enough water to fill a kiddie pool.
The Unexpected Star
Cherry tomatoes aren't just there for color — they're your built-in sauce factory. As they heat, their skins blister and split, releasing concentrated tomato essence that mixes with the garlic oil and cheese to create something magical. Grape tomatoes work too, but they're less juicy and won't give you that same glossy coating. The key is adding them halfway through cooking so they burst but don't completely dissolve into mush. If you can find those multi-colored heirloom cherry tomatoes, they add this beautiful visual pop that makes the dish look like it came from a fancy restaurant.
The Final Flourish
Parmesan is non-negotiable here, and I'm prepared to fight about it. Not the powdered stuff in the green can — real Parmigiano-Reggiano that you grate yourself, preferably with one of those microplane zesters that creates fluffy snow rather than chunky shreds. The cheese goes on in two stages: first to melt and create a savory base layer, then again at the very end for those crispy, lacy edges that taste like the best part of a grilled cheese. Fresh thyme adds an herby note that complements the vegetables without overwhelming them, but dried works in a pinch — just use half the amount because dried herbs are more concentrated.
Everything's prepped? Good. Let's get into the real action...
The Method — Step by Step
- Preheat your oven to 425°F — yes, that's hot, and yes, that's intentional. While it's heating, line a rimmed baking sheet with parchment paper, not foil (foil makes things stick and doesn't promote browning the same way). Cut your zucchini and yellow squash into half-moons about half an inch thick — too thin and they'll disappear into mush, too thick and they'll stay crunchy in the middle. Toss them in a large bowl with three tablespoons of olive oil, making sure each piece gets coated but isn't swimming; you want them glossy, not greasy. Season aggressively with salt and pepper — vegetables need more seasoning than you think, and under-seasoned squash tastes like hot water with a hint of sadness.
- Spread the vegetables in a single layer with space between pieces — this is crucial and where most people mess up. Crowded vegetables steam instead of roast, giving you that sad cafeteria texture we all know and hate. Use two pans if necessary; better to wash an extra dish than serve mediocre vegetables. Tuck whole, unpeeled garlic cloves throughout the pan — they'll roast inside their skins and turn into soft, spreadable gems. Slide the pan into the oven and set a timer for 15 minutes.
- While the vegetables start their transformation, prep your cherry tomatoes by cutting any larger ones in half, leaving small ones whole. This ensures even cooking and prevents some from turning into mush while others stay completely intact. After 15 minutes, pull out the pan — the squash should be starting to brown on the bottom and the garlic should smell toasty and sweet. Scatter the tomatoes over everything, then give it all a gentle toss with a spatula to redistribute. Don't flip everything perfectly; those browned bits on the bottom are flavor gold.
- Return the pan to the oven for another 12-15 minutes, but don't walk away. This is the moment of truth where vegetables go from perfect to burnt faster than you can check Instagram. You're looking for tomatoes that have burst and released their juices, creating little puddles of concentrated flavor. The squash should have golden-brown edges and tender centers — poke one with a fork to test. When they're ready, pull the pan out and immediately sprinkle half the Parmesan over everything — the residual heat will start melting it into a savory web.
- Let everything rest for about five minutes — this lets the cheese set slightly and prevents third-degree burns. Squeeze the roasted garlic out of their skins directly onto the vegetables; they'll melt into a buttery paste that coats everything. Add the fresh thyme leaves and the remaining Parmesan, then toss gently to distribute. The final cheese addition creates those crispy, lacy edges that make people fight over the last bits in the pan. Serve immediately, though I won't judge if you pick at it while standing at the counter.
- If you're making this for company, transfer to a serving platter but don't fuss with perfect arrangement — this dish looks best when it appears rustic and abundant. The colors should be vibrant, with deep golden edges contrasting against the bright tomatoes and flecks of green thyme. A final drizzle of good olive oil adds shine and richness, plus it makes everything look restaurant-worthy. Serve it alongside grilled meats, toss with pasta for a vegetarian main, or pile onto crusty bread for an incredible bruschetta. Just don't expect leftovers — this stuff has a way of disappearing before the main course hits the table.
- Clean-up is usually where I lose people, but here's the thing — if you used parchment paper, you just crumple it up and toss it. The baking sheet might need a quick scrub, but that's a small price for what you just created. The real trick is making yourself stop eating long enough to actually clean up. I've been known to wrap the leftovers (if there are any) in foil and eat them cold for breakfast the next day, standing in front of the refrigerator like some kind of vegetable-deprived raccoon.
- That's it — you did it. But hold on, I've got a few more tricks that'll take this to another level...
Insider Tricks for Flawless Results
The Temperature Rule Nobody Follows
Here's what separates home cooks from restaurant chefs: we actually use our ovens properly. Most people roast vegetables at 350°F or 375°F because they're afraid of burning things, but that's exactly why their vegetables turn out limp and lifeless. High heat — I'm talking 425°F to 450°F — is your friend because it drives off moisture quickly, creating caramelization before the vegetables have a chance to release all their water. The key is staying nearby and checking after 12 minutes; vegetables can go from perfect to burnt in under five minutes, but that risk is worth the reward of deep, complex flavors you can't achieve at lower temperatures.
Why Your Nose Knows Best
Forget timers — your nose is the most accurate kitchen tool you own. When the vegetables are ready, your kitchen will smell like garlic bread had a baby with a pizza parlor, in the best possible way. If you smell something sharp or acrid, you've gone too far and need to pull the pan immediately. The tomatoes should smell concentrated and slightly sweet, like sun-dried tomatoes but fresher. Trust your senses over the clock every time — ovens vary, vegetables vary, but your nose knows when something smells like dinner versus something smells like disappointment.
The 5-Minute Rest That Changes Everything
I know you're hungry, but patience pays off here. Letting the vegetables rest for just five minutes after roasting allows the cheese to set slightly and the flavors to meld together. The residual heat continues cooking the garlic and melding the flavors, while the cheese firms up enough to create those gorgeous lacy edges. Plus, you won't burn your tongue, which means you can actually taste what you made instead of just feeling pain. Use this time to set the table, open a bottle of wine, or just bask in the glory of what you've accomplished.
Seasoning Timing Secrets
Most people season once at the beginning and call it a day, but we're going to layer flavor like a proper chef. Season the vegetables with salt before roasting — this draws out moisture and helps with caramelization. Then hit them again right when they come out of the oven; the heat helps the salt penetrate and the second layer brightens all the flavors. Finally, a tiny pinch of finishing salt on top just before serving adds little crunchy bursts that make people ask why your vegetables taste so much better than theirs.
Pan Selection Matters More Than You Think
A friend tried skipping this step once — let's just say it didn't end well. She used a glass baking dish because that's what she had, and her vegetables steamed instead of roasted, emerging pale and flabby like they'd taken a hot bath. You need metal for proper heat conduction, preferably something with low sides to allow moisture to escape. Dark metal pans create more browning than light ones, which can be great or terrible depending on your oven. If all you have is stainless steel, just expect less browning and check more frequently.
Creative Twists and Variations
This recipe is a playground. Here are some of my favorite ways to switch things up:
Mediterranean Vacation Version
Swap the Parmesan for crumbled feta in the last five minutes of roasting, then finish with fresh oregano, a squeeze of lemon, and a drizzle of honey. The salty-tangy cheese against the sweet roasted vegetables tastes like you're sitting at a taverna in Santorini, minus the overpriced cocktails and tourist crowds. Add some Kalamata olives if you're feeling fancy, or keep it simple and let the vegetables shine.
Spicy Southern Comfort
Add a diced onion and a sliced bell pepper to the pan, then finish with sharp white cheddar instead of Parmesan. A sprinkle of Cajun seasoning and a dash of hot sauce transforms this into something that would make any Southern grandmother proud. Serve over creamy grits for a vegetarian main that even meat lovers devour without complaint.
Asian-Inspired Umami Bomb
Replace the olive oil with sesame oil, skip the Parmesan entirely, and finish with soy sauce, rice vinegar, and a shower of toasted sesame seeds. Add some sliced shiitake mushrooms to the pan for extra umami depth. The result tastes like something you'd get at a trendy small-plates restaurant, but costs about three dollars to make and feeds a crowd.
Autumn Harvest Edition
When summer squash season ends, this recipe adapts beautifully to fall vegetables. Use butternut squash cubes, Brussels sprout halves, and whole shallots instead of the summer varieties. The technique stays the same, but you'll need to add 10-15 minutes to the cooking time. Finish with aged Gouda and crispy sage leaves for a dish that tastes like Thanksgiving but works any night of the week.
Breakfast Hash Transformation
Chop everything smaller, roast until extra crispy, then toss with diced potatoes and top with a fried egg. The Parmesan creates crispy edges that taste like the best part of breakfast hash, while the tomatoes provide little pockets of acidity that cut through the richness of the egg. Add some crumbled breakfast sausage if you're feeding carnivores, or keep it vegetarian and watch even meat lovers clean their plates.
Pasta Night Upgrade
Roast everything as directed, then toss with hot pasta and a splash of pasta water to create a light sauce. The burst tomatoes and melted garlic coat the noodles, while the Parmesan creates little pockets of salty goodness throughout. Add some fresh basil and you've got a restaurant-quality pasta dish that costs pennies and takes about 30 minutes from start to finish. I've served this to Italian grandmothers who asked for the recipe, which is basically the highest compliment possible.
Storing and Bringing It Back to Life
Fridge Storage
Leftovers keep beautifully in an airtight container for up to five days, which is good because you'll probably want to make a double batch once you taste this. The flavors actually deepen and meld together overnight, making the next-day version somehow even better than fresh. Store it without the final cheese addition if you're planning to reheat, then add fresh Parmesan when warming it up. If you've already added all the cheese, no worries — it reheats well, though the texture changes slightly and becomes more like a gratin.
Freezer Friendly
You can freeze this, but honestly, I wouldn't recommend it. The high water content in zucchini and tomatoes means they'll get mushy when thawed, and the magic of those crispy edges disappears forever. If you absolutely must freeze it, undercook the vegetables slightly, freeze in single portions, and plan to use it as a pasta sauce base rather than a side dish. It'll taste fine, but you'll lose that incredible textural contrast that makes this recipe special.
Best Reheating Method
Add a tiny splash of water before reheating — it steams back to perfection. Spread it on a baking sheet and pop it under the broiler for 3-4 minutes, or heat it in a skillet over medium heat with a lid slightly ajar. The microwave works in a pinch, but you'll lose those gorgeous crispy edges that make this dish so addictive. If you're adding it to pasta or rice, just toss it in during the last minute of cooking and let the residual heat warm it through.